


On October 25, 2026, I started a new Substack under my own name: levichambers.com. I already run almost a dozen newsletters, and my first post there says it plainly: “Yes, another Substack.”
The clicks take an afternoon. The decisions take longer, and two of them (your URL and your handle) break links if you change them after people start sharing. This guide covers both, in the order you’ll hit them, with screenshots from levichambers.com at every step.
By the end, you’ll have:
A publication with a name, a URL, and a one-sentence promise that tells visitors who it’s for
A site that looks like yours, with an About page that does the selling
A welcome email that greets every new subscriber
Your first post, live, and a plan for the 30 days after it
Is Substack Free?
Yes. In Substack’s words, “Publishing on Substack is free, no matter how many subscribers you have” (Substack). You don’t pay to start, and you don’t pay as your list grows.
Fees start only when readers pay you. Turn on paid subscriptions and Substack keeps 10% of that revenue. Stripe, which processes the payments, takes 2.9% plus 30 cents per US card payment and another 0.7% on recurring payments. The only other cost is optional: a custom domain is a one-time $50, and you buy the domain itself somewhere else.
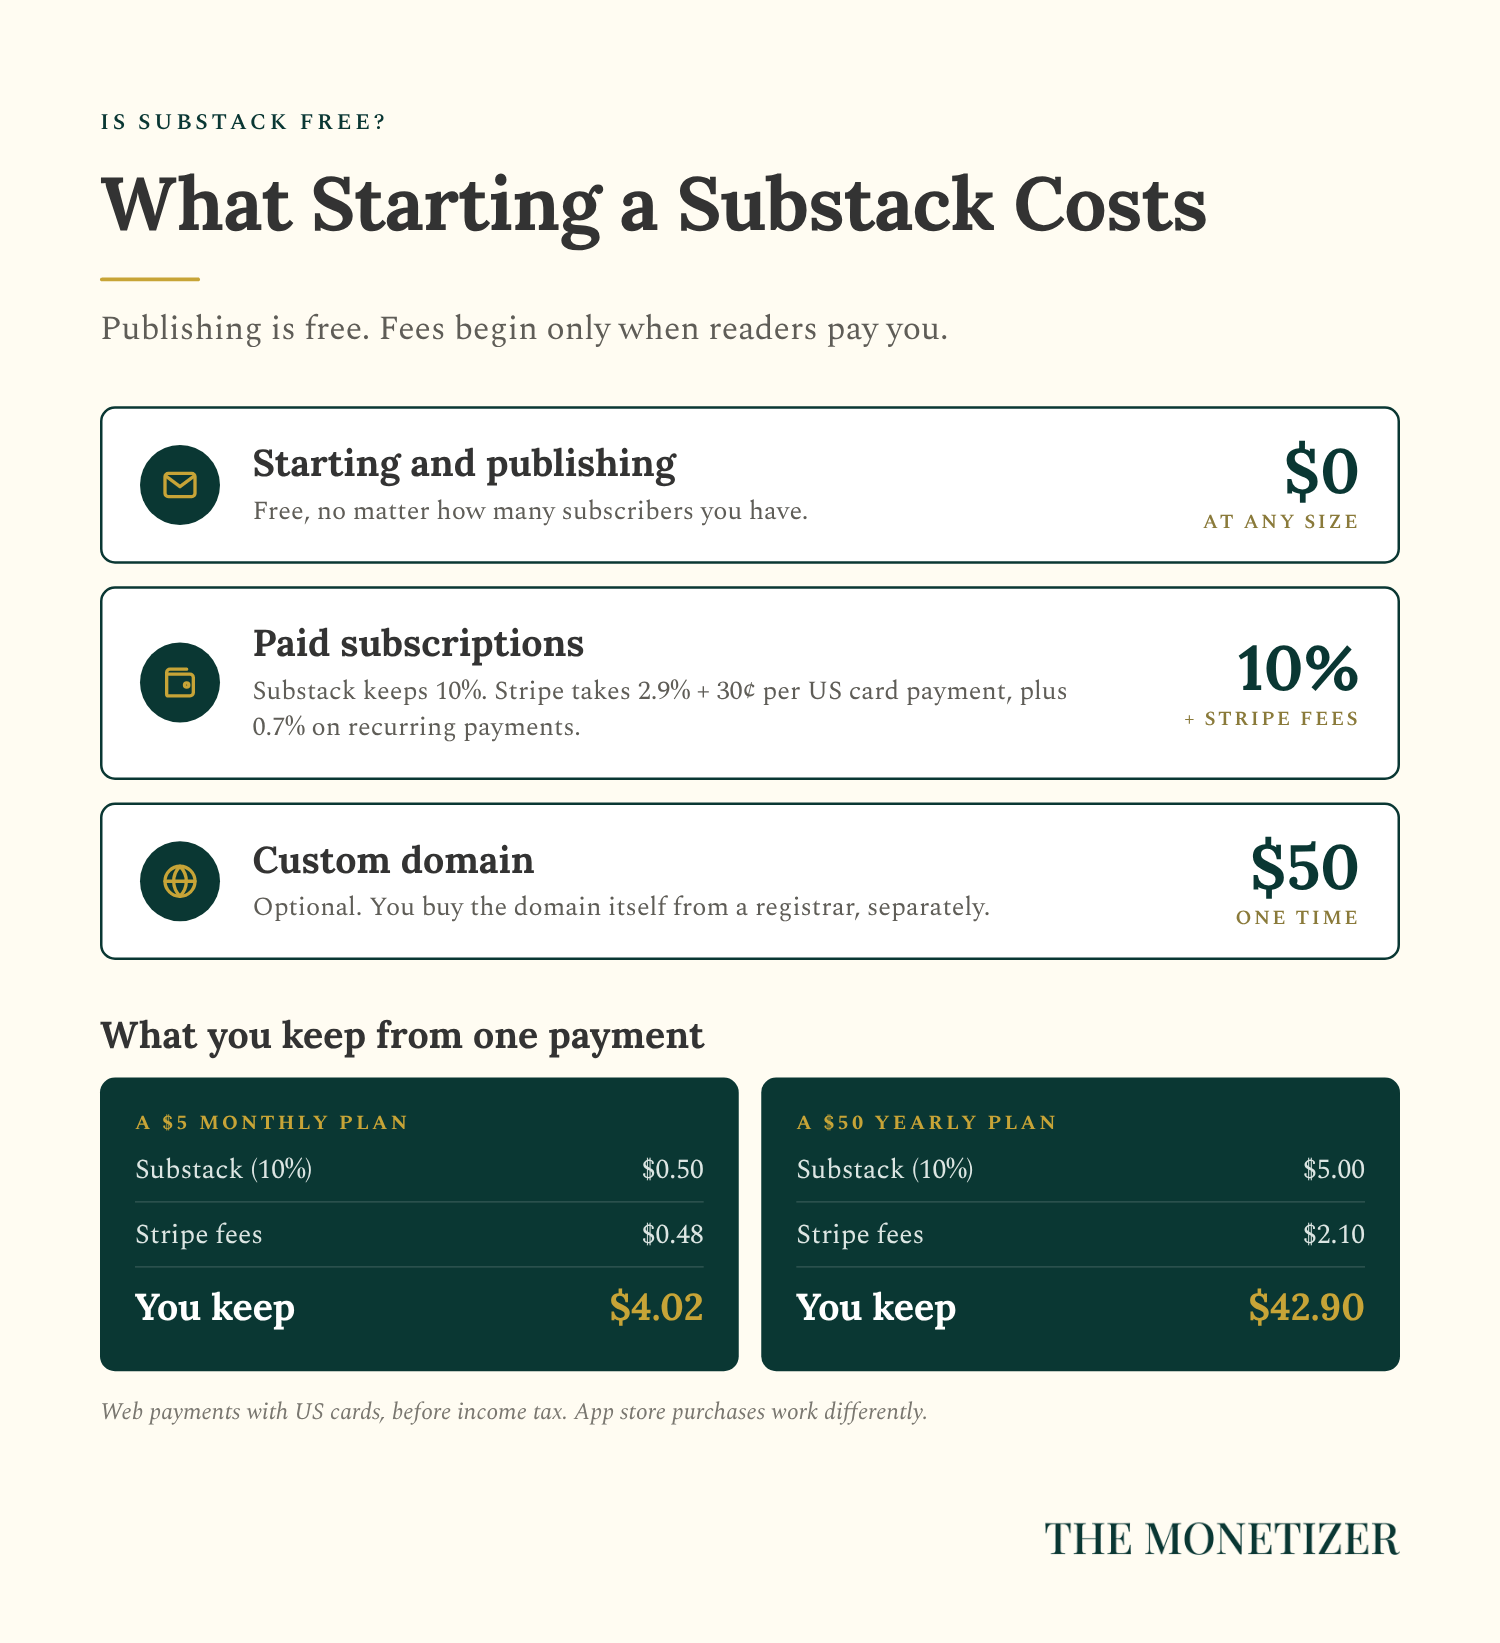
Here’s what that looks like on one payment. On a $5 monthly plan, Substack takes 50 cents and Stripe takes about 48 cents, so you keep $4.02. On a $50 yearly plan, you keep $42.90, about 86%. That math uses Substack’s published fees for US card payments on the web, before income tax.
Two more things change the numbers once you charge. Readers who pay with Apple’s in-app payment in the iPhone app go through Apple, and that option switches on automatically for paid publications. Apple takes 30% in a subscription’s first year and 15% after that, though you can raise in-app prices to cover it. US readers can also pick web checkout in the app, which skips Apple. And starting December 1, 2026, Substack will calculate, collect, and remit sales tax and VAT on paid subscriptions at no extra cost. If you’re based in the US or Canada, tax is added on top of your price at checkout wherever it applies.
How Does Substack Work?
A Substack is three things at once: a website, an email newsletter, and a profile inside Substack’s app. Publish a post once, and it lands on your site, in your subscribers’ inboxes, and in the app.
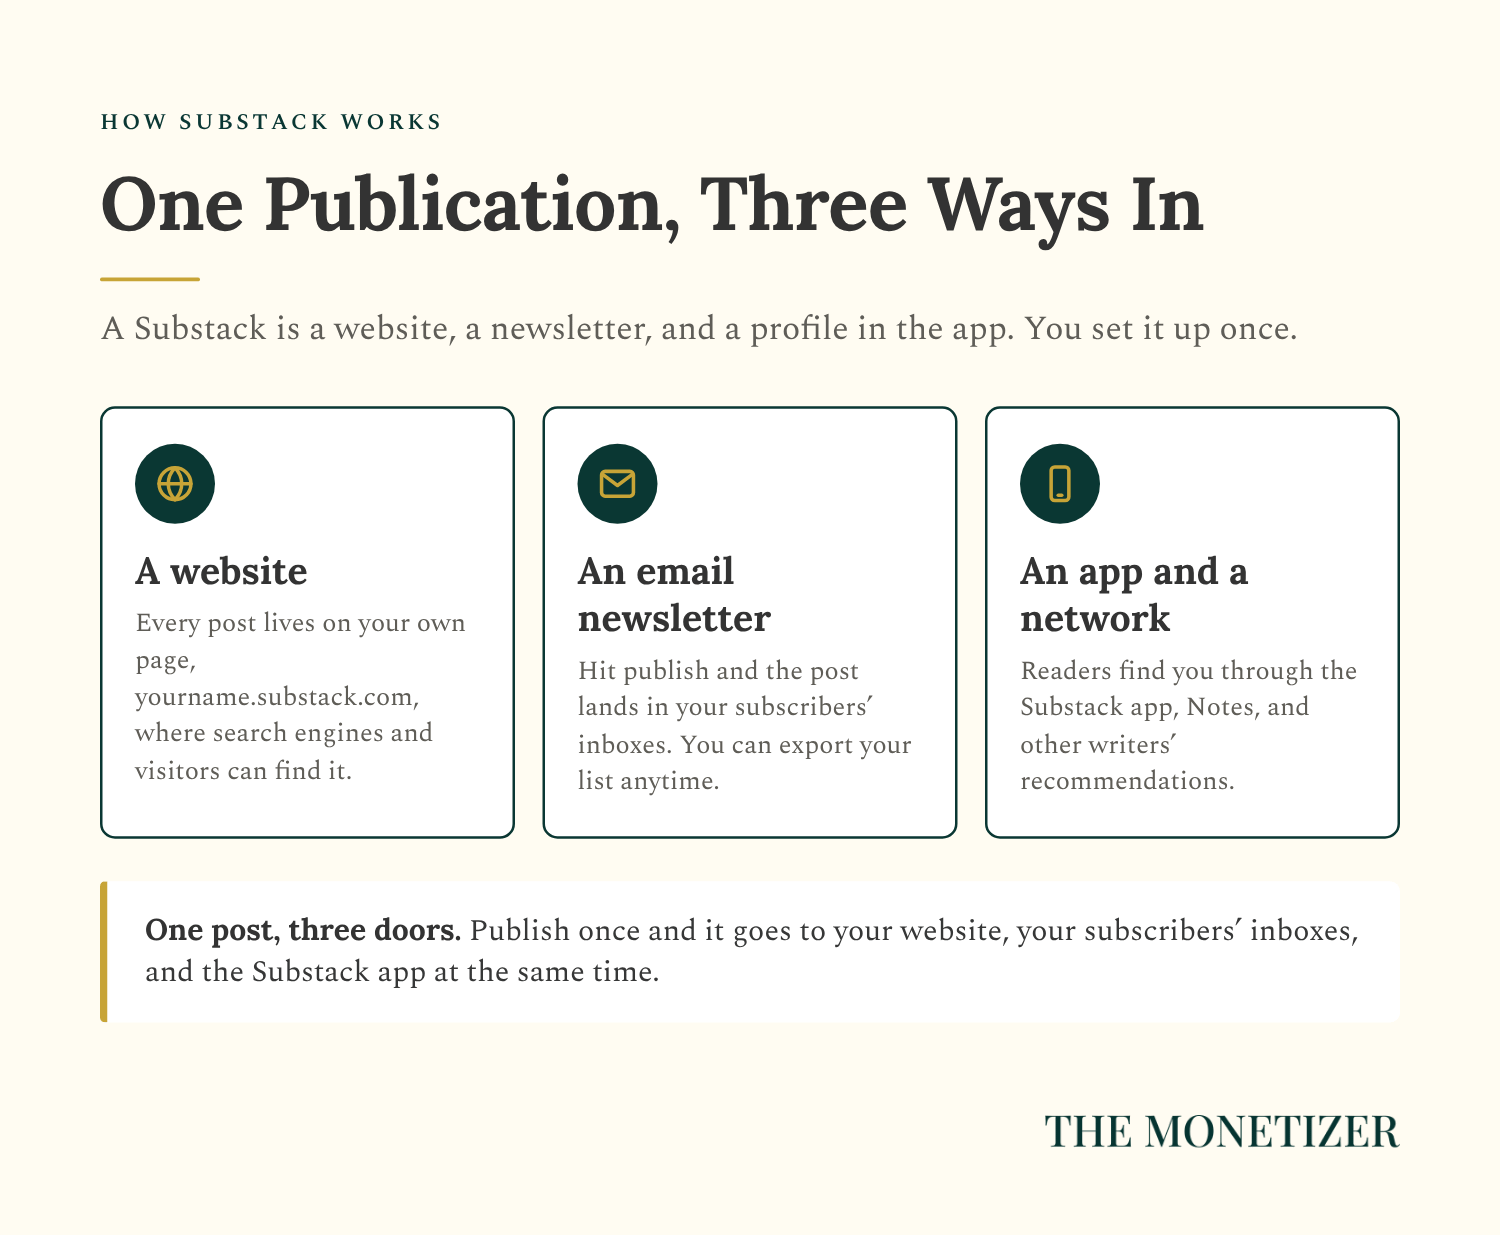
That’s why I don’t think of Substack as a newsletter platform. It’s where you build a publication. Treat it like an email list and you’ll write for the inbox only. Treat it like a publication and every post can also be found in search and recommended inside the app. In April 2026, Substack said its network drives more than half of all subscriptions on the platform.
One more thing to know up front: your list is yours. Readers who subscribe in the app still give you their email address, just like any other subscriber, and Settings › Import / Export lets you export your posts and subscriber list at any time.
Before You Start: Make Three Decisions
These take ten minutes, and they shape every step that follows. Get them on paper first, and most of the setup turns into copy and paste.
1. Who It’s For and What They Get
Write one sentence that says what readers get, how often, and who it’s for. It becomes your short description, the top of your About page, and the first line of your welcome email.
The formula: [How often] [what you send] about [topic] for [specific reader].
A personal publication can skip the reader. Mine does. The levichambers.com About page puts it this way: “One free letter a week about business, money, AI, creativity, and building a life with more freedom.”
2. Your Name or a Brand Name
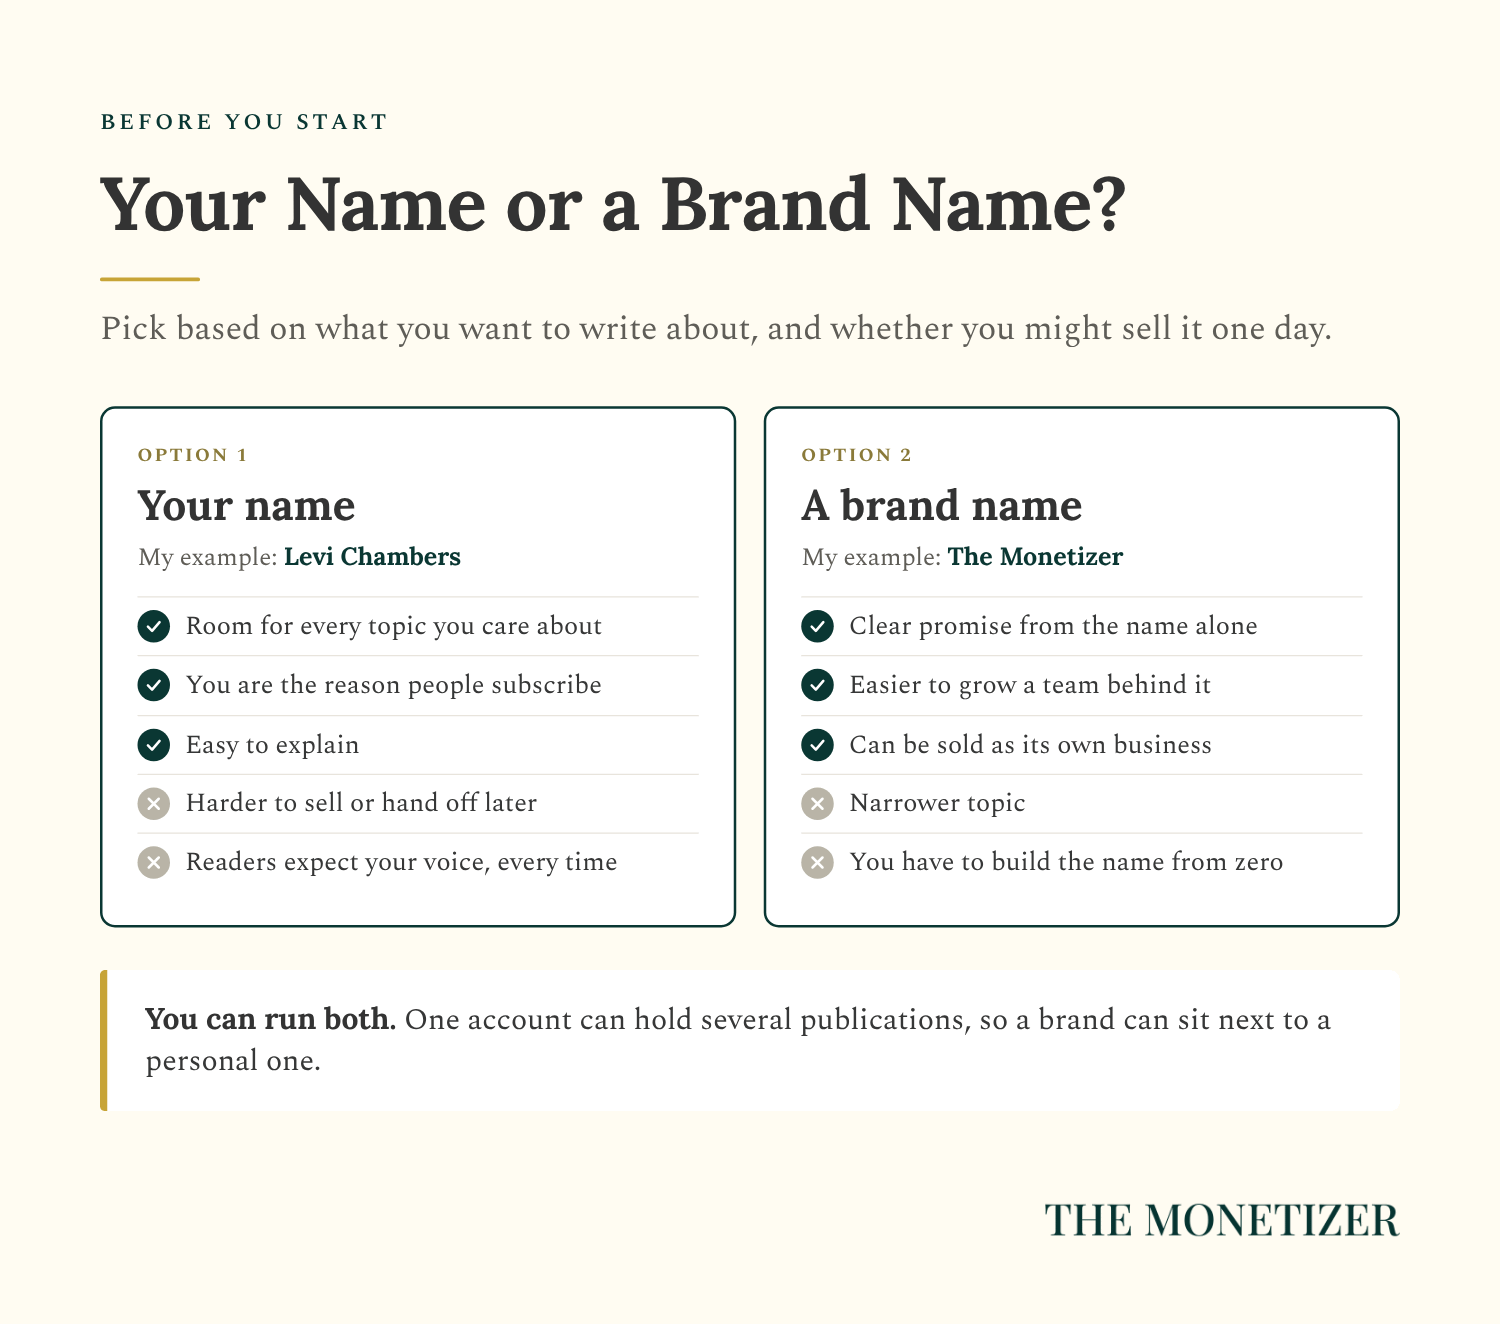
I run both kinds. On levichambers.com, I explained the split like this: “The Monetizer is for business. Academy of AI is for AI. The Queer Agenda covers LGBTQ+ news and politics. This one is where I want to be a little more personal.”
A simple test: if you can name one topic you’d write about every week for a year, a brand name can work. If you can’t, your name gives you room to figure it out.
3. How Often You’ll Publish
Substack recommends publishing at least once a week as a starting point. Pick a pace you can keep on a bad week, then put it in your About page and welcome email so readers know when to expect you. levichambers.com promises one letter a week.
Paid subscriptions can wait. They come later in this guide, and nothing you set up now gets in their way.
Part 1: Create Your Publication
Step 1: Create Your Account and Choose Your URL
Create a free account at substack.com. Substack starts you with a profile: a photo, your first name, and a short bio (Substack). You’ll also pick a handle, your @name on Substack. From Substack Home, the + button and Post take you to your own Substack. If you already have an account from reading other people’s Substacks, use it. The option to create a publication is in your account settings at substack.com/settings. Once you start the publication, the screen that matters most is this one.
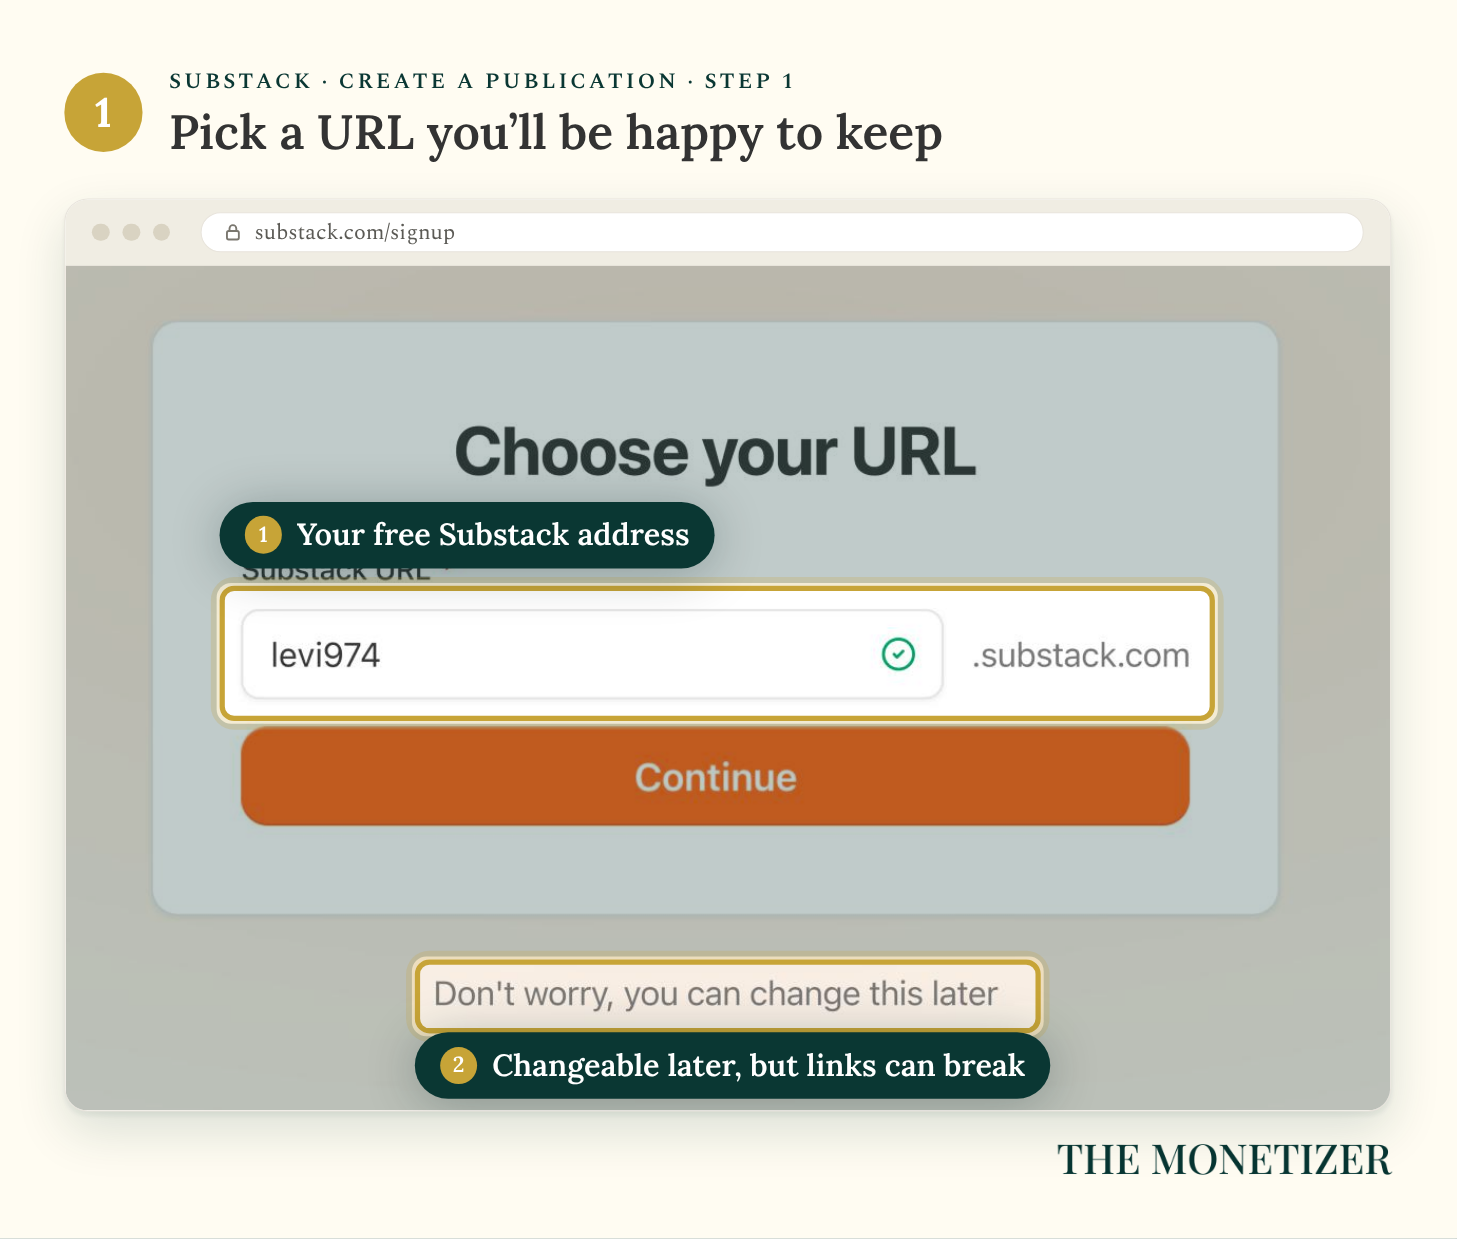
Your URL is your free address: yourname.substack.com. Substack’s search advice is to use your name in it, or a name readers already know. It needs 4 to 32 characters, letters and numbers only.
You can change it later, with a catch. A plain change breaks every link you’ve already shared. Substack gives you one change that redirects old links, and you only get it once. Handles are looser: you can change yours as often as you like, but links to your old @handle stop working.
Step 2: Name It, Describe It, and Add a Logo
Open your dashboard and go to Settings › Basics. Three fields matter here.
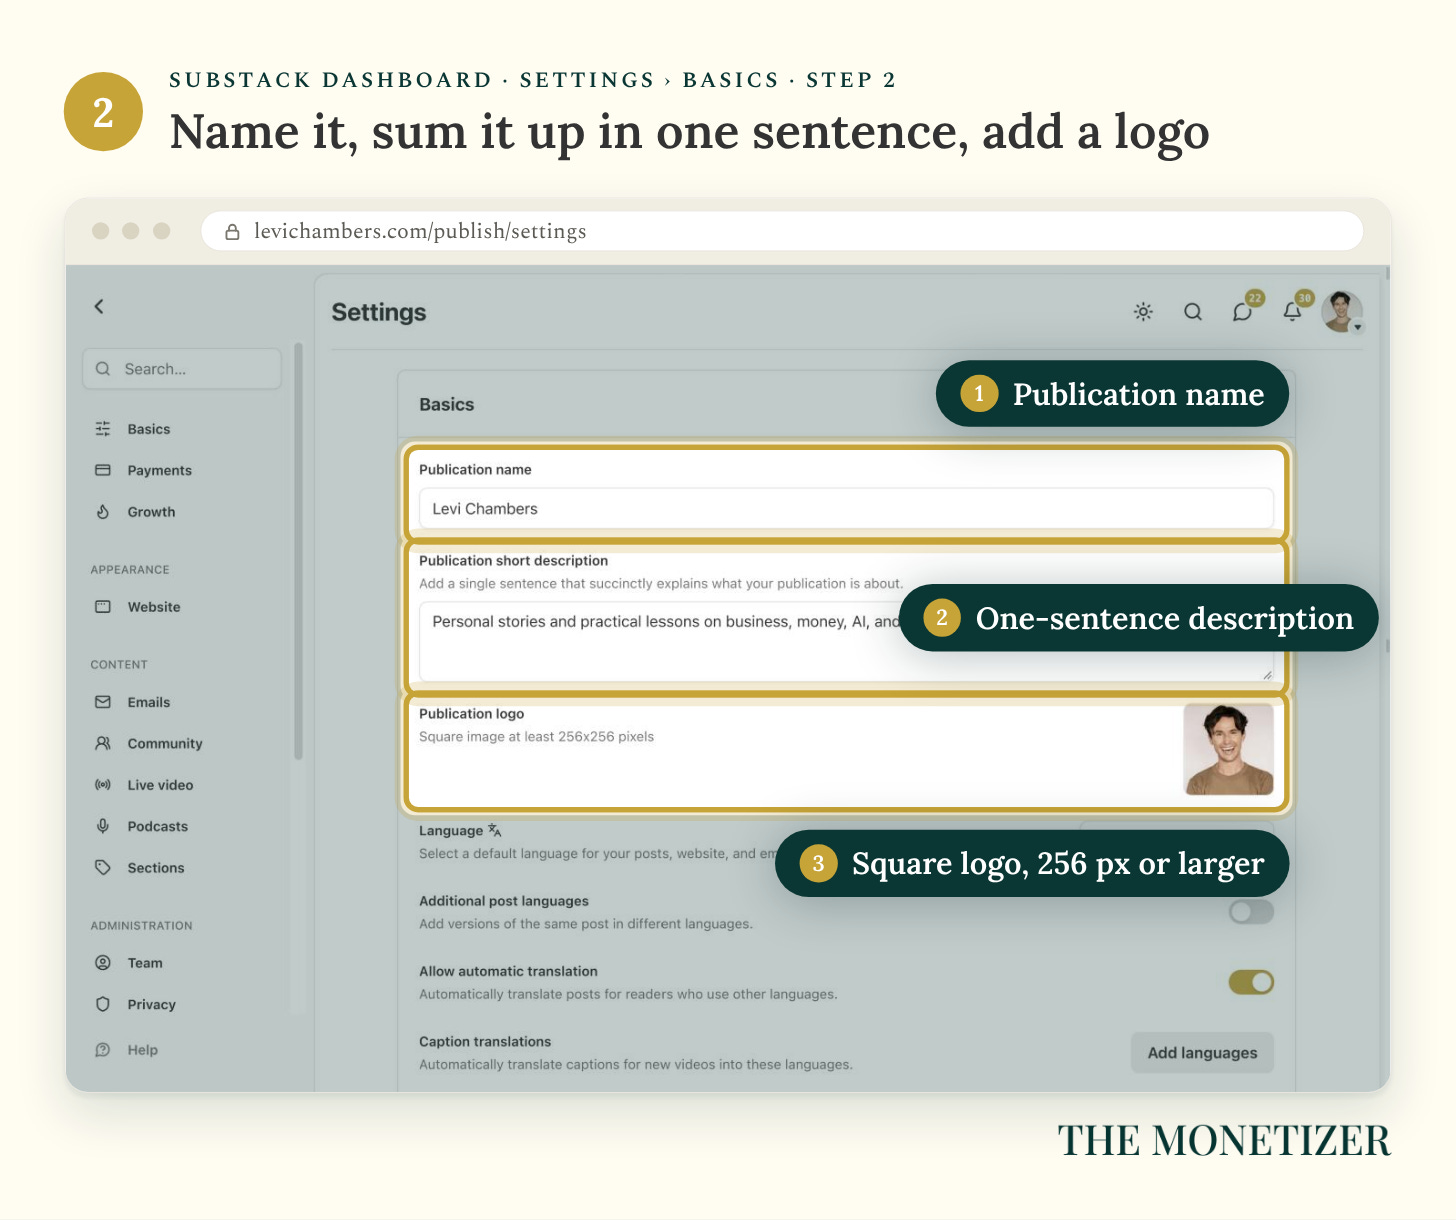
Publication name. Anything from 2 to 60 characters (Substack). You can change it later, and the change is immediate.
Short description. Your sentence from Decision 1. It shows at the top of your Welcome page, the page Substack shows first-time visitors.
Logo. A square image of at least 256 by 256 pixels with a transparent background (Substack).
Can’t See Your Name or Logo? Switch Themes
Substack sites now come in two themes. The Profile theme makes your site a mirror of your Substack profile, and it hides your publication name, short description, and logo. The Custom theme gives you a full website with your own layout and branding.
If your name and logo aren’t showing up, switch to Custom in the website editor (Settings › Edit theme › Structure › Theme, per Substack’s Help Center). That fixes a second problem too. In the Profile theme, welcome emails don’t start sending until you’ve published two posts.
Part 2: Make the Site Look Like Yours
Step 3: Style Your Site in the Website Editor
In Settings › Website, click Edit theme. That opens the website editor, where you set your colors, fonts, and homepage layout.
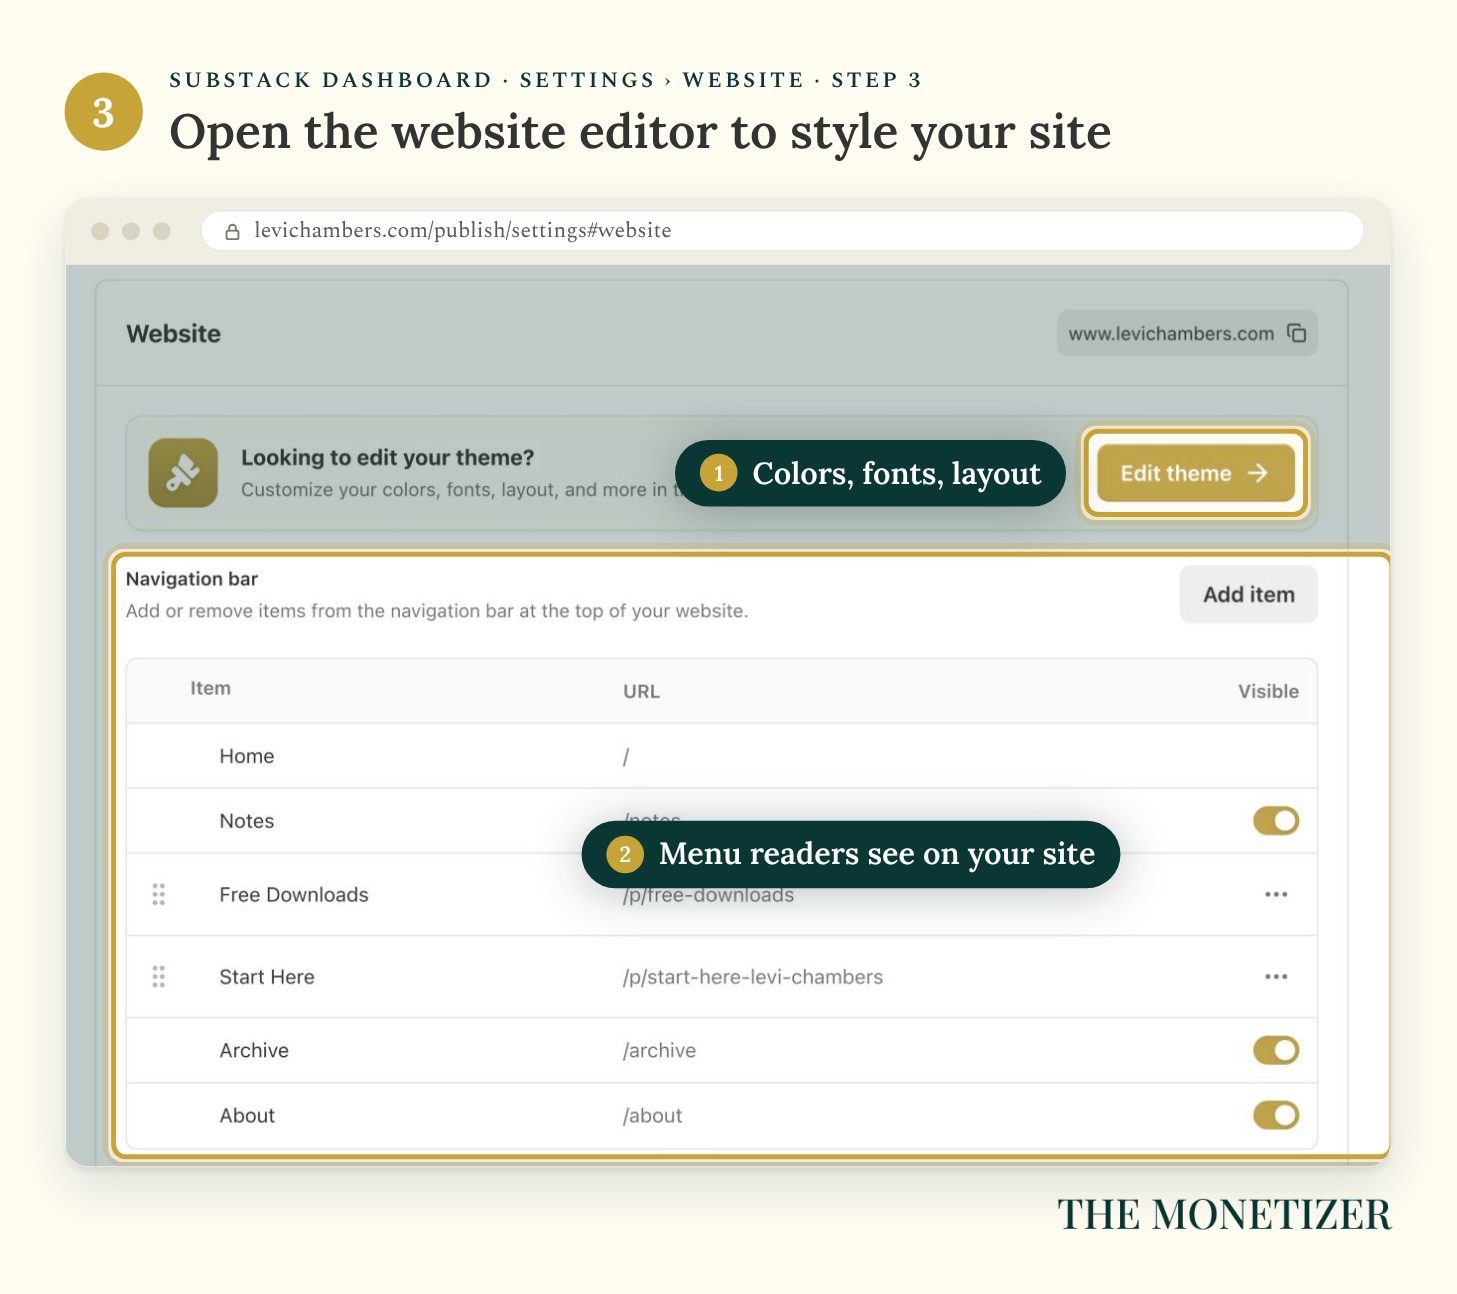
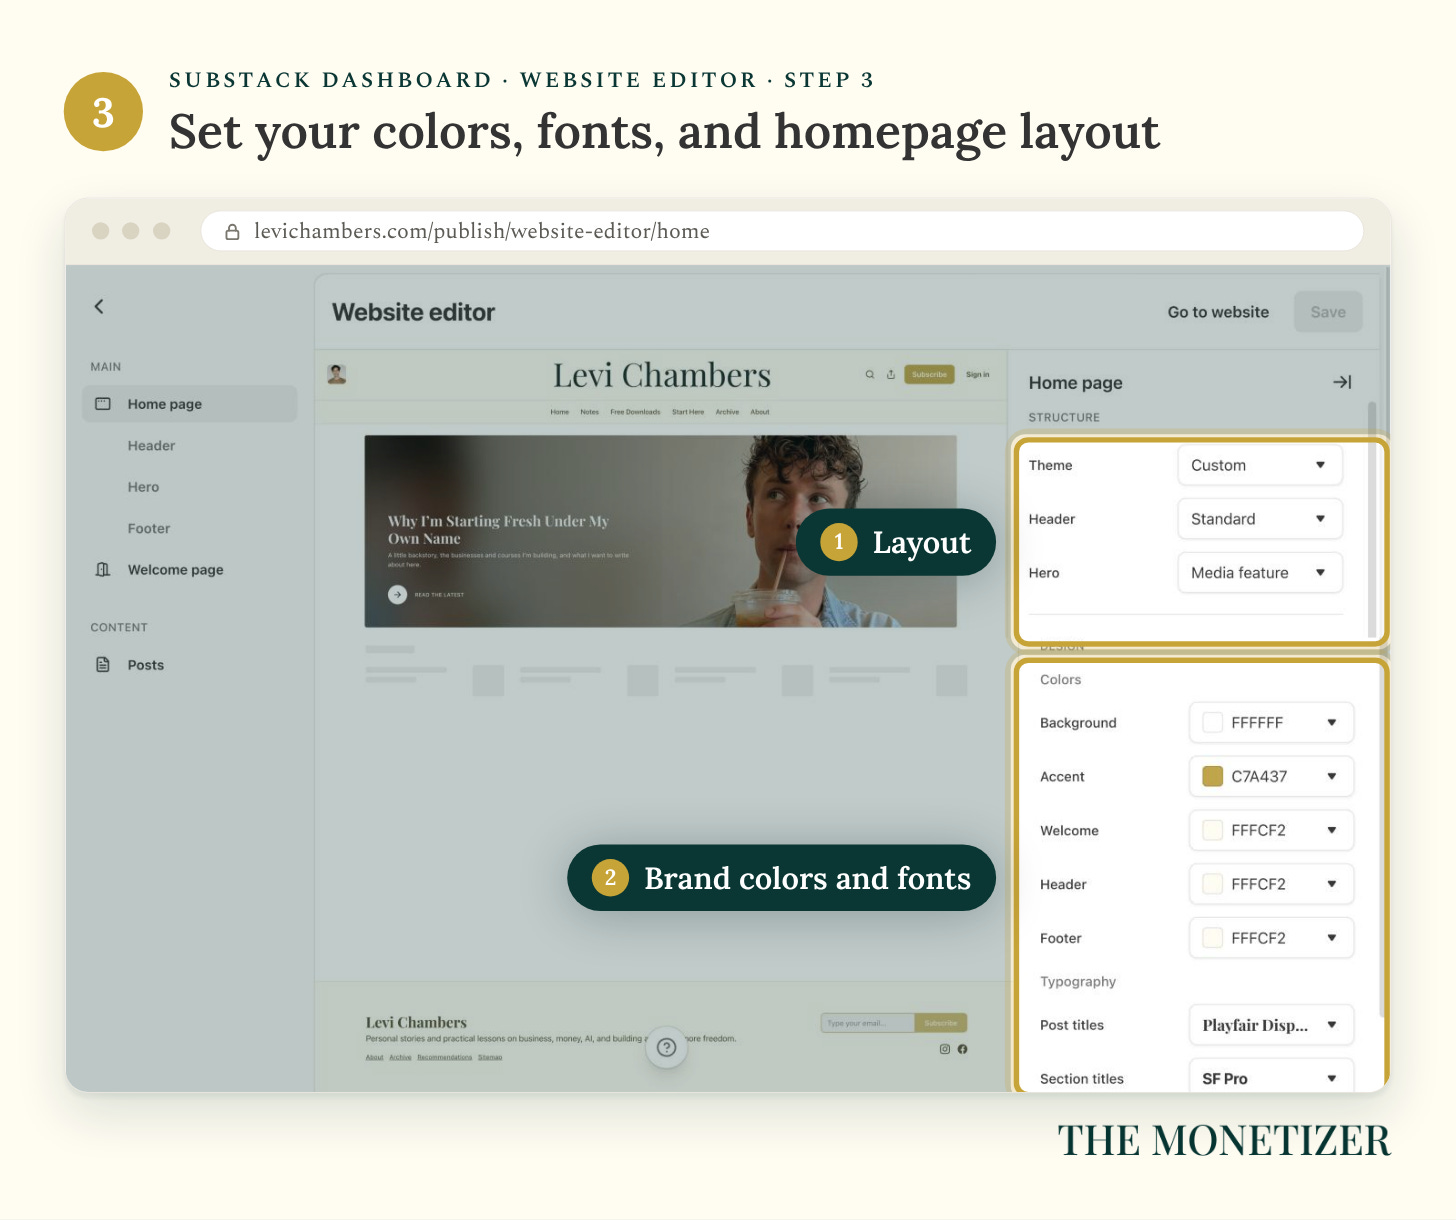
Keep it simple. Pick a background color, one accent color, and fonts for titles and body text. Substack sets the font size automatically from the font you choose (Substack). For the homepage, a plain list of posts keeps a new site from looking empty. Save the magazine-style layouts for when you have enough posts to fill them.
The Substack Image Sizes to Know
Logo: at least 256 x 256 px, transparent background (Settings › Basics)
Wordmark (your name as an image): at least 1344 x 256 px (Website editor, Header)
Welcome page cover image: at least 600 x 600 px (Website editor, Welcome page)
Email banner: 1100 x 220 px (Settings › Emails › Email header & footer)
Social and post preview images: at least 1200 x 630 px (each post’s settings)
Sizes come from Substack’s guides to image dimensions, custom themes, and email headers.
Step 4: Write Your About Page
Don’t skip this one. In its 2022 paid launch checklist, Substack said About pages turn visitors into free subscribers at a higher rate than posts or welcome emails. Edit it from Settings › Website (click Edit next to About page), or open your public About page and click Edit page.
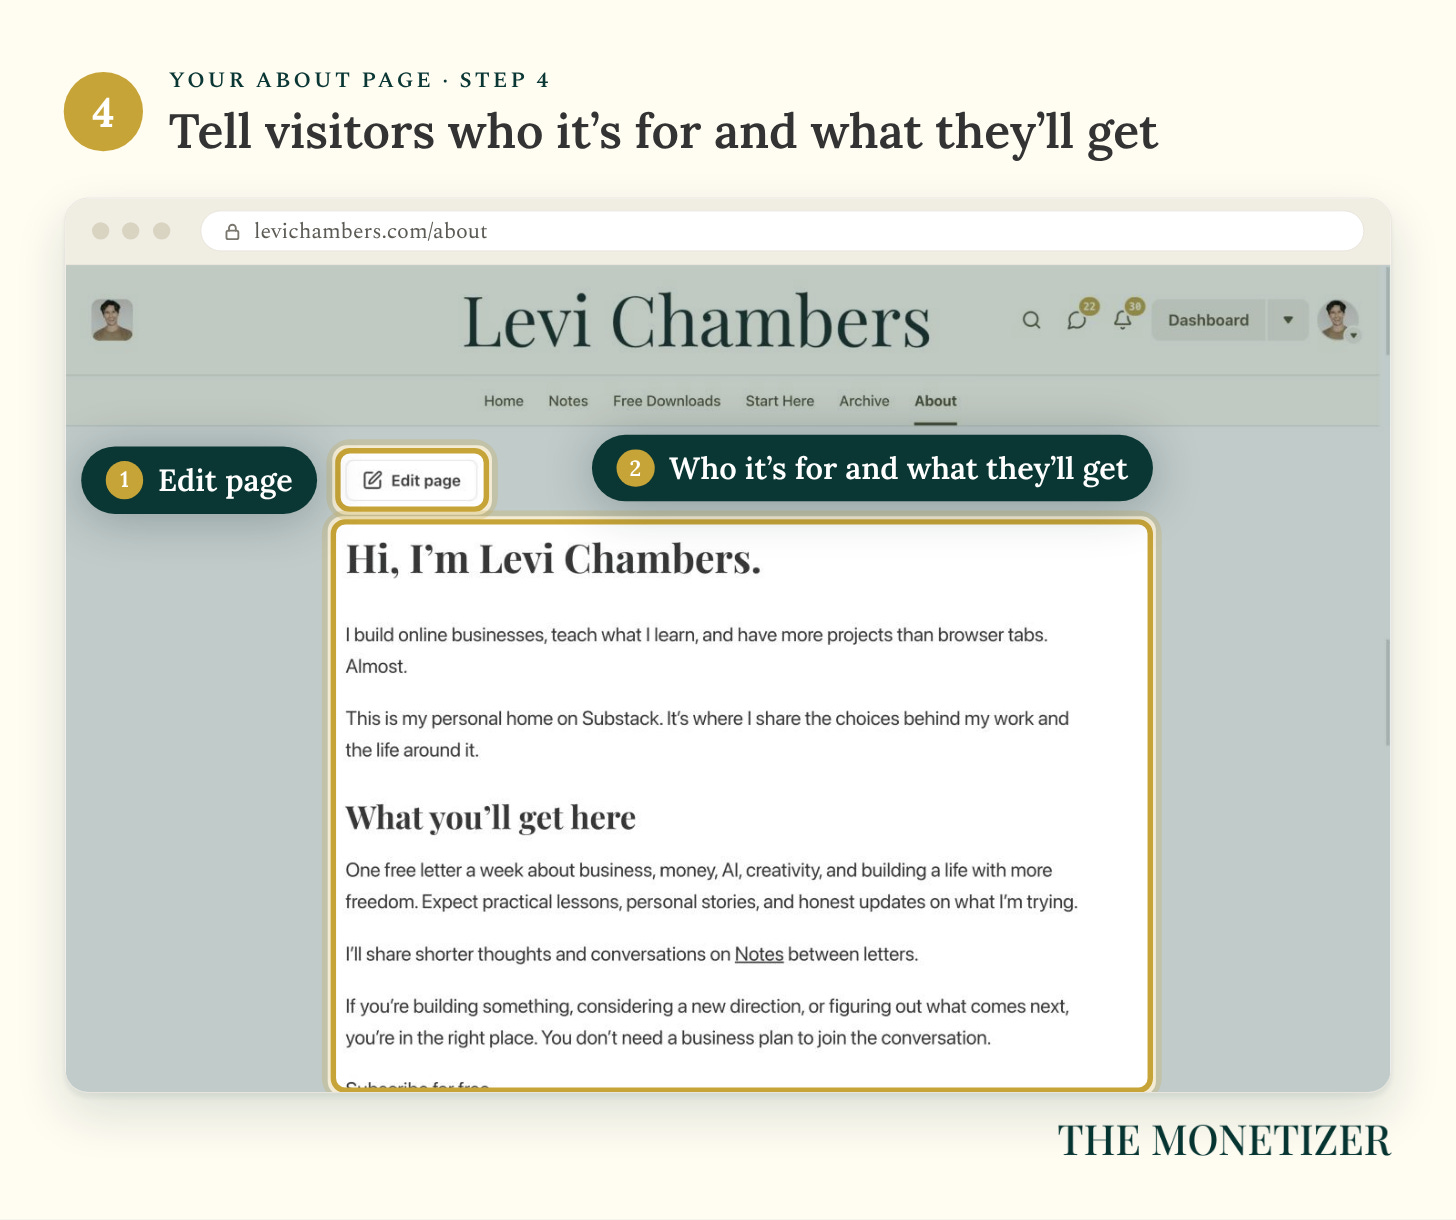
Substack suggests covering your topics, a short bio, how often you publish (and the price, once you charge), and what free and paid subscribers get (Substack). This order works:
Who it’s for and what they’ll get
How often it arrives, and what it costs
Who you are, in a paragraph
A subscribe button
The bio can be short and still sound like you. From mine: “I build online businesses, teach what I learn, and have more projects than browser tabs. Almost.”
Part 3: Set Up What New Subscribers See
Step 5: Write Your Welcome Email
Every new subscriber gets a welcome email right after they sign up. It’s the first email they’ll ever get from you, so write it yourself. Go to Settings › Emails and find the welcome emails.
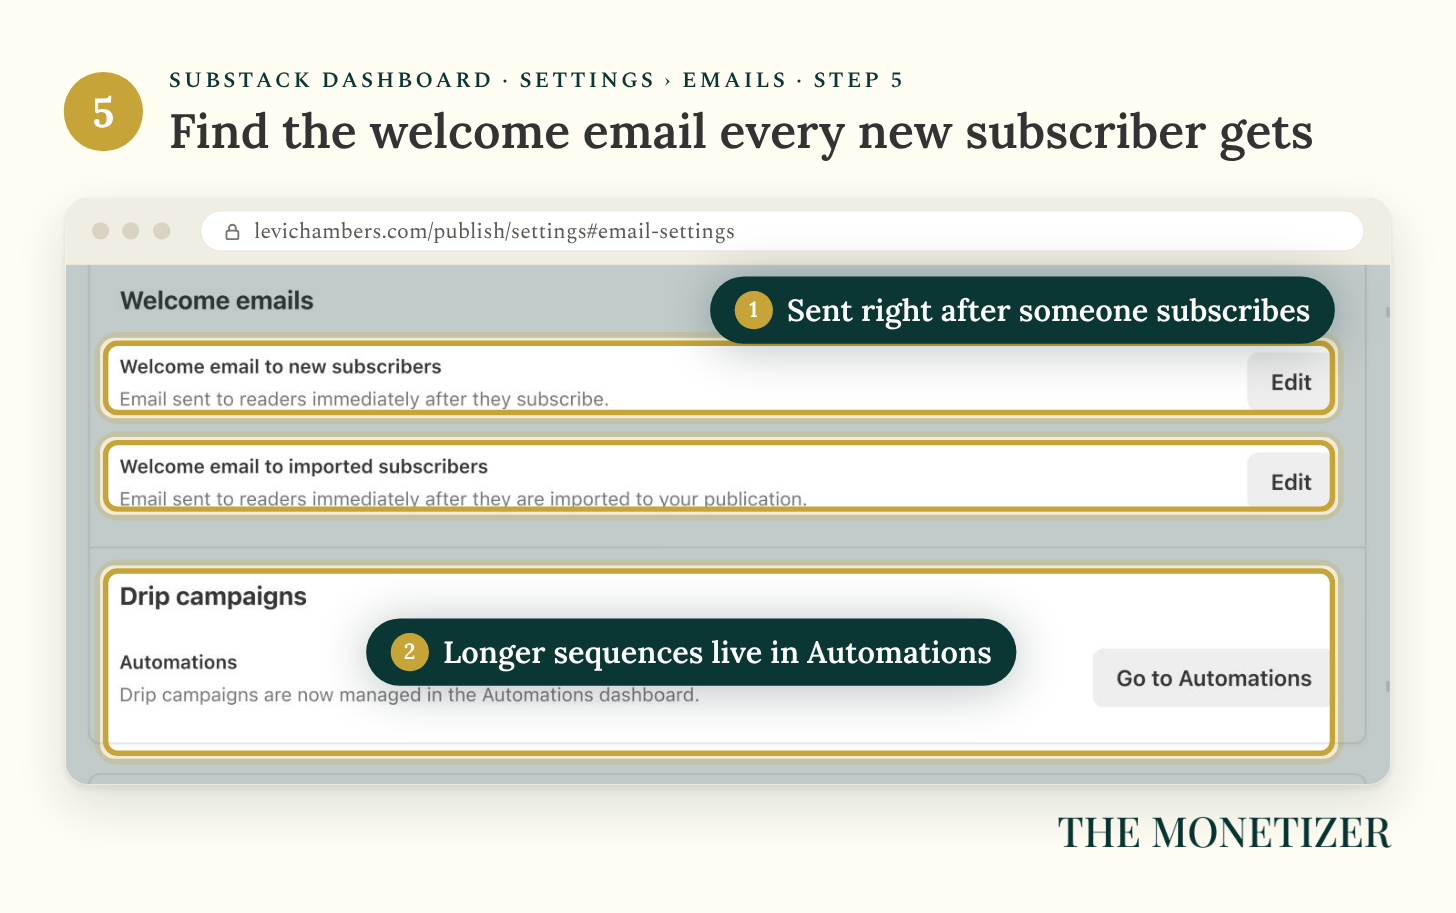
With payments off, you’ll see two: “Welcome email to new subscribers” and “Welcome email to imported subscribers.” Edit both. If you never edit the default templates, Substack adds its New Reader survey to your free and paid welcome emails (Substack).
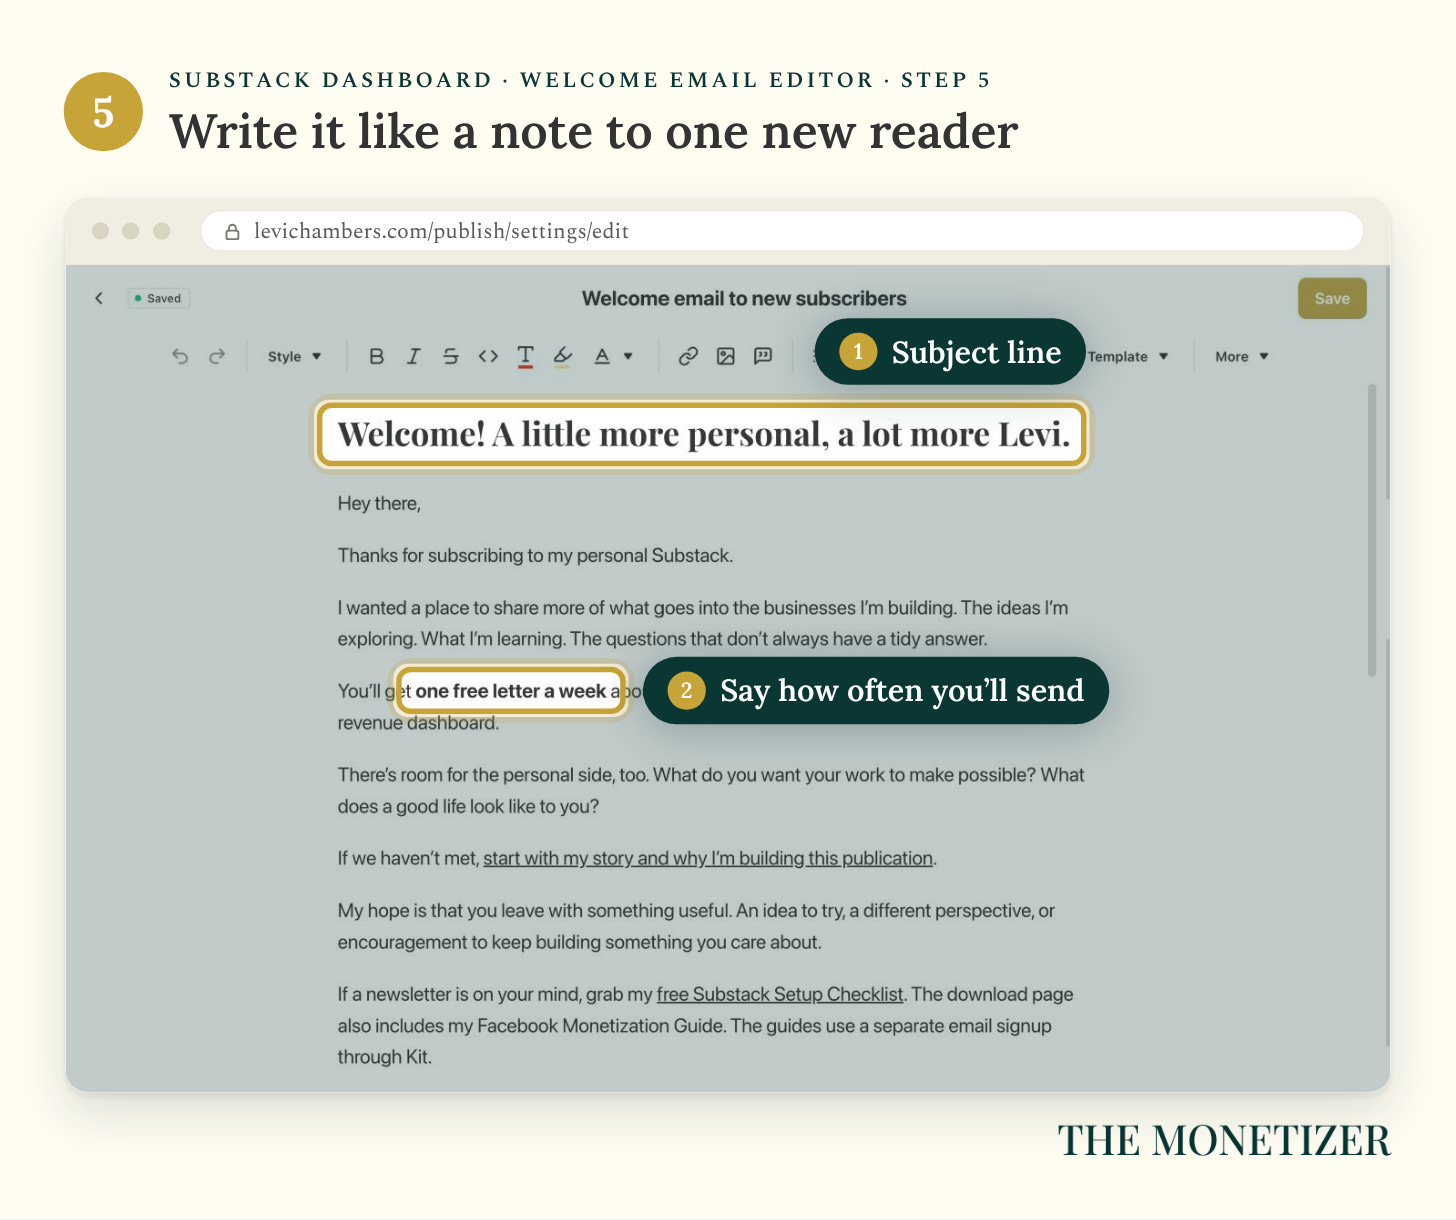
A simple welcome email you can adapt:
Subject: Welcome to [publication]. Here’s what to expect.
Thanks for subscribing. You’ll get [what you send] every [day of the week].
If you read one thing first, make it this: [your best post].
One question: what’s the biggest thing you’re working on with [topic]? Hit reply and tell me.
You can attach a file to it, too, like a checklist or a guide (Substack). When you’re ready for a longer series of emails, that lives in Automations. Here are the seven automations I’d build first.
Welcome email not sending? Check your theme. In the Profile theme, welcome emails wait until your second post (see the fix under Step 2).
Step 6: Import Your Email List (If You Have One)
If you already have subscribers somewhere else, bring them with you. Go to Settings › Import / Export and click Import emails. You can paste addresses (Substack) or upload a CSV file (Substack).
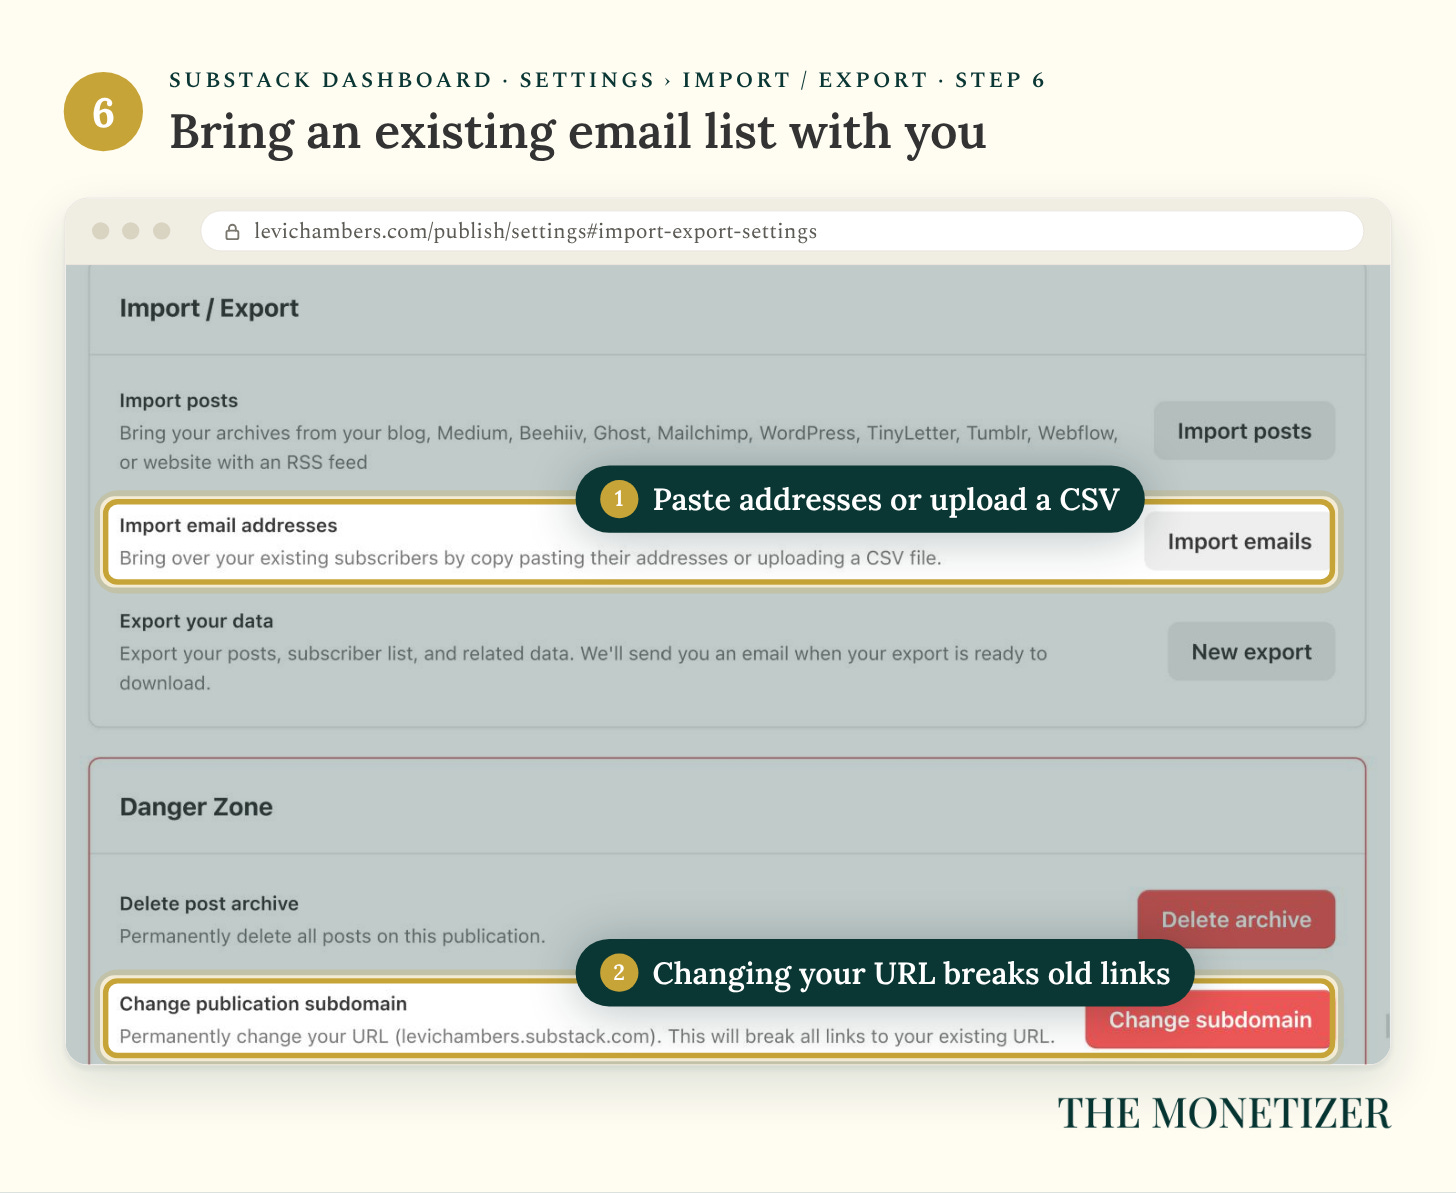
Import only people who explicitly opted in to hear from you. Substack can restrict your publishing if you don’t. There’s no size limit, but a large list can go to a human review that Substack aims to finish within 72 hours, so import before launch day, not on it. Only email addresses come over, not names. Edit your imported welcome email first, so people who already know you get a note that makes sense for them.
Step 7: Recommend a Few Publications
Go to Audience › Recommendations and click Add recommendation. Pick publications your readers would actually like, and add a short reason for each, up to 500 characters (Substack).
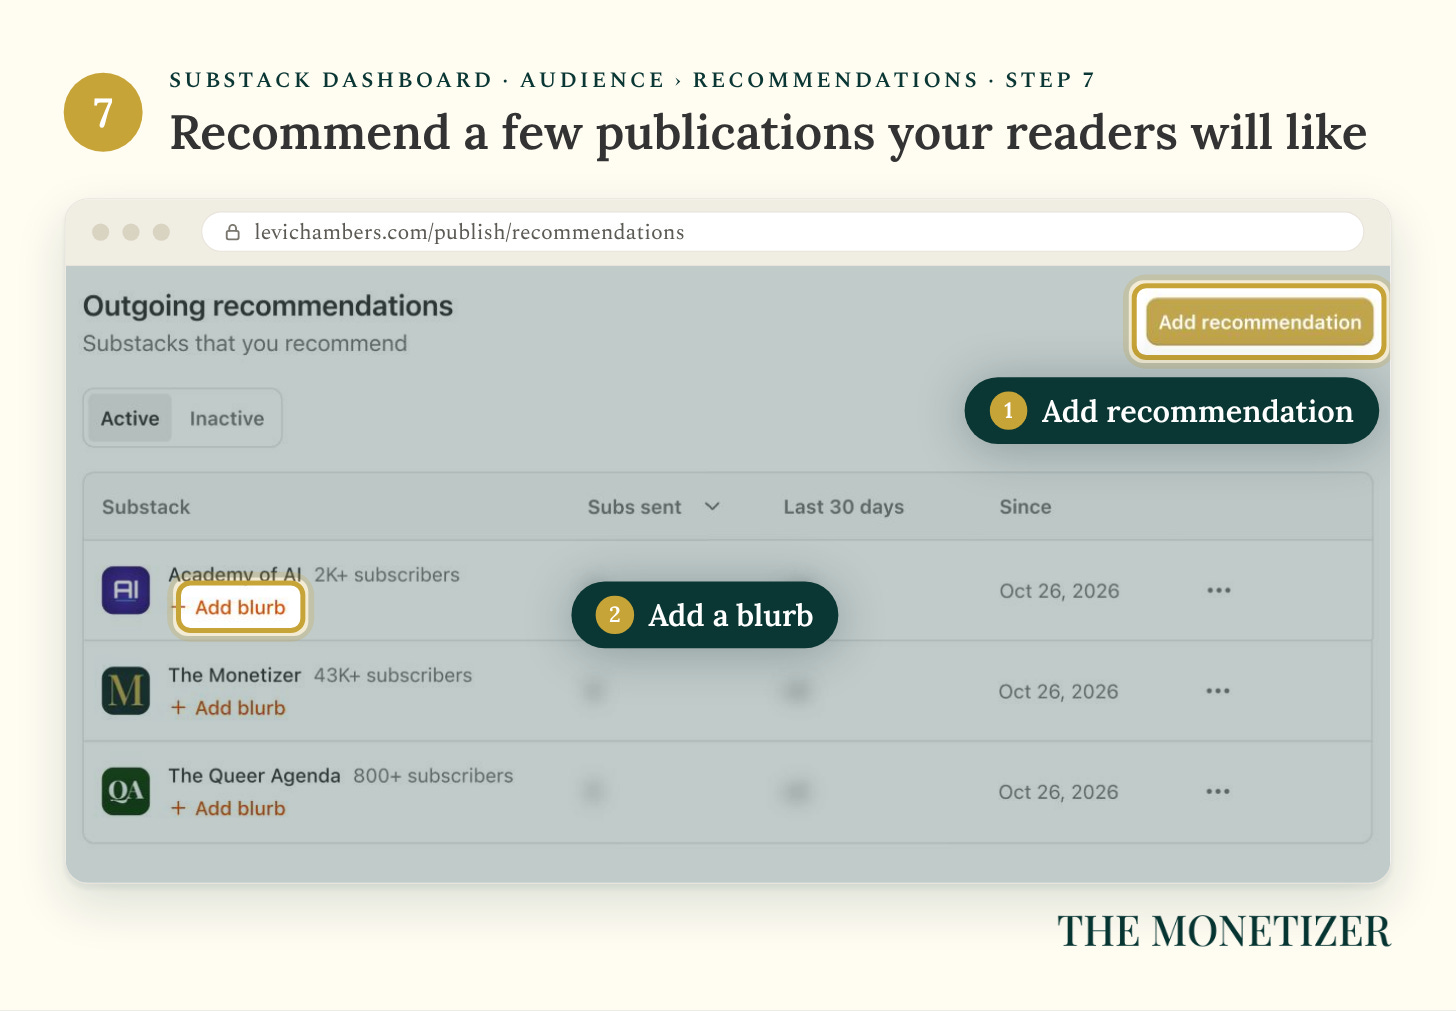
It matters on day one. Right after someone subscribes, Substack can show them up to three of your recommendations, each one click to subscribe. It works in your favor, too: Substack’s 2022 launch guide says writers who recommend others are three times as likely to be recommended back. Since October 29, 2026, you can also group your recommendations into themed lists.
Part 4: Publish Your First Post
Step 8: Write and Publish Your First Post
From your dashboard, click Create, then Article. Add a title, a subtitle, and the post itself.
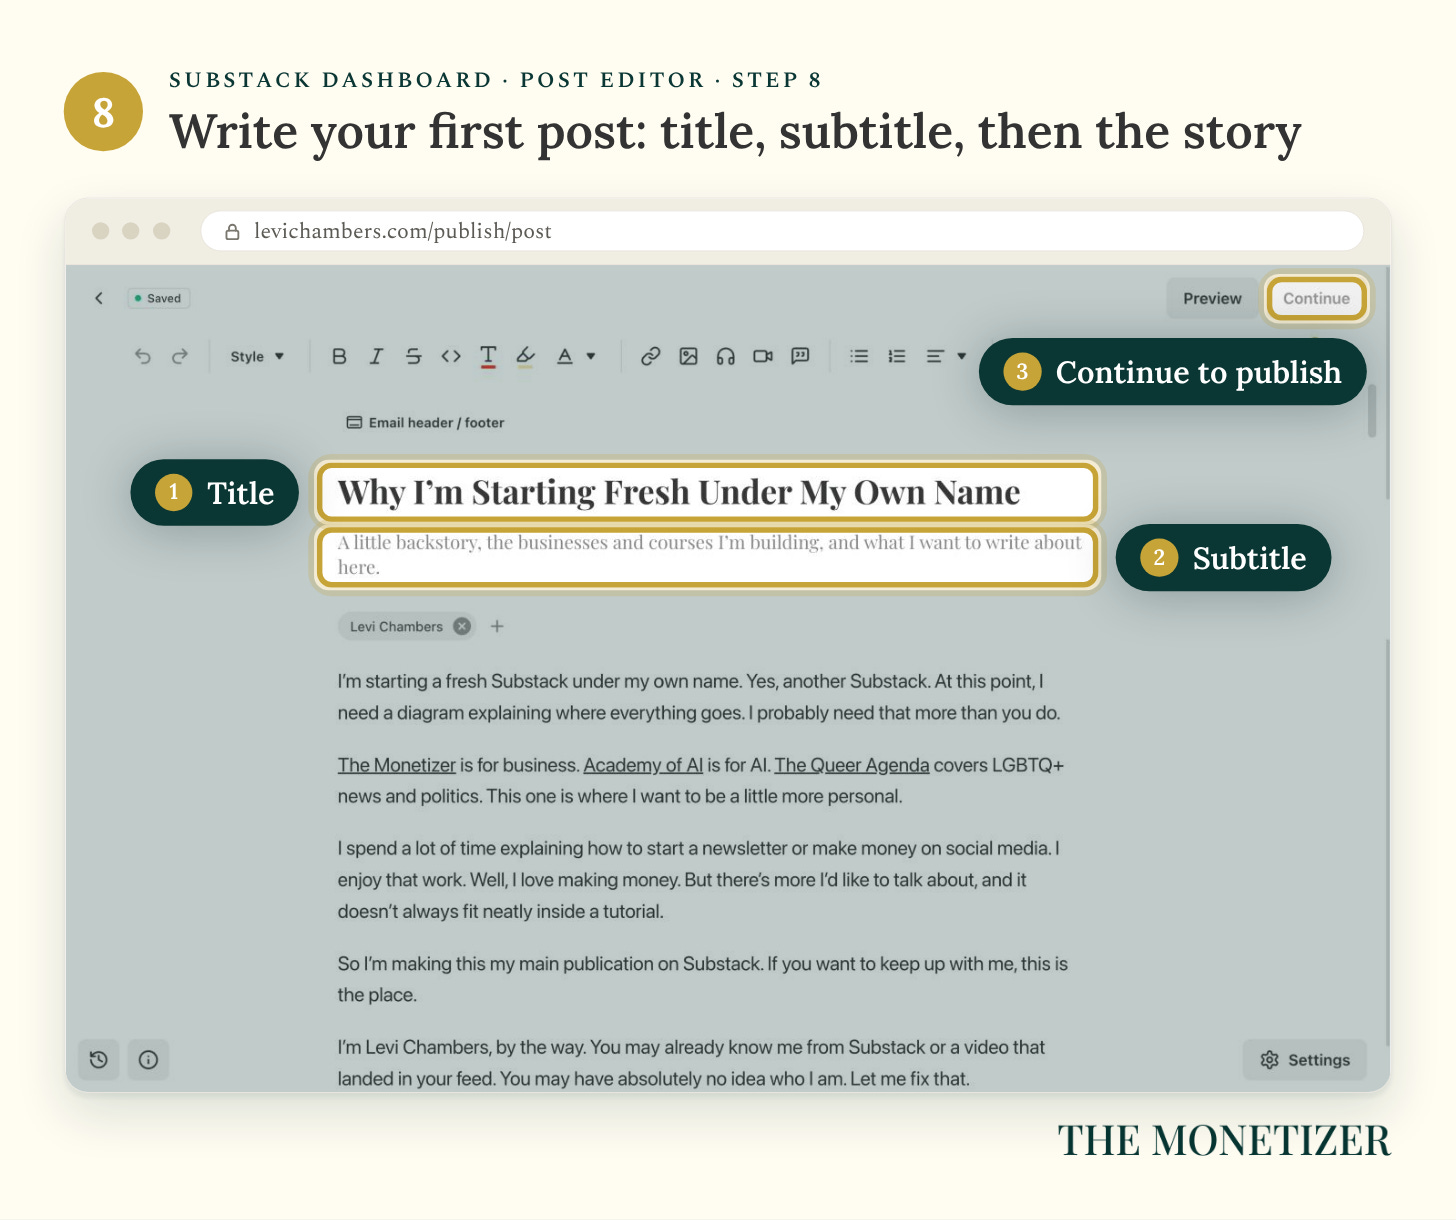
Substack’s own advice for a first post: make it free, say why you’re starting and why it matters to you, tell readers what to expect, and give them a reason to join, with a subscribe button (Substack).
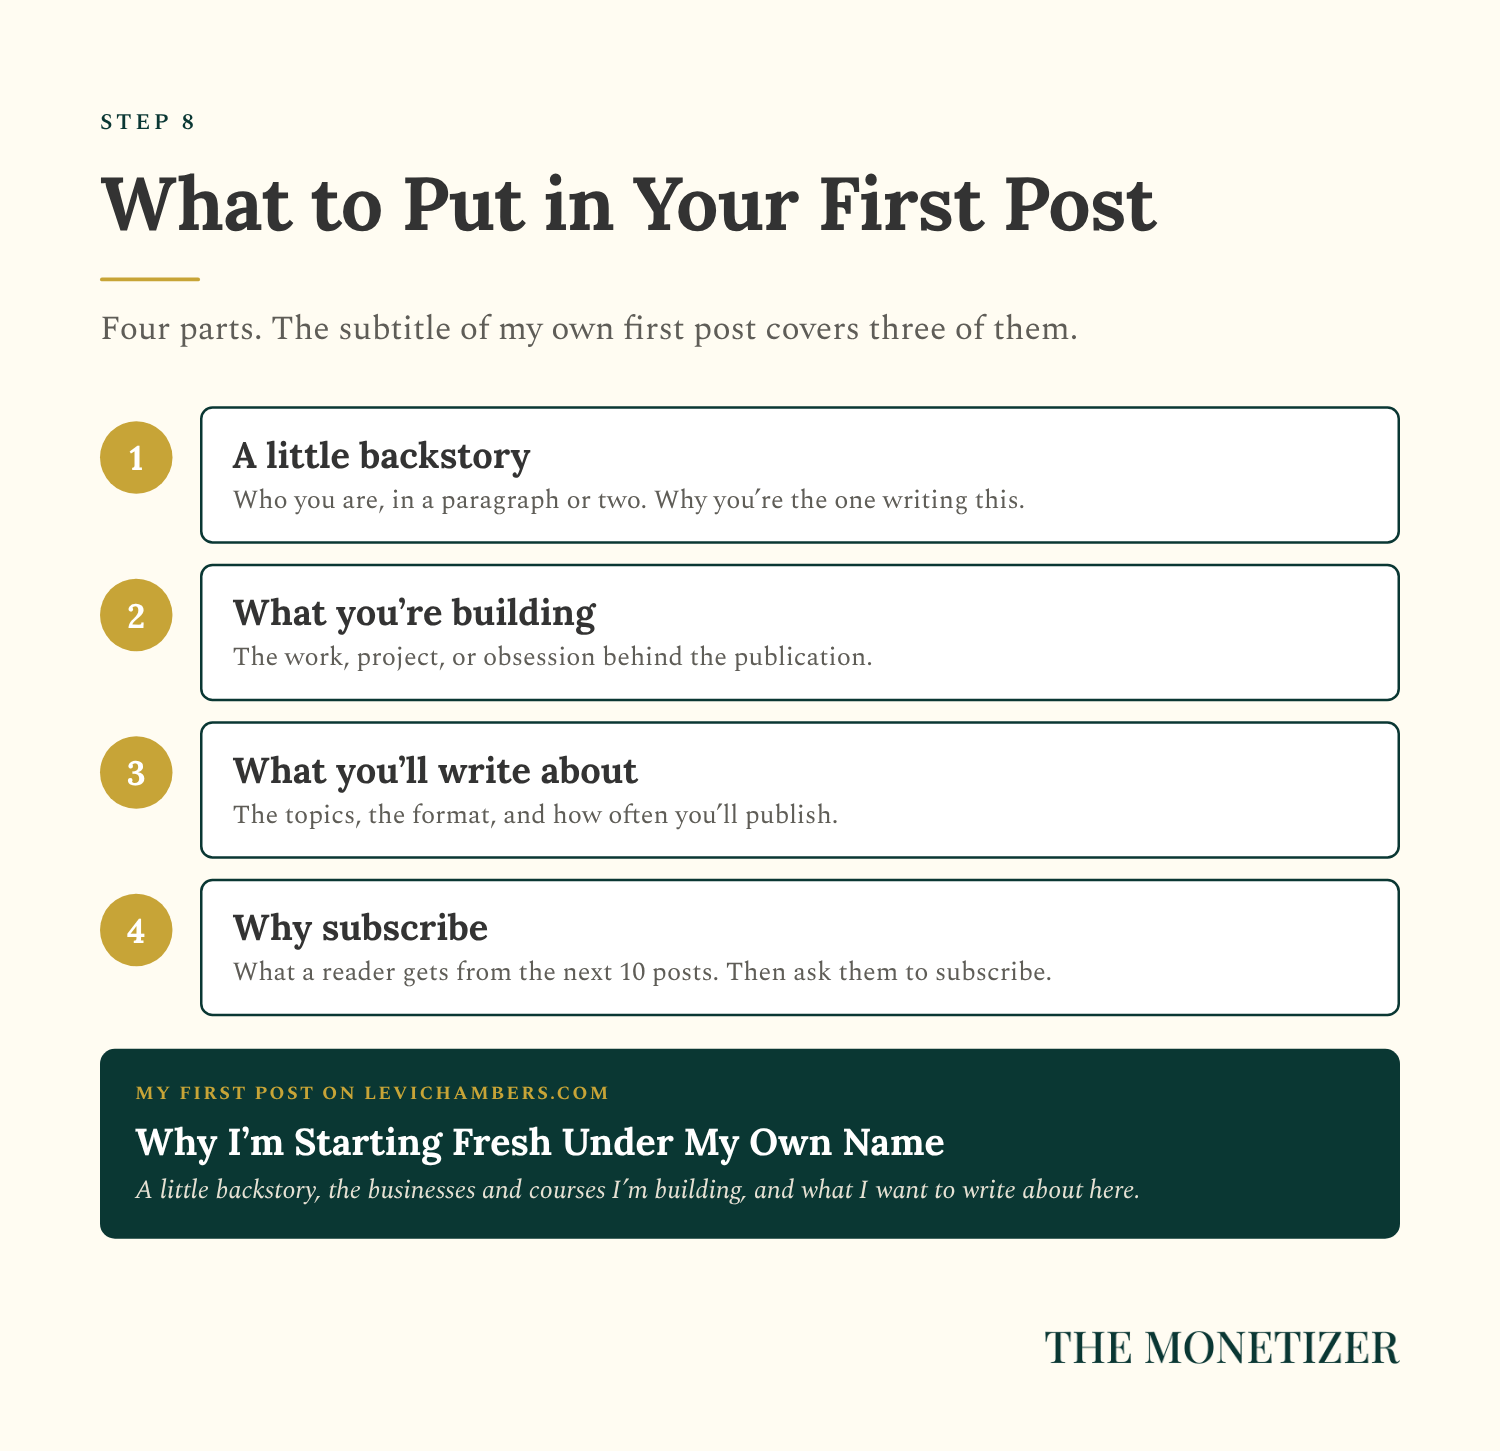
My first post on levichambers.com, “Why I’m Starting Fresh Under My Own Name,” follows that shape. The subtitle alone covers the backstory, what I’m building, and what I’ll write about.
Click Continue when you’re done. Substack lets you set the audience, comments, tags, whether the post goes out by email and to the app, and a schedule (Substack). Before you hit publish:
Send yourself a test email. Once a post goes out by email, Substack can’t resend it.
Fill in the SEO settings: title, description, and URL slug. My Substack SEO guide walks through each field.
Check the social preview image. Aim for 1200 x 630 pixels or larger.
Then publish it. Post a Note on Substack the same day to say you’ve arrived.
Optional: Turn On Paid Subscriptions
You can turn on payments any time. Go to Settings › Payments and click Connect with Stripe. The dashboard says it takes about five minutes.
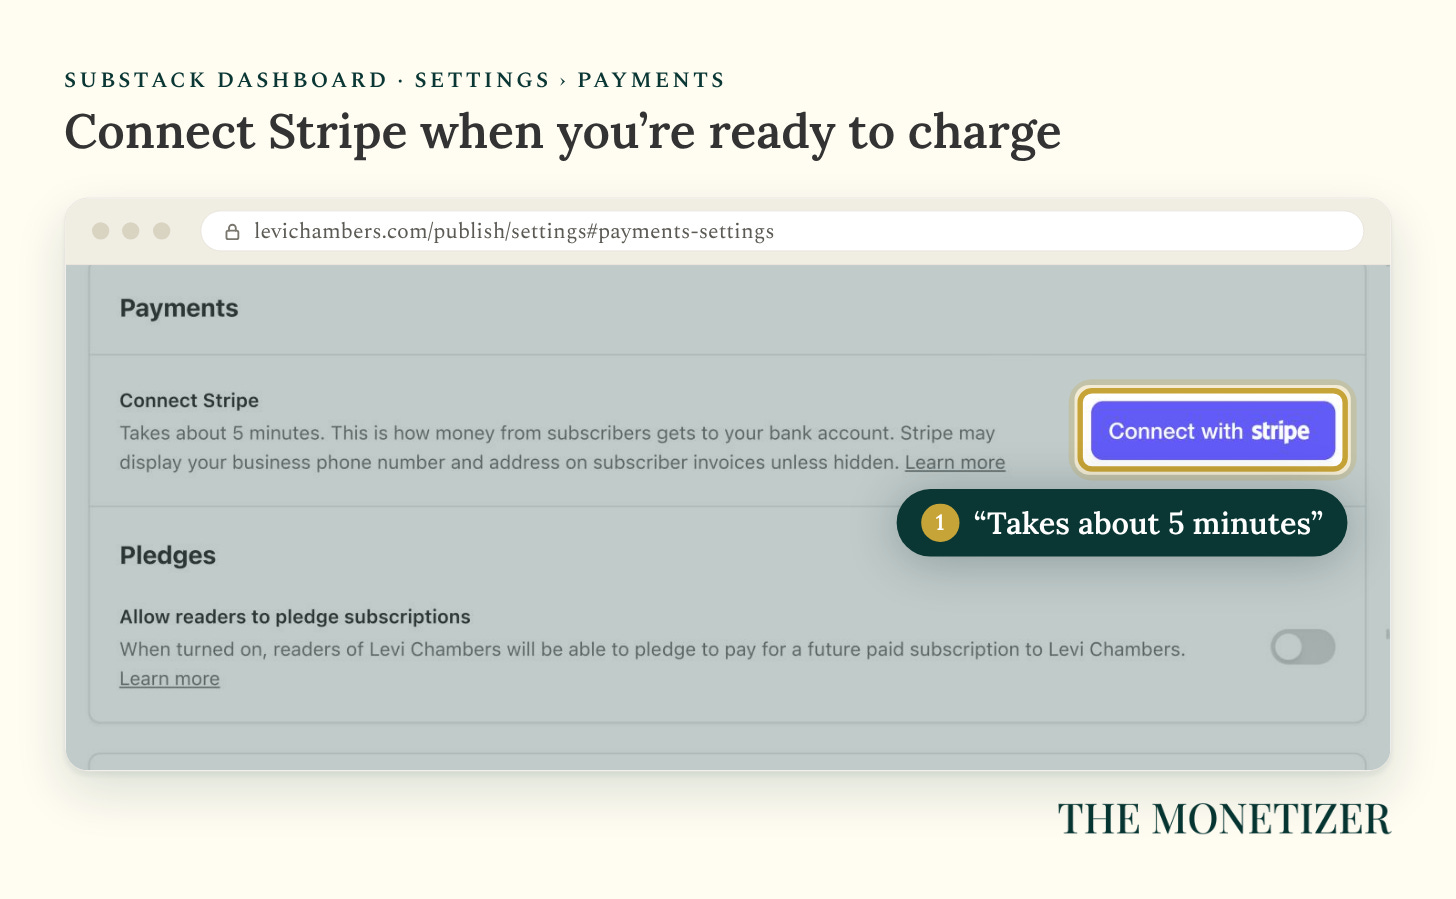
Stripe asks for your details, an address, and a bank account. A home address works, but it can show on receipts, so Substack suggests a virtual mailbox (Substack). Then you set prices. The minimum is $5 a month and $30 a year in US dollars, and there’s no yearly-only option. Not sure what to charge? In 2025, Substack’s team said $5 to $6 a month suits most readers paying out of pocket, and $10 or more works when readers can expense it (Substack).
Paid doesn’t have to happen on day one. Free articles are the growth engine for my publications, and once you do charge, you choose free or paid for each post (Substack). Until then, free Substacks have Pledges turned on by default. Readers pledge to one of your suggested prices. When you enable payments, those pledges turn into paid subscriptions automatically, as long as your prices aren’t higher than the pledge. If they are, Substack emails the reader to subscribe at the new price.
Optional: Add a Custom Domain
A custom domain turns yourname.substack.com into www.yourname.com. levichambers.com uses one. It costs a one-time $50, on top of the domain itself, which you buy from a registrar. Substack doesn’t sell domains.
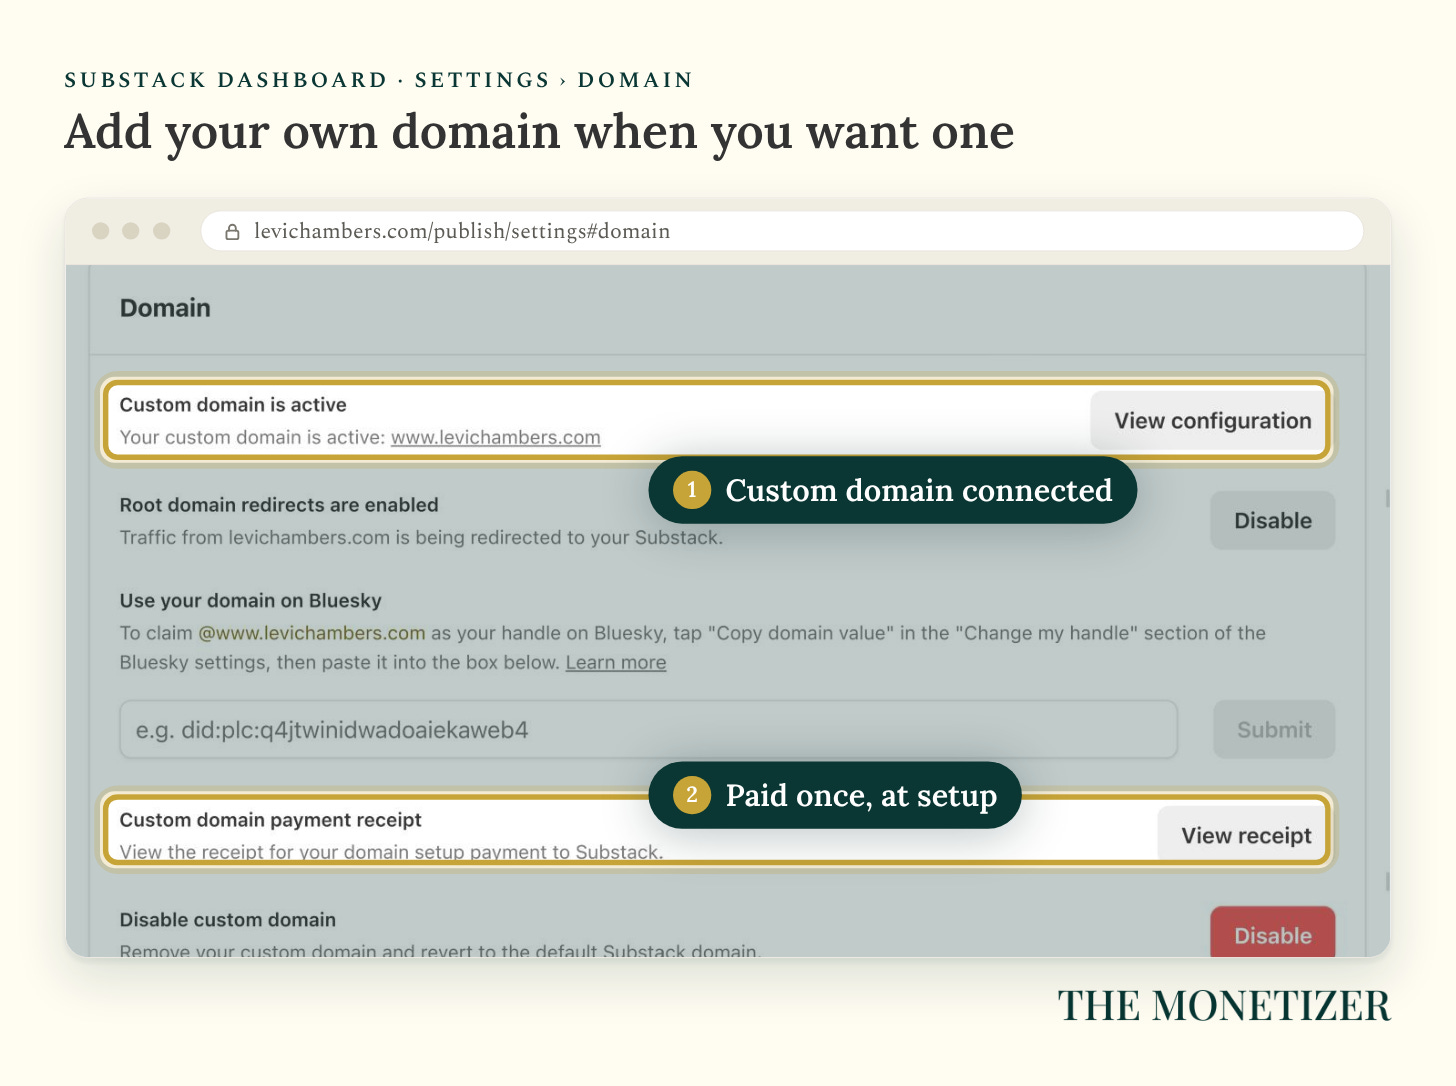
Go to Settings › Domain, click Add, pay the $50, and enter your domain with www in front. Then add a CNAME record at your domain provider that points www to target.substack-custom-domains.com. To make the bare domain (no www) work too, tick Enable root domain redirects and add the extra record Substack lists. Verification can take up to 36 hours (Substack).
It doesn’t need to happen on day one. Substack’s 2023 SEO guide notes that the default substack.com address borrows Substack’s own search reputation. If you already own a domain people know, connect it. If not, it can wait.
After You Launch: Your First 30 Days
Setup gets you live. Growth is a separate job, and it starts the day you publish.
What grows my publications comes down to three habits. Free articles do the heavy lifting, because a good one gets found in search, shared on social, and clicked inside the Substack app. My post 10 Niches That Could Make You $100K a Year on Substack brought in 1,100 new subscribers in its first week, from the Substack app alone. I also post Notes every single day from every publication. And I treat each one as a media publication, not a newsletter.
Get to three posts quickly. Your publication only shows up in other writers’ recommendation digests once it has at least three posts and has published in the last 30 days (Substack).
A few features also wait until you’ve grown a little:
Live video: 10 free subscribers
Headline A/B testing: 200 subscribers
Subscriber count on your Welcome page: more than 1,000 subscribers
Sitemaps and Google Search Console verification: “As your publication grows,” with no number published
For the full plan, day by day, read How to Grow on Substack: Your First 1,000 Subscribers in 30 Days.
FAQ
How Much Does Substack Take From Paid Subscriptions?
Substack keeps 10% of subscription revenue. Stripe charges 2.9% plus 30 cents per US card payment, plus 0.7% on recurring payments. On a $5 monthly subscription, that leaves you $4.02 before income tax.
Can I Change My Substack URL Later?
Yes, in Settings › Danger Zone. A plain change breaks every link you’ve shared. Substack also offers a change that redirects old links, but you can only use it once.
Do I Need a Custom Domain for Substack?
No. Your free yourname.substack.com address works for search, email, and the app. A custom domain costs a one-time $50, plus the domain itself, and verification can take up to 36 hours.
Can I Start Free and Add Paid Subscriptions Later?
Yes. Turn on payments any time in Settings › Payments. Until then, readers can pledge to your suggested prices, and those pledges convert to paid subscriptions when you enable payments, as long as your prices aren’t higher.
Can I Have More Than One Substack?
Yes. One account can run up to 10 publications, and you switch between them from your dashboard (Substack). Each one needs its own Stripe account if you charge, though payouts can go to the same bank account (Substack).
How Long Does It Take to Start a Substack?
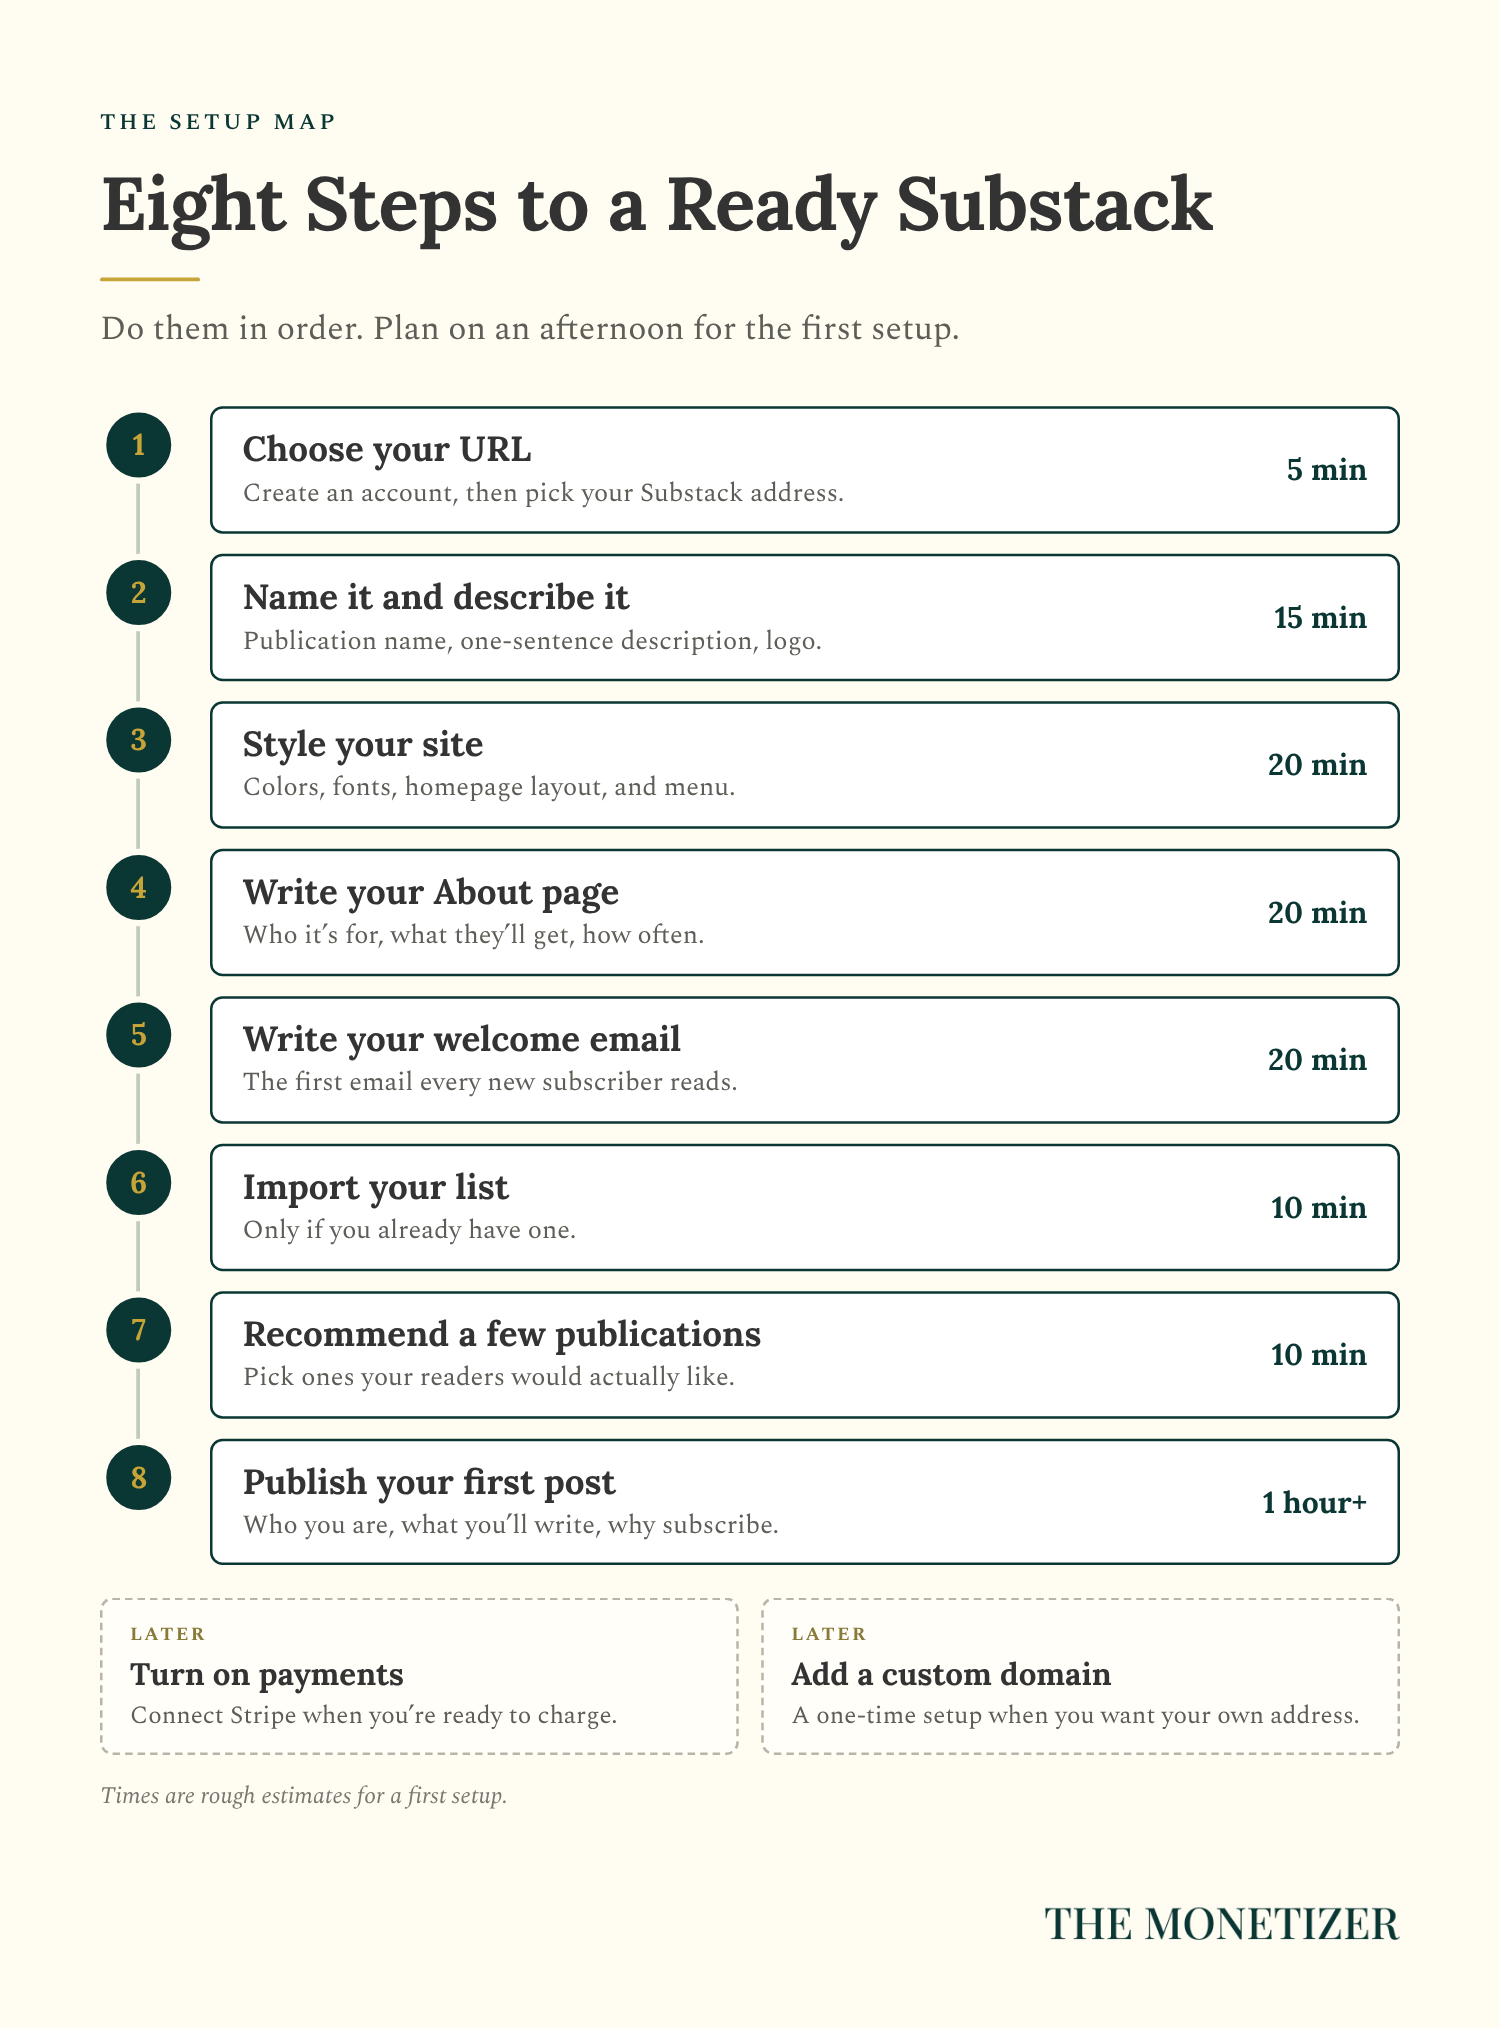
Plan on an afternoon for the setup in this guide. The account and URL take minutes. The About page, welcome email, and first post take most of the time. A custom domain can add up to 36 hours of waiting for verification.
Where to Go From Here
Starting a Substack takes an afternoon. Turning it into income that renews every month takes a system.
That’s what I teach in Substack Best Seller Academy. It’s the documented system behind my $720K in annual recurring revenue on Substack, and more than 10,000 students have trained with me through The Monetizer. If you want your new Substack to become a real business, that’s the next step.
Get the Printable Launch Checklist
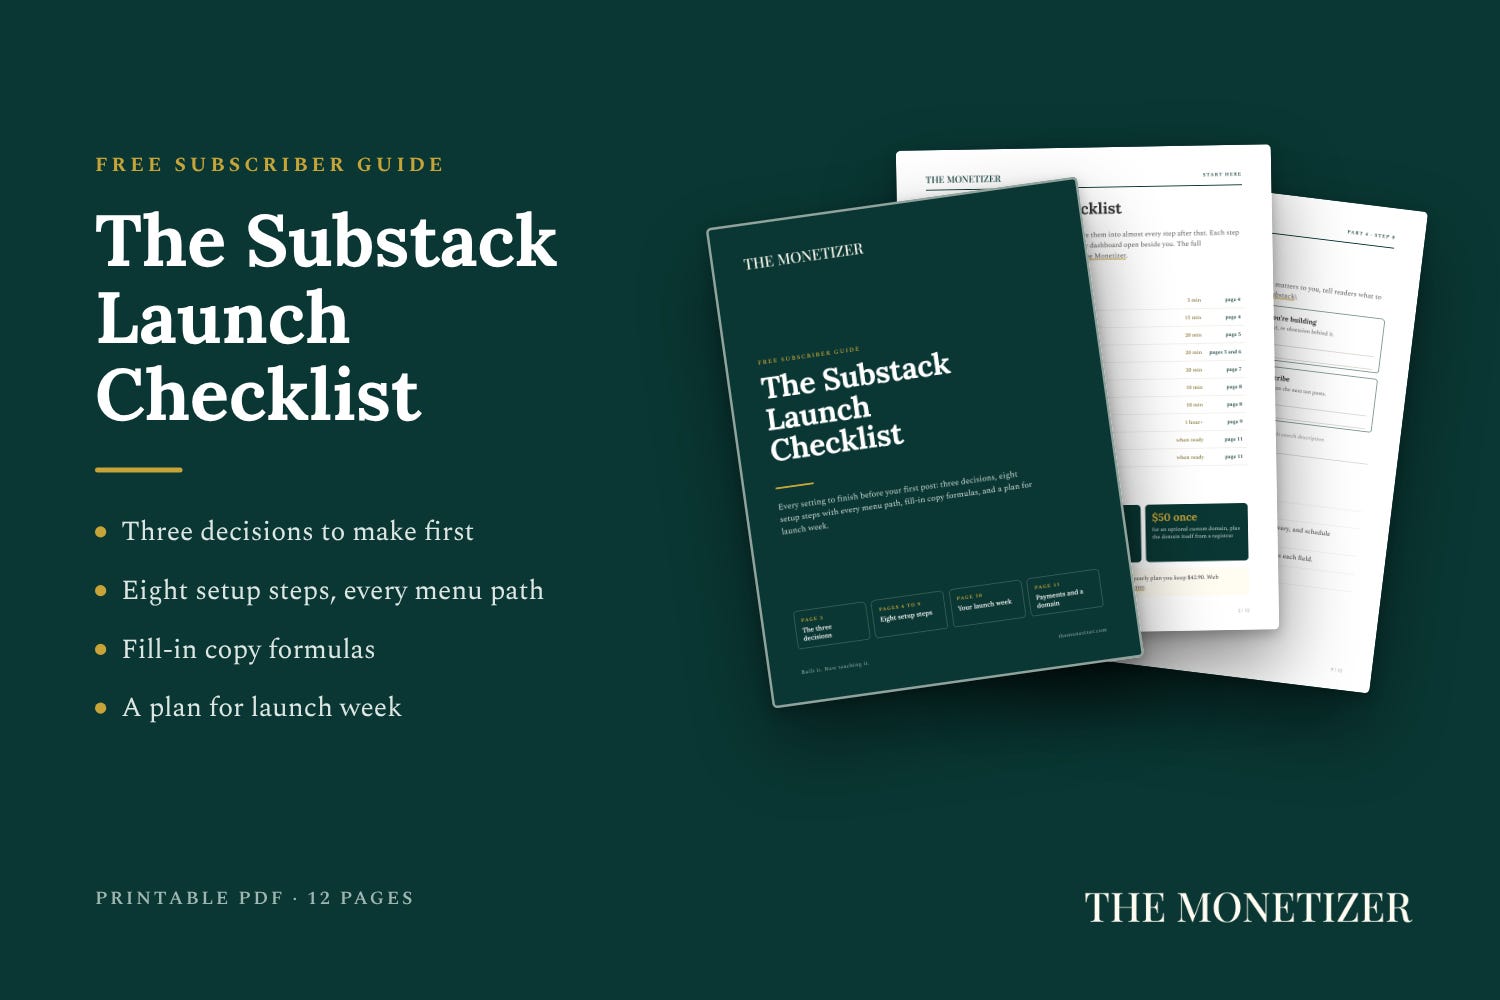
The free printable checklist puts every step of this guide in one place:
The three decisions to make first, with fill-in prompts
All eight setup steps, with every menu path
Formulas for your description, About page, welcome email, and first post
A pre-publish check and a plan for launch week
It’s free for subscribers. Subscribe, and it’s right below.