


I launched my newest Substack, levichambers.com, on October 26. Six days later, I pasted my Start Here post into Google Search Console.
“URL is not on Google.”
Right underneath: “URL is unknown to Google.”
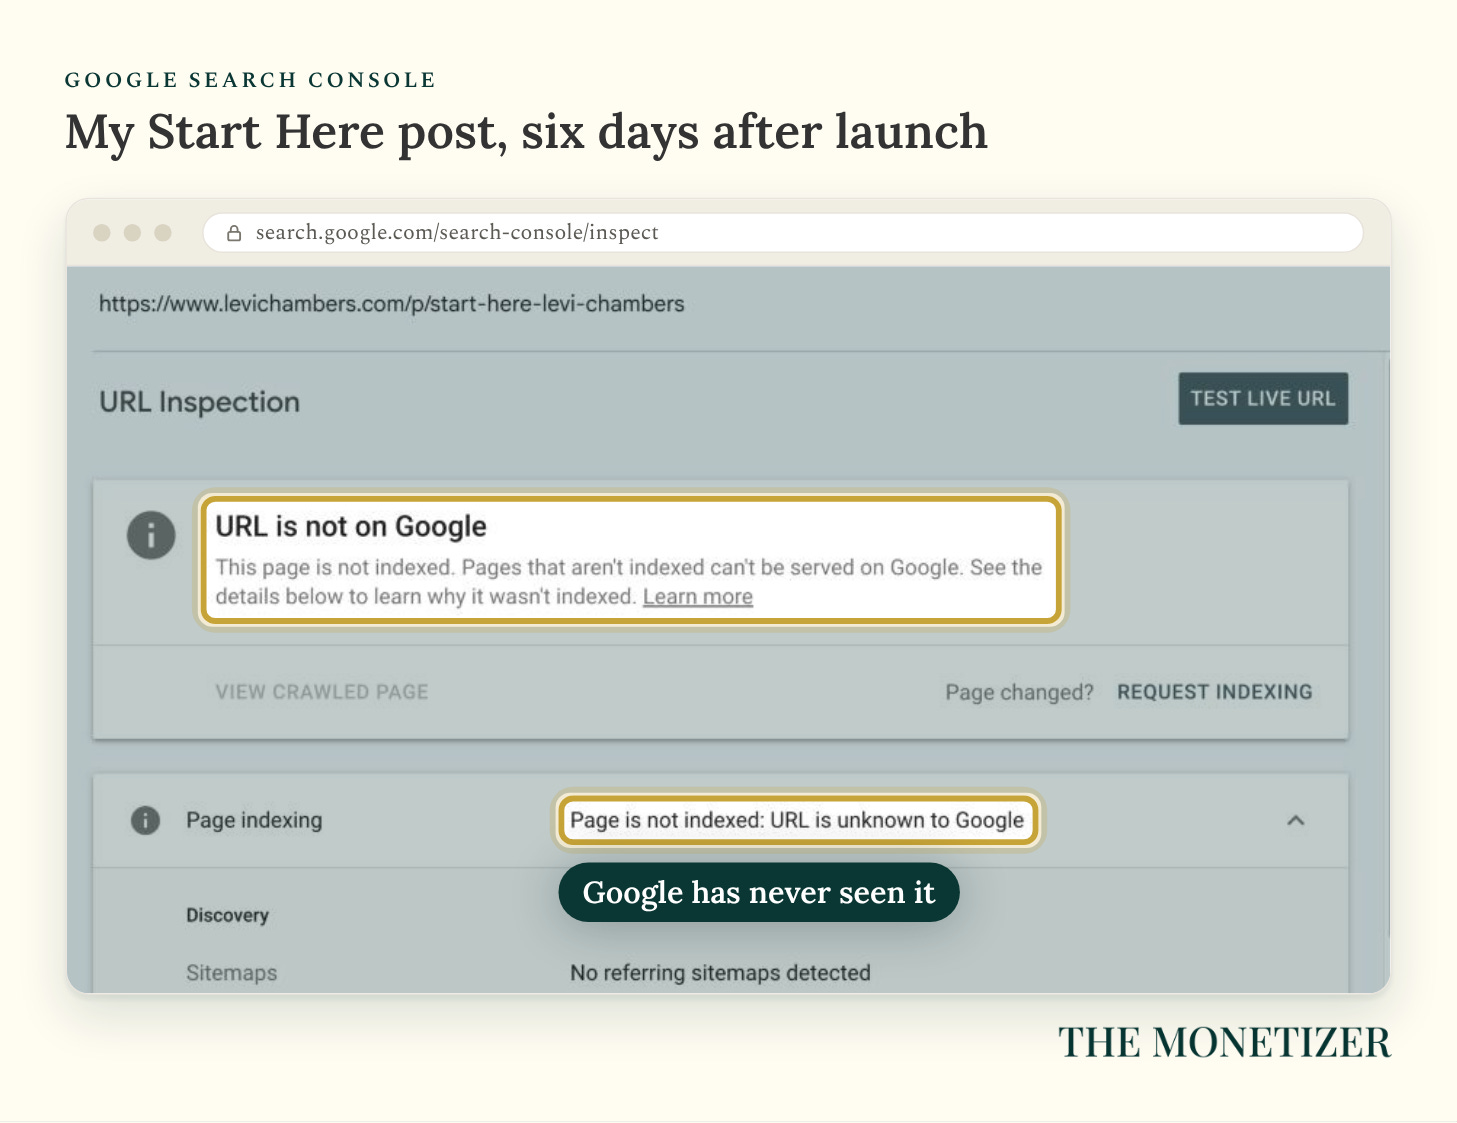
Google didn’t know the page existed.
Six days is early for a new website. Still, that message gives you very little to work with. I checked Search Console and Analytics, then added the publication to Bing. I took screenshots as I went. Below, you can follow the setup and see what happened in my accounts.
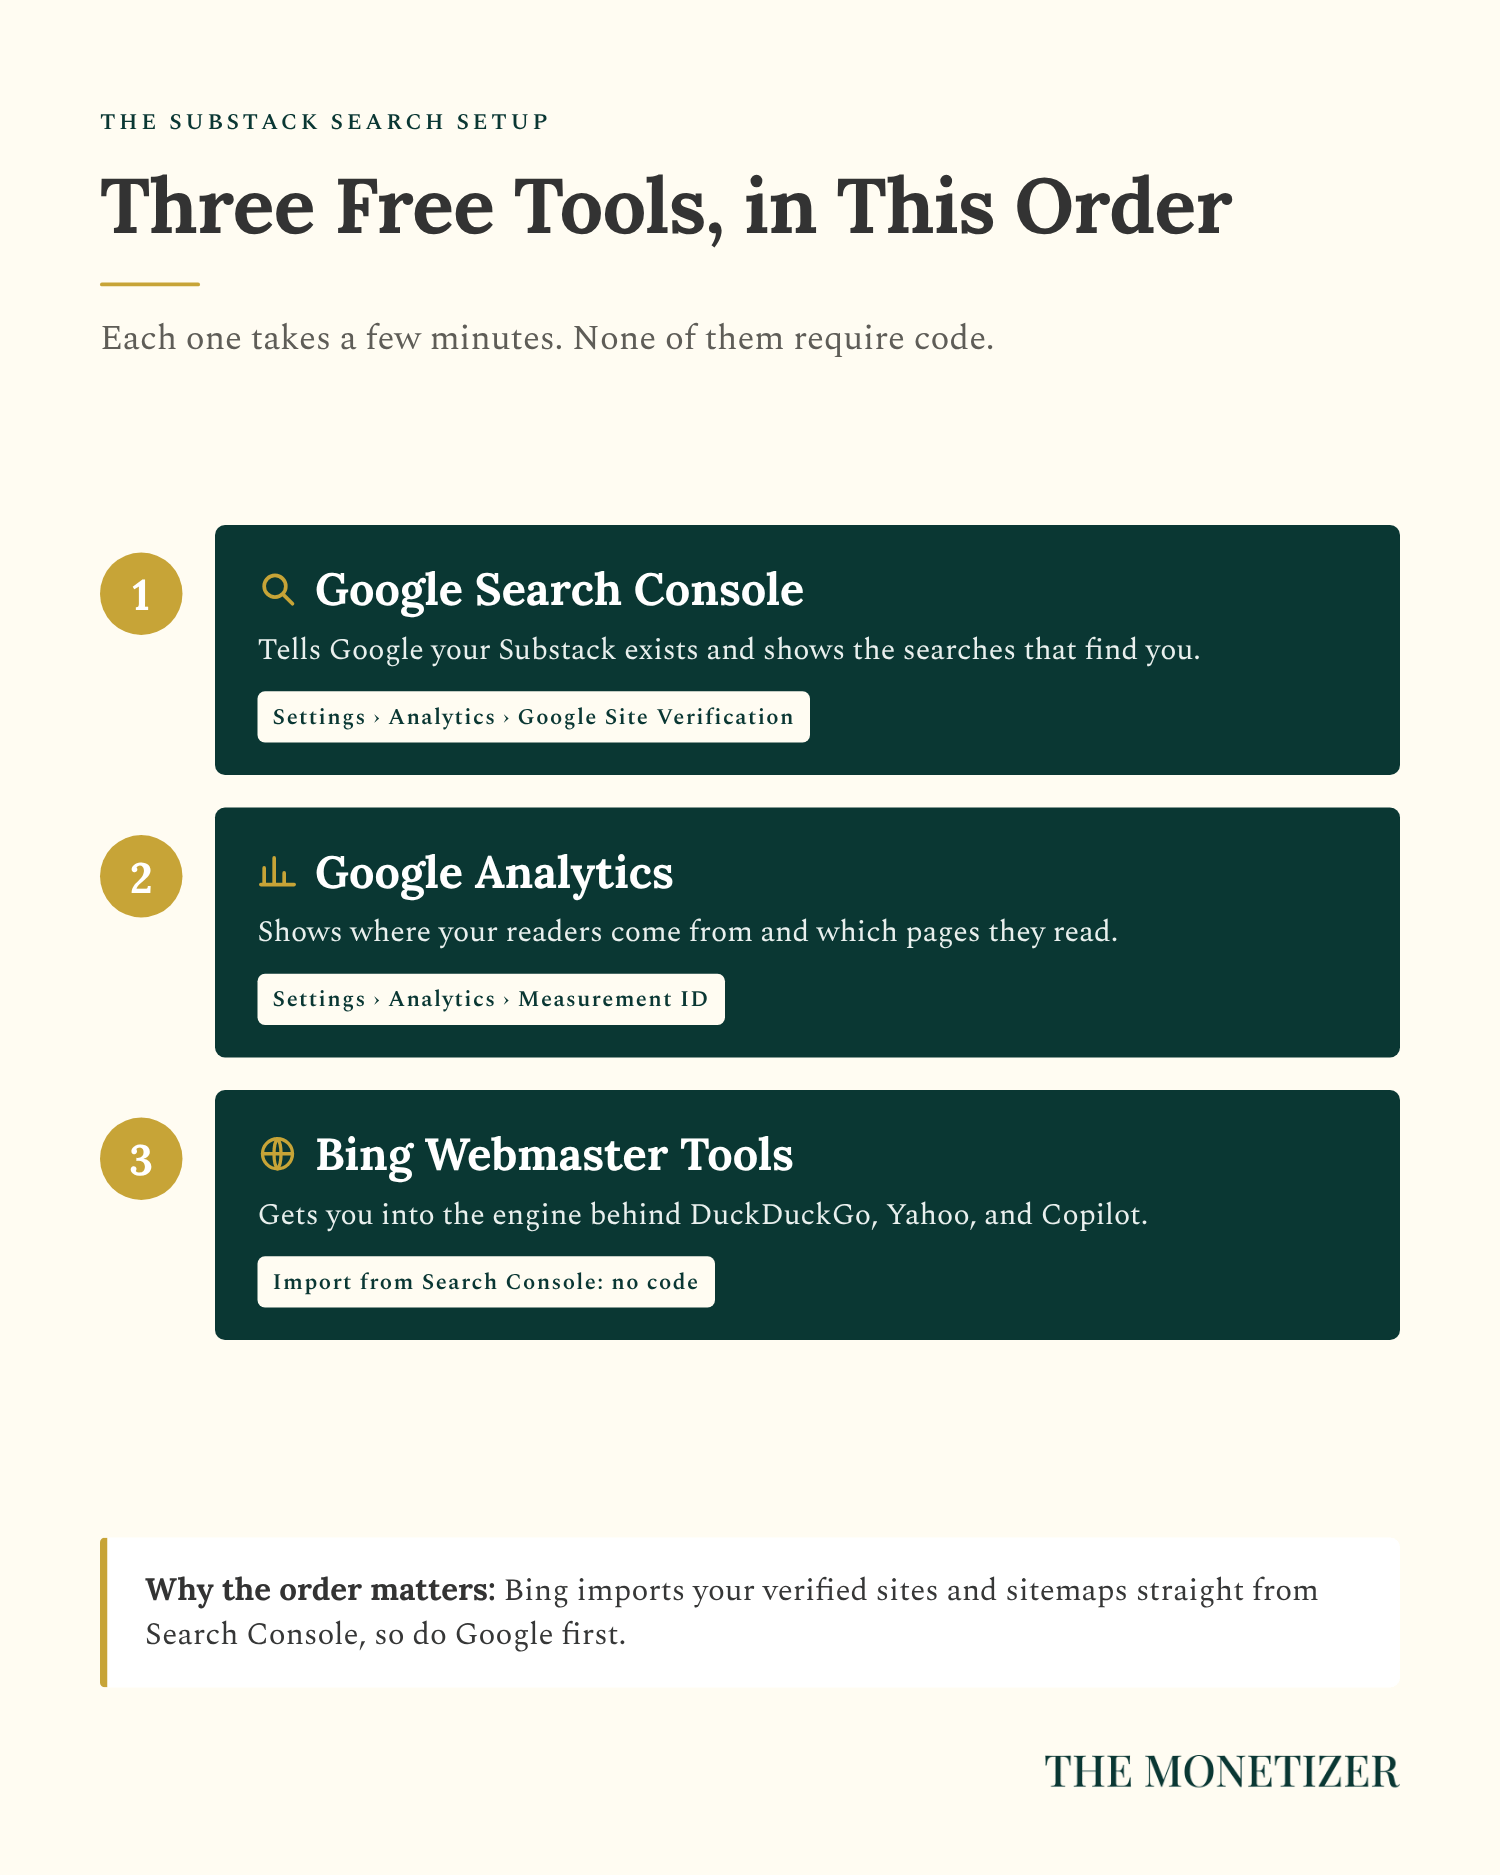
There are four pieces to this:
Google Search Console: check Google’s indexing and the searches that show your posts.
Google Analytics: measure website visits and what readers do after they arrive.
Bing Webmaster Tools: submit pages to Bing and check its reports.
Post settings: describe each article clearly for people searching for help.
Keep your Google account and Substack dashboard open. Most of this involves copying a value from one tab into another. A couple of screens look technical, but you won’t be writing code.
First, a word about what “on Google” means. Google has to discover your page, then decide whether to include it in its index. Even an indexed post can appear too far down the results for anyone to notice. Search Console helps you tell those problems apart. Analytics measures the visits that follow; adding it won’t improve your ranking.
The full walkthrough is free. If you’re a paid subscriber, there’s also a printable setup kit at the bottom.
Jump to: Your setup path · Search Console · Analytics · Bing · Post settings · Follow-up checks
Why Search Belongs in Your Substack Plan
I run almost a dozen newsletters, and I treat them like media publications. That includes the websites. A reader shouldn’t have to join Substack before they can find something I’ve written.
I post Notes every day from every publication, so I’m hardly giving up on the feed. I want search working alongside it. Someone typing a question into Google has already told you what they need. A useful answer can introduce them to your newsletter months after you publish it.
You don’t need Google’s permission to start appearing in search. Substack handles some of the technical work, and Google can find a website without you registering it. But I want to know which posts it has found. Otherwise, “give it more time” becomes the answer to everything.
One Substack detail can send you in circles before you’ve even started.
Sitemaps and Search Console verification “become available as your publication grows,” according to Substack. You may open your settings and find that the verification box in my screenshot simply isn’t there. The next section covers that situation, including a separate route for custom domains.
I’ve included Bing because its reach extends beyond people visiting Bing’s homepage. Microsoft describes its role in other search and AI services. Google has also introduced reports for generative AI visibility. You’ll have more places to check how your work gets found, although setup alone won’t earn an AI citation.
Before You Start: Find Your Setup Path
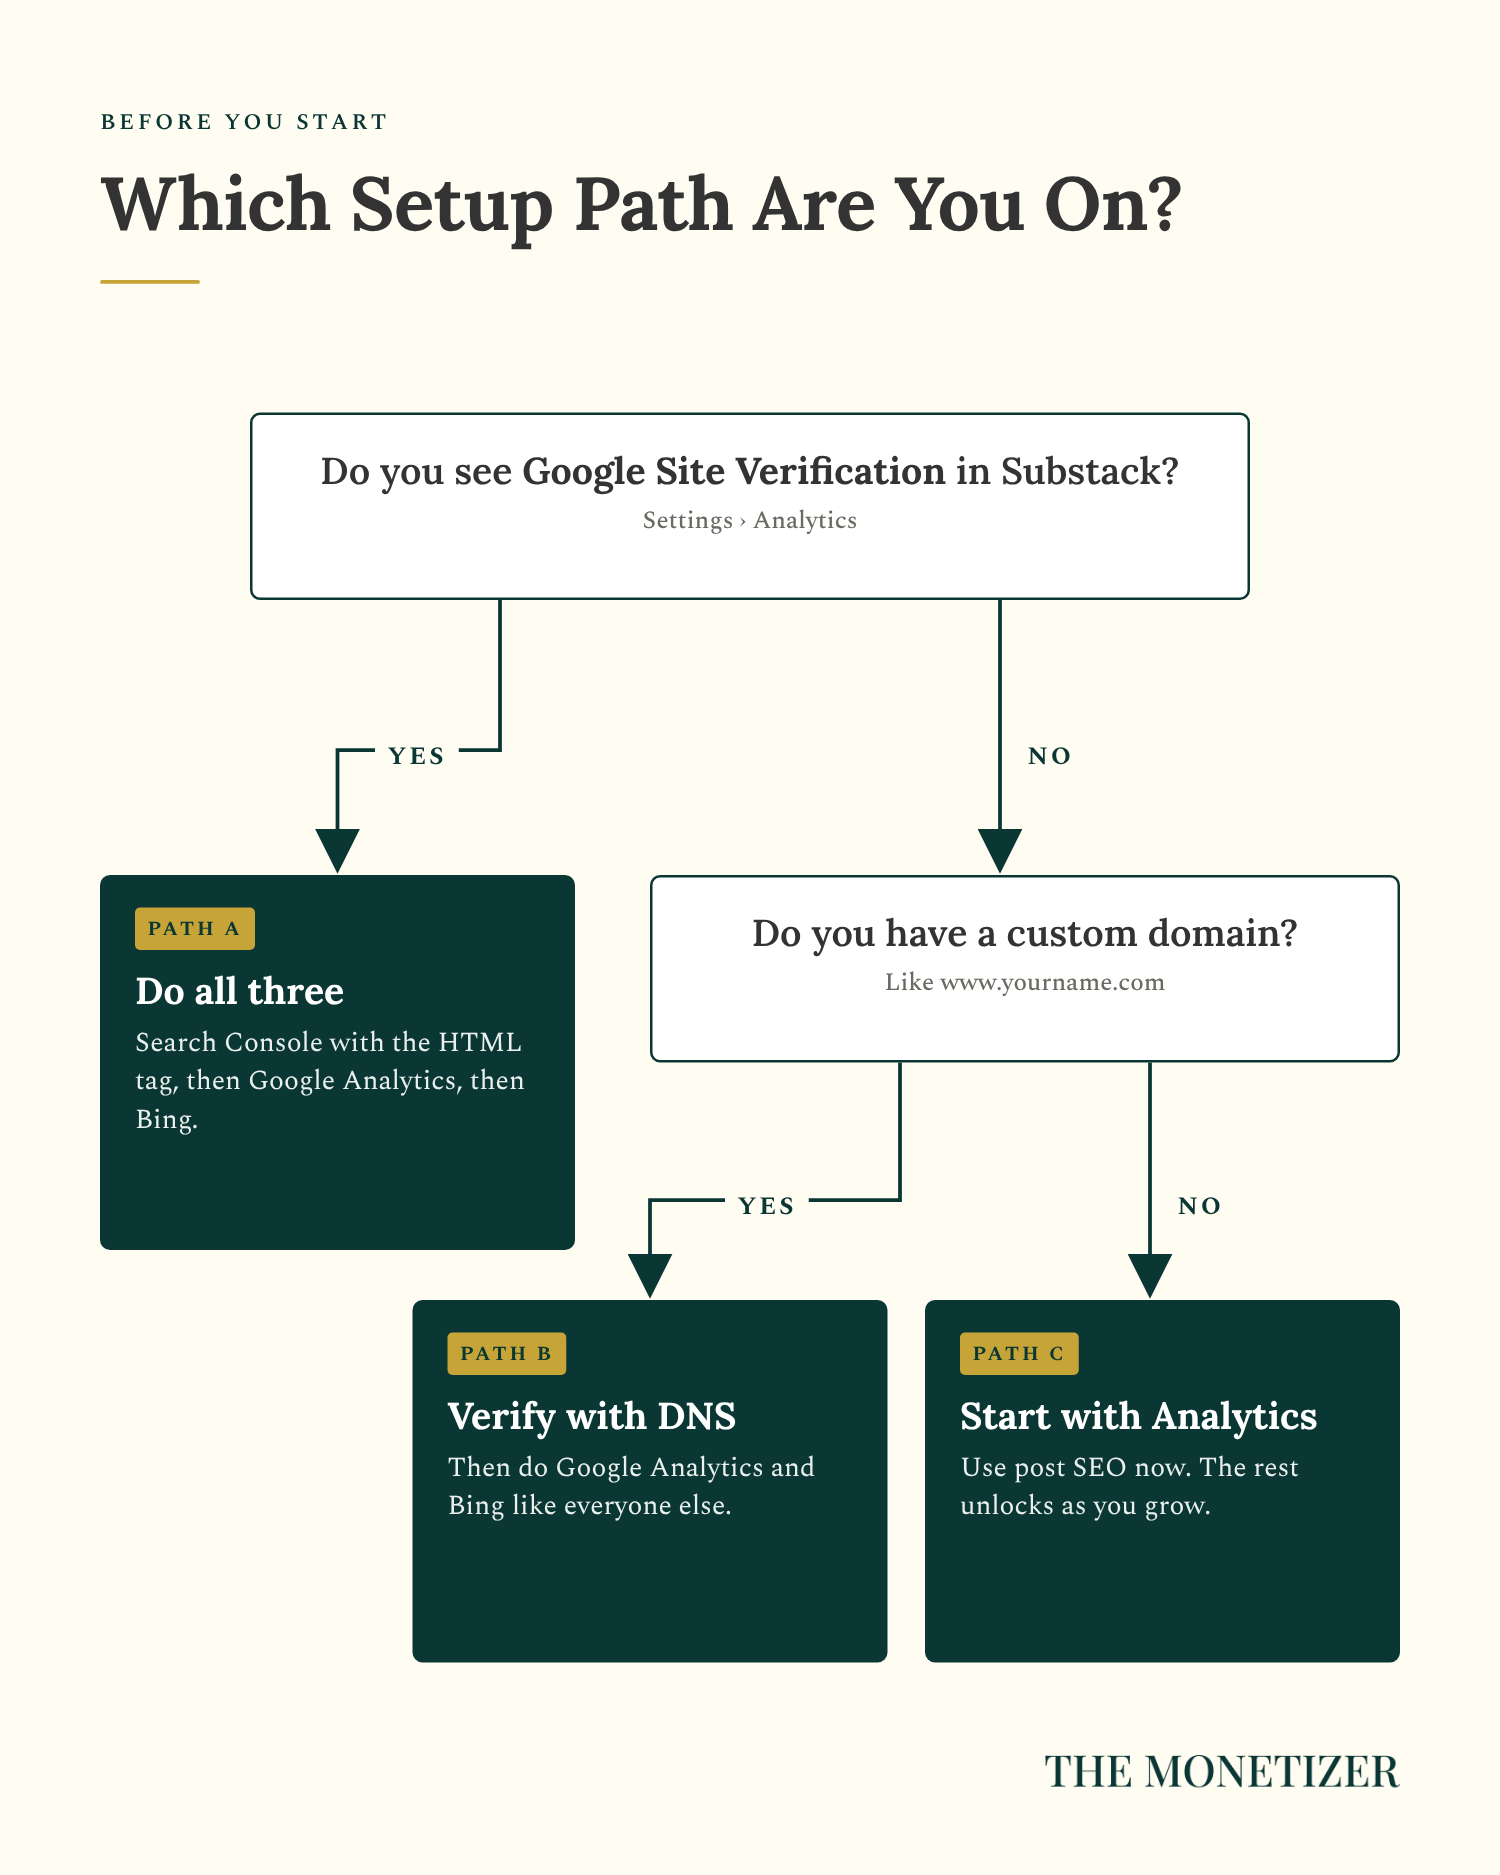
Before following the screenshots, check your address and one setting. Your answers determine where to start.
Check your address. Open your publication’s homepage and copy the address after it finishes loading. It might be yourname.substack.com or a custom domain like my www.levichambers.com. Use the address you land on, keeping https:// and any www. You’ll reuse it throughout this guide.
Check for the verification box. In your Substack dashboard, open Settings → Analytics. Look for Google Site Verification.
Choose the route that matches your settings:
You have the verification box: follow Part 1, then Analytics and Bing.
No box, but you own a custom domain: use “No Verification Box? Use Your Domain.” Then return to Steps 7 and 8.
No box and no custom domain: complete Analytics and Part 4 now. The HTML-tag route isn’t available. Google also supports Analytics-based verification, but it depends on the installed tag. Treat that as an optional attempt, not a guaranteed Substack workaround. Otherwise, revisit the verification field as your publication grows.
Part 1: Connect Your Substack to Google Search Console
Search Console is where I go to answer the question that started this guide: has Google found this post? It also reports the searches that show your pages. It’s free, and Google calls each website you add a property.
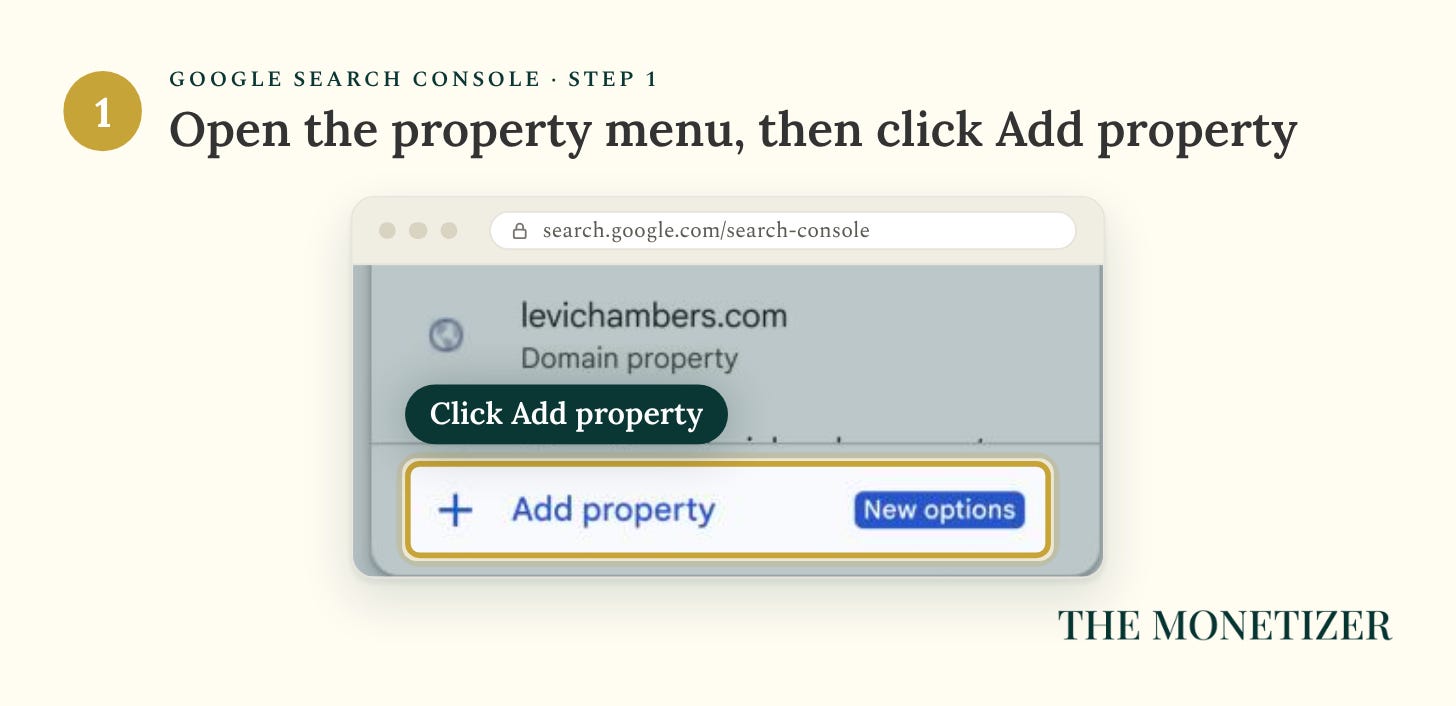
Step 1: Open Search Console and Add a Property
Sign in to Google Search Console. Open the property menu at the top left and click Add property. If you’ve never used Search Console, it may take you straight to this screen.
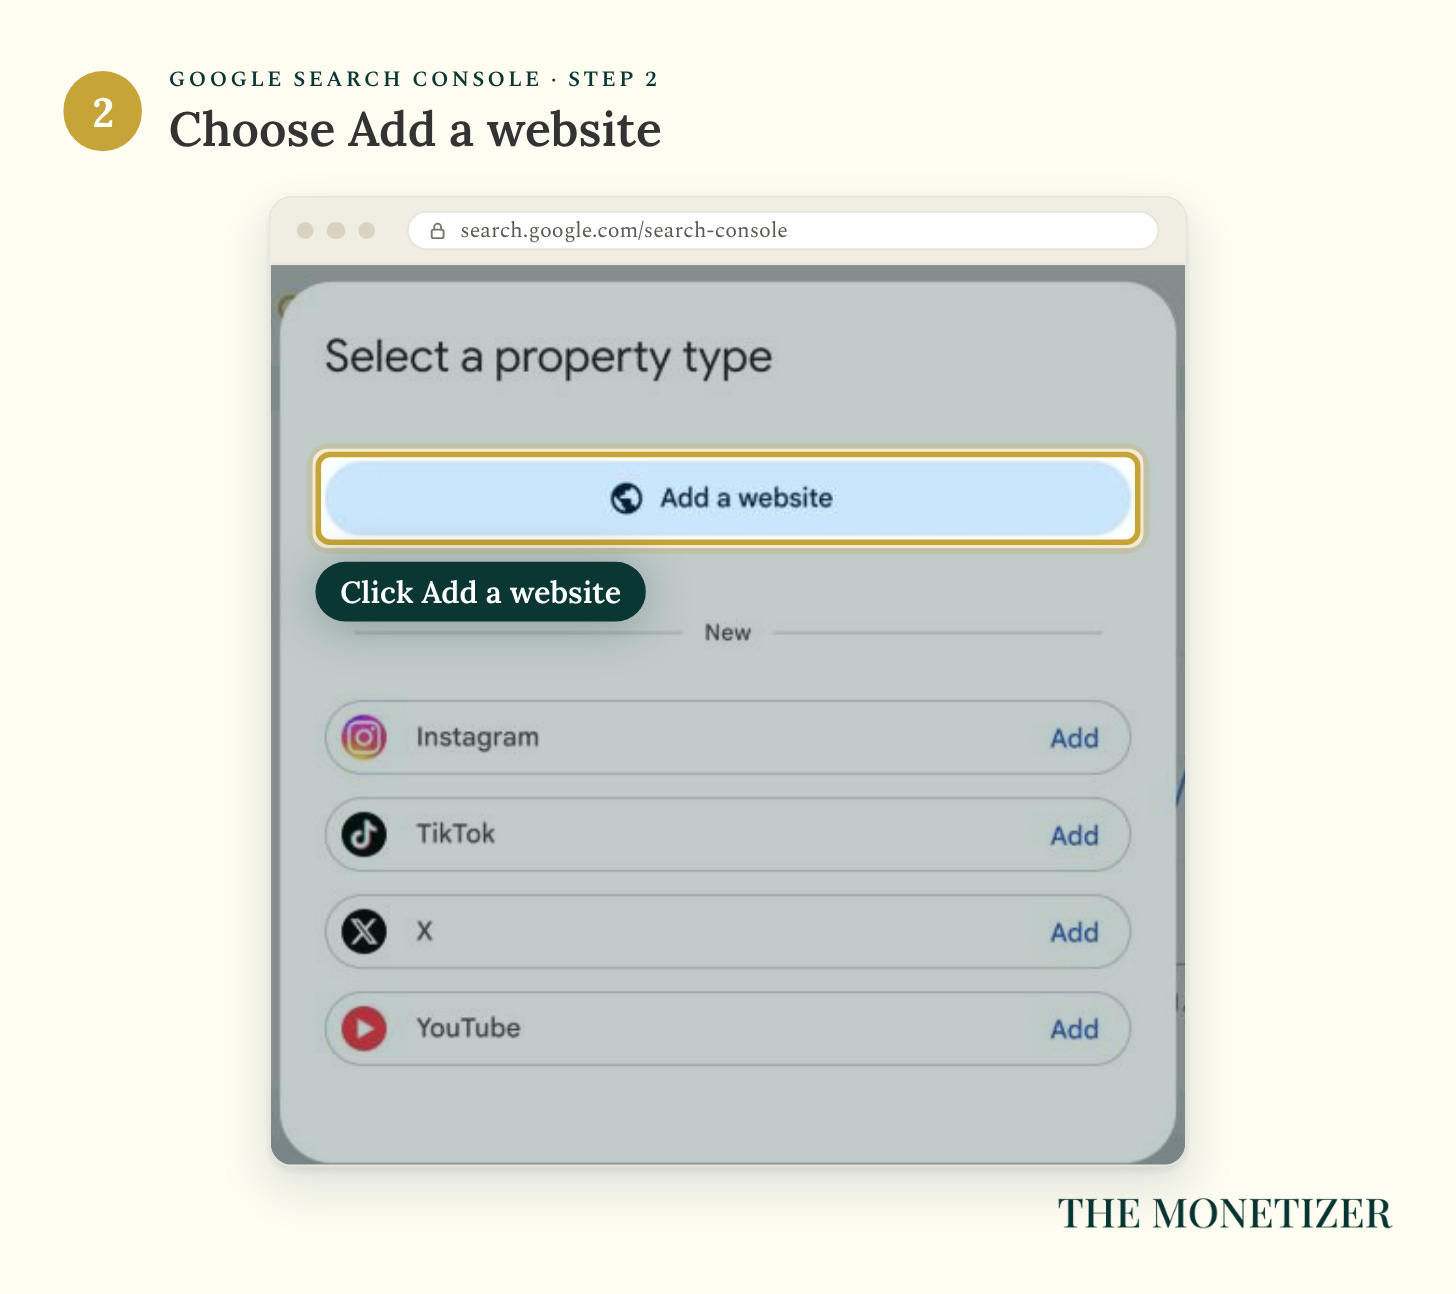
Step 2: Choose “Add a Website”
Click Add a website. Search Console may offer Instagram, TikTok, X, and YouTube properties too. We’re adding the Substack website here, so leave those for another time.
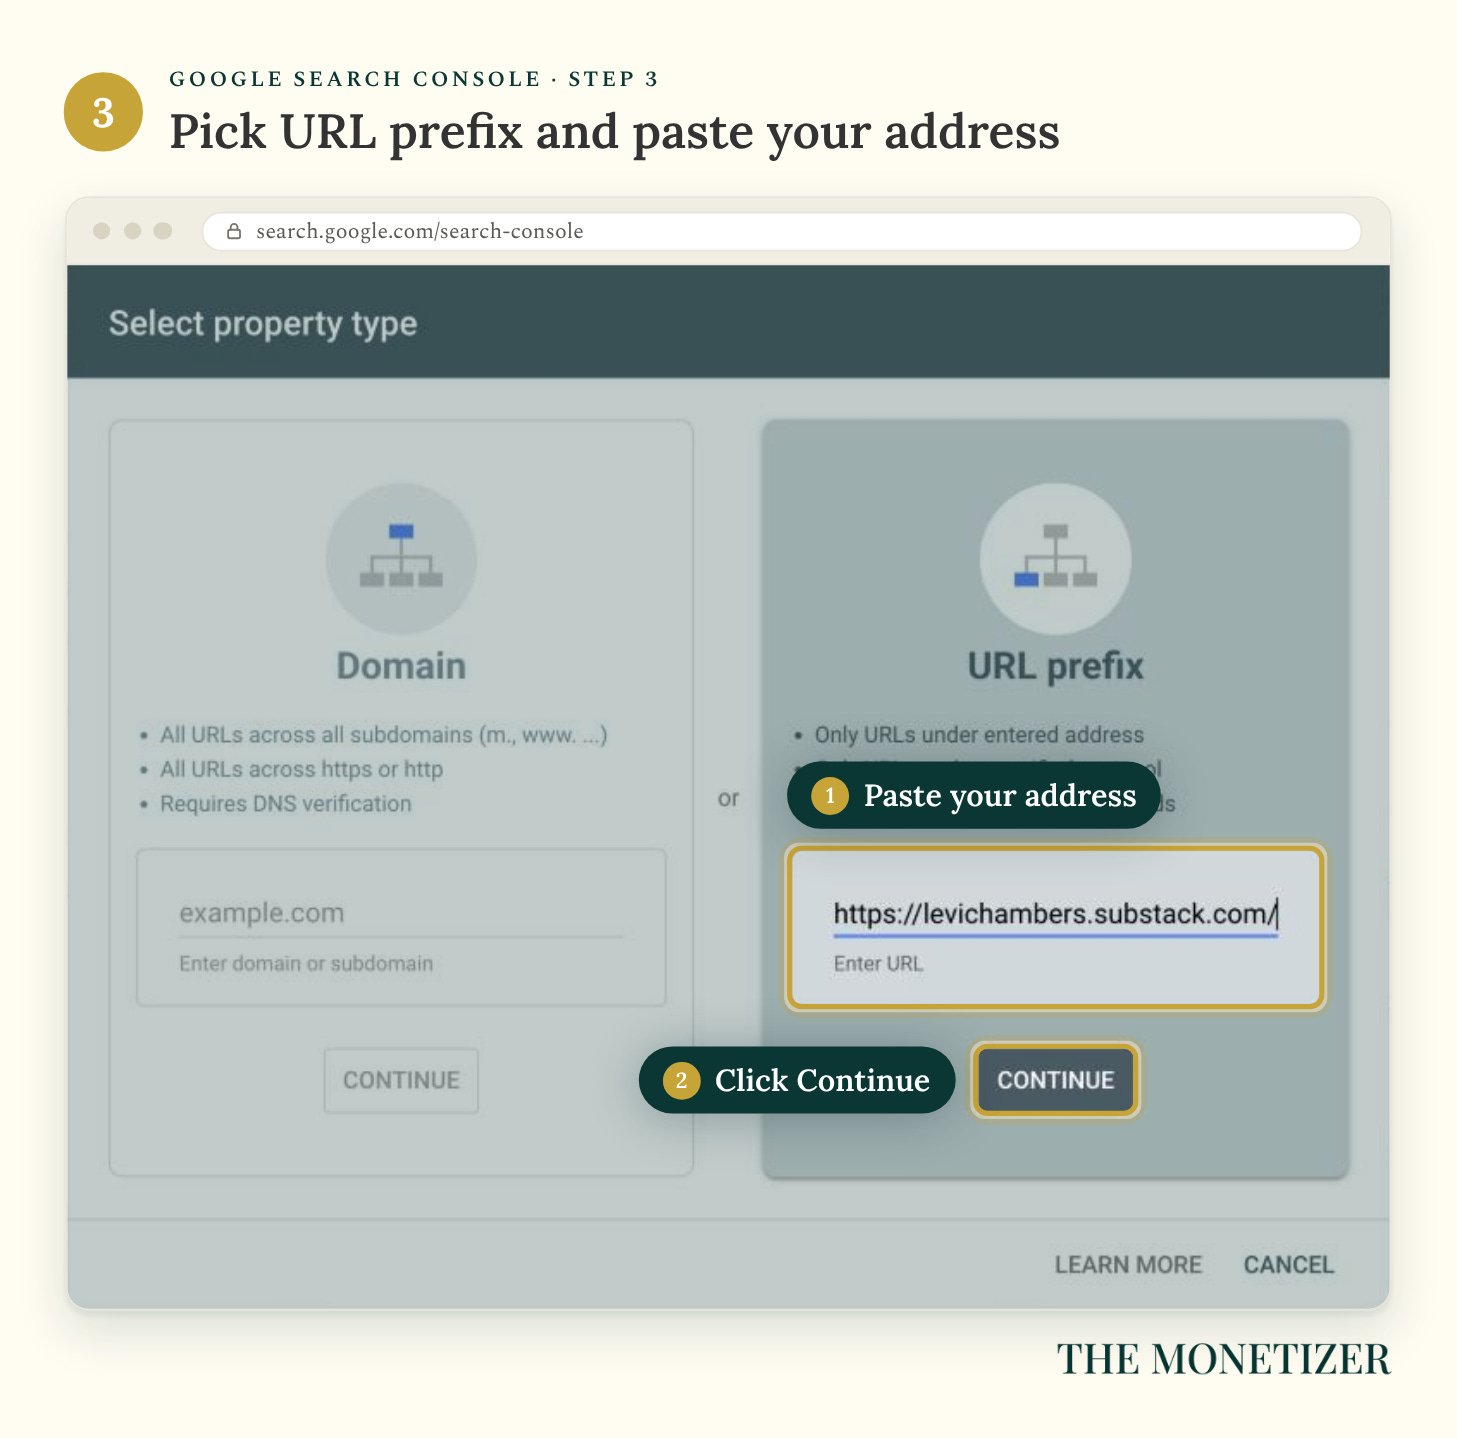
Step 3: Pick URL Prefix and Paste Your Address
Use URL prefix, the box on the right. Paste the homepage address from your earlier check. It should look like one of these:
https://yourname.substack.com/
https://www.yourdomain.com/ (if you have a custom domain)
Click Continue. The other box, Domain, requires access to DNS: the settings that connect a domain to its website. Substack controls those for a substack.com address. If you own a custom domain, you can use that option instead. I’ve included those instructions under “No Verification Box? Use Your Domain.”
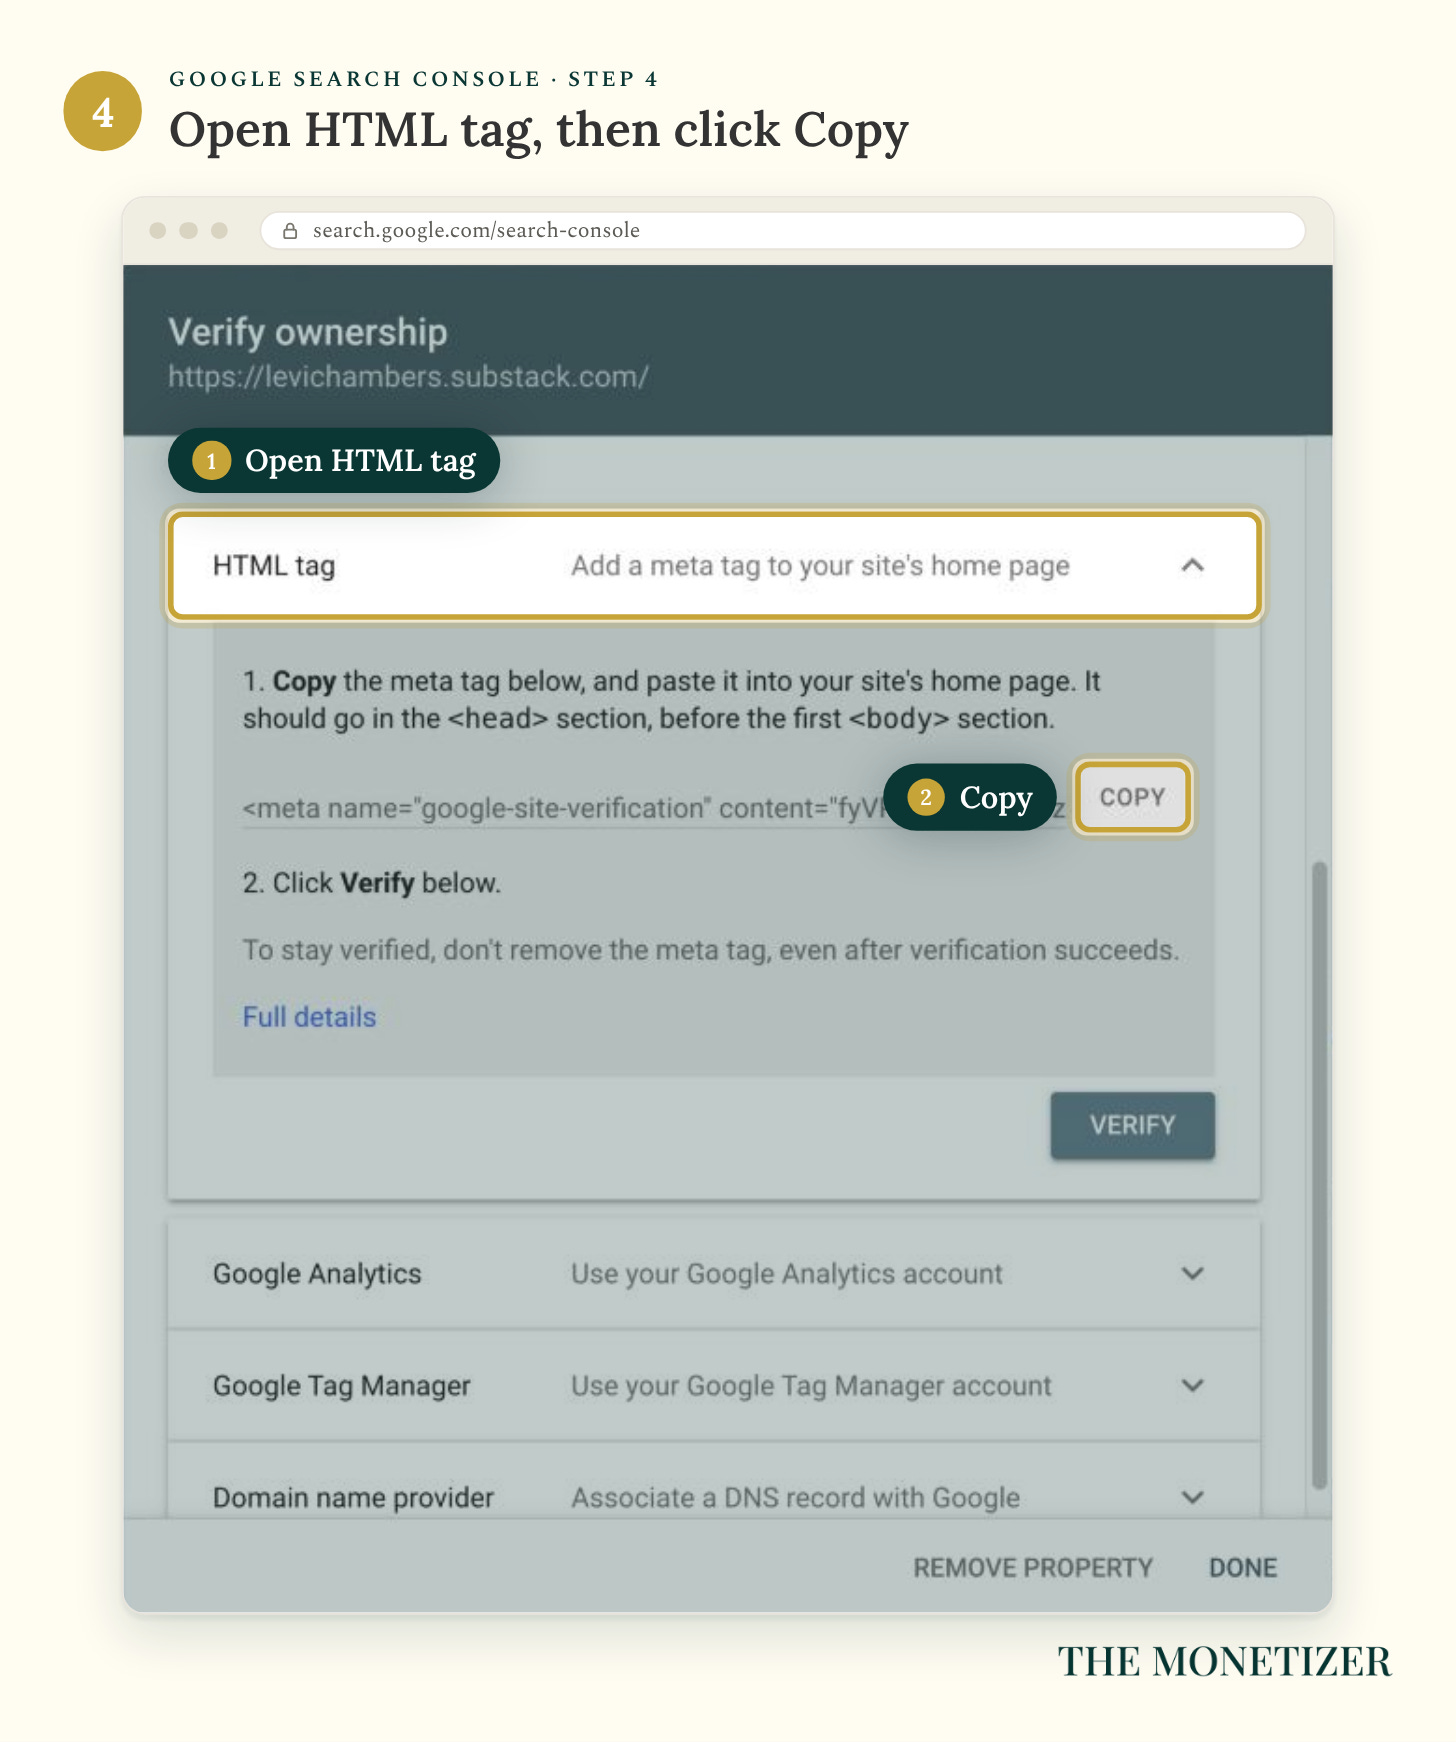
Step 4: Copy the HTML Tag
Google may recommend uploading an HTML file. That route won’t work here because Substack doesn’t let you place a verification file where Google needs it. Scroll to Other verification methods, open HTML tag, and click Copy.
You’ve copied a line beginning <meta name="google-site-verification". Keep it intact and leave this tab open. We’re taking it over to Substack, then coming right back.
Step 5: Paste the Tag Into Substack
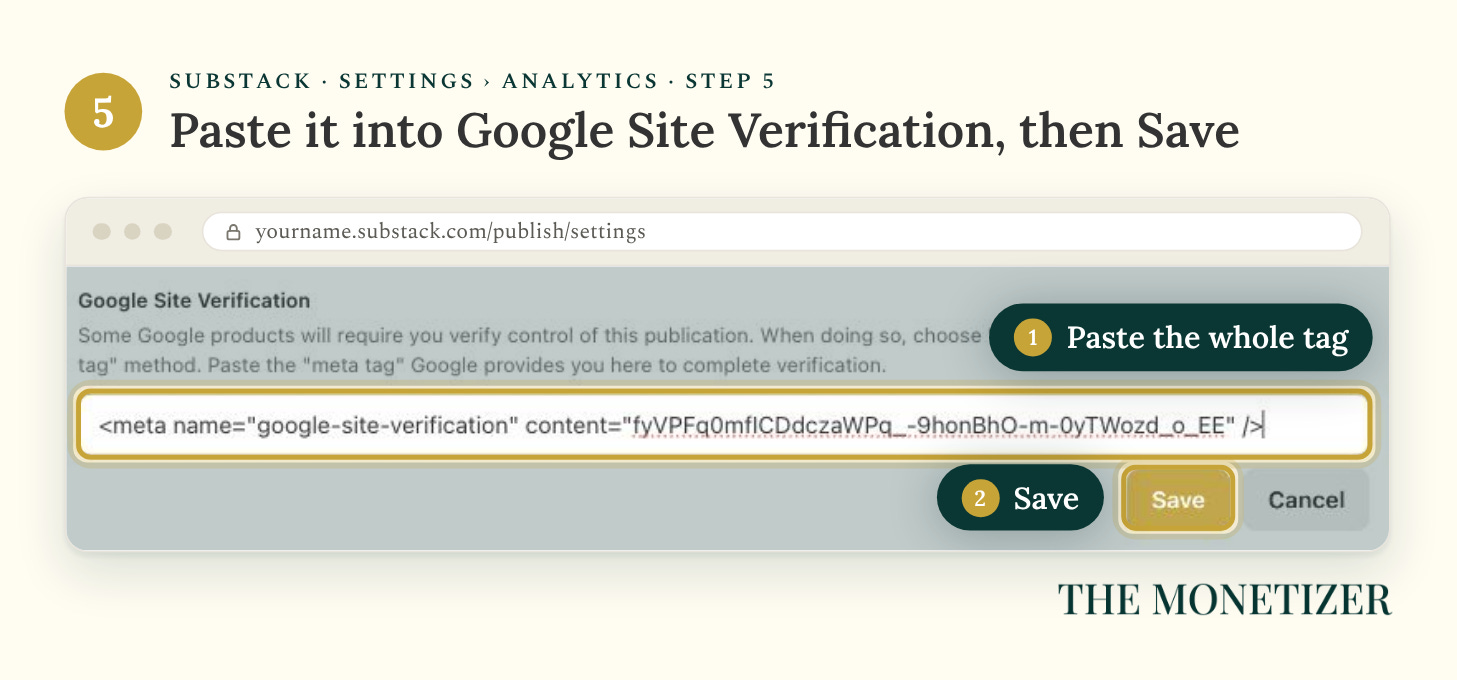
Open Substack in another tab. Under Settings → Analytics, find Google Site Verification. Paste the tag there and click Save.
After saving, mine showed only the token from inside the tag. Substack had shortened what I pasted. Google still accepted it, so don’t assume a shorter field means the save failed.
Step 6: Go Back and Click Verify
Back in Google, click Verify. A green Ownership verified message means this part worked.
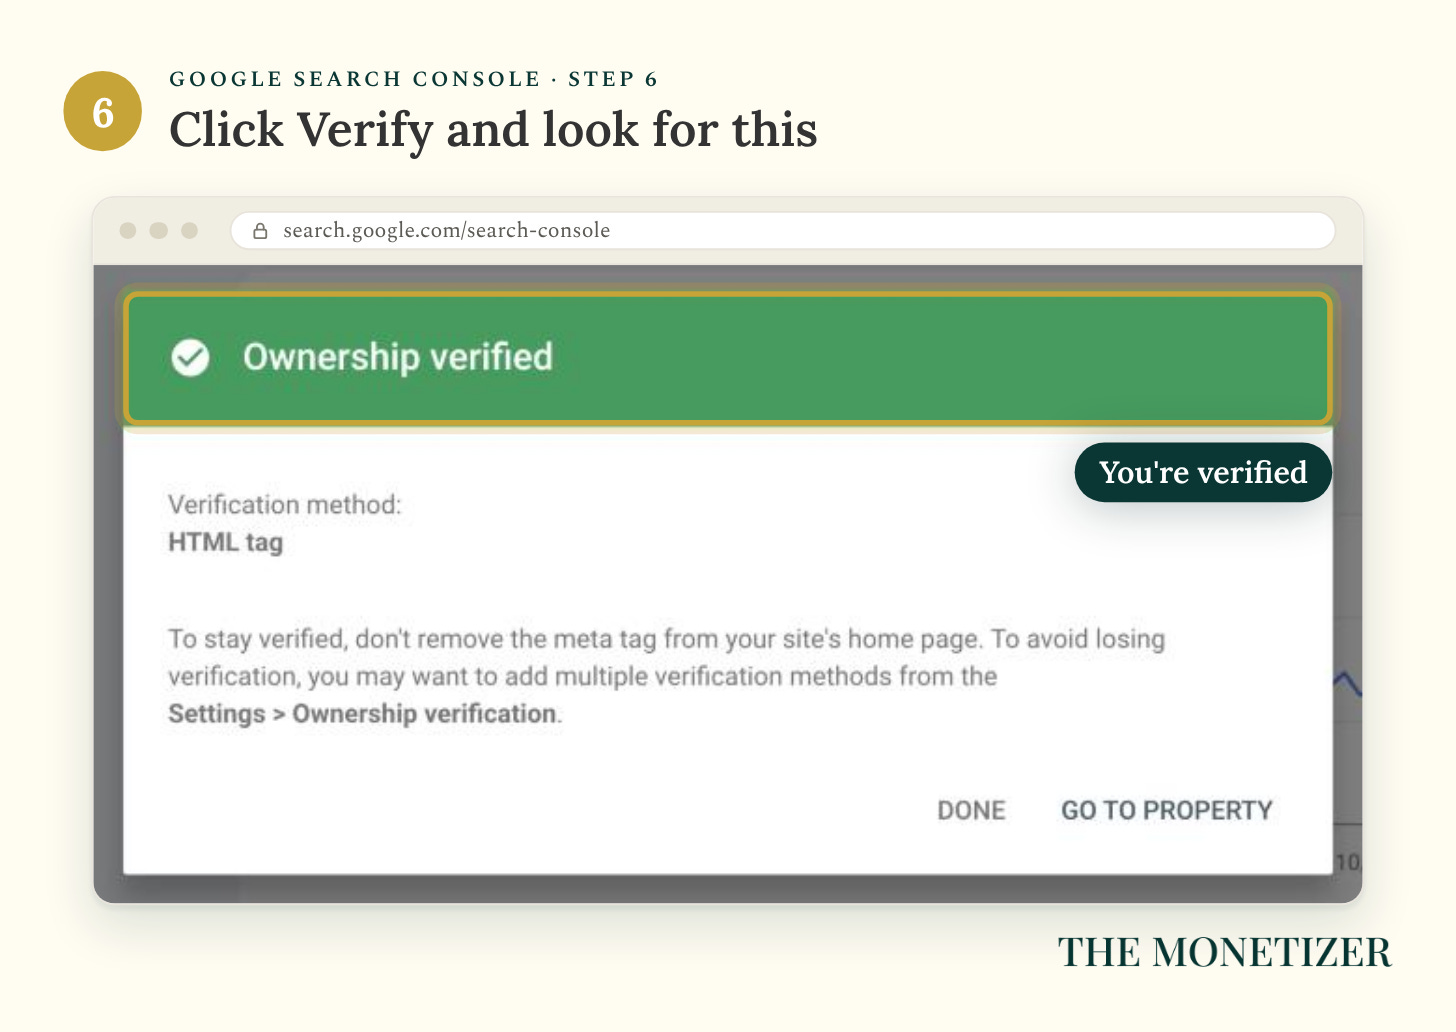
Keep that value in Substack. Google checks it again later. If verification fails, check the publication name and homepage address before pasting anything else. It’s easy to work in the wrong tab when you have several newsletters open. After confirming the value saved, give the change time to appear and try again.
Step 7: Submit Your Sitemap
A sitemap lists your pages for search engines. Open your homepage address with /sitemap.xml added at the end. For example, www.yourdomain.com/sitemap.xml. You’re looking for a list of addresses, possibly displayed as plain XML. It doesn’t need to look like a finished webpage.
No sitemap yet? You can still request individual pages in Step 8. Getting verified doesn’t necessarily mean Substack has made your sitemap available.
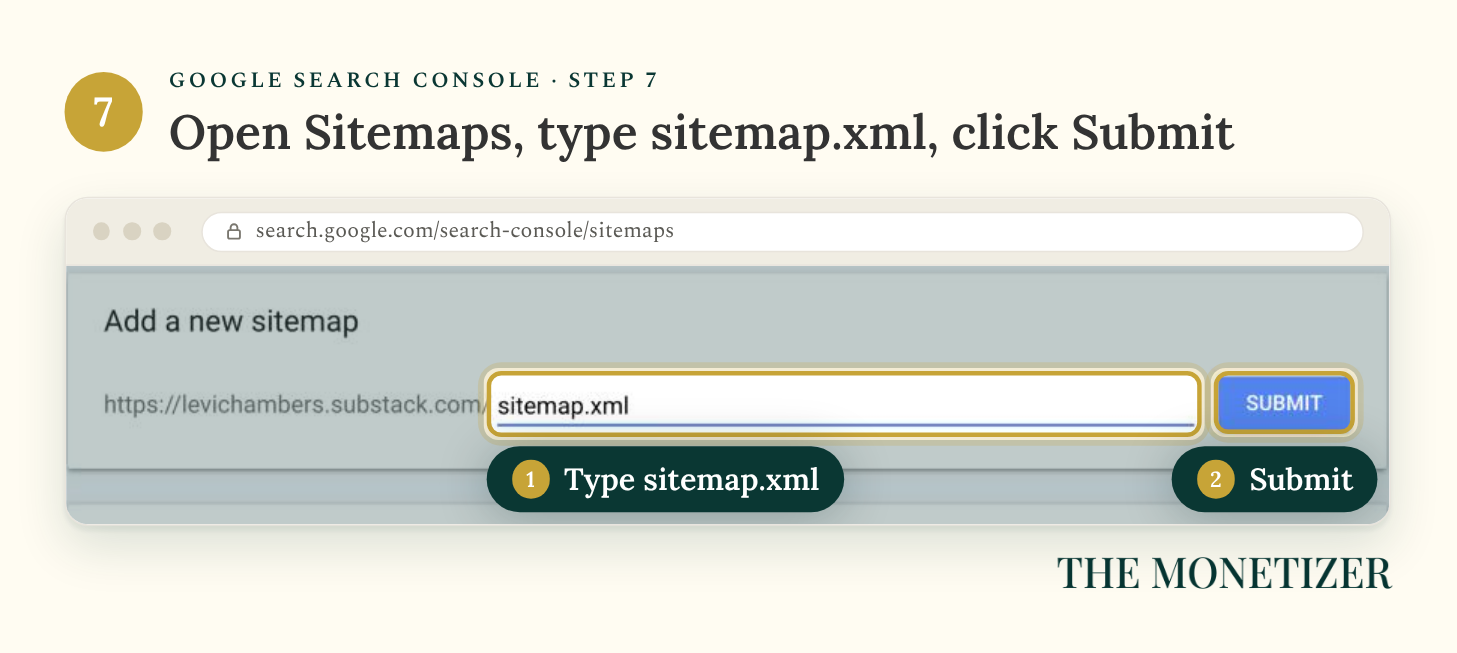
Open Sitemaps in Search Console. In my screenshot, Google has already filled in the beginning of the address. I only need to type sitemap.xml. If your box has no prefix, paste the complete sitemap address instead. Click Submit.
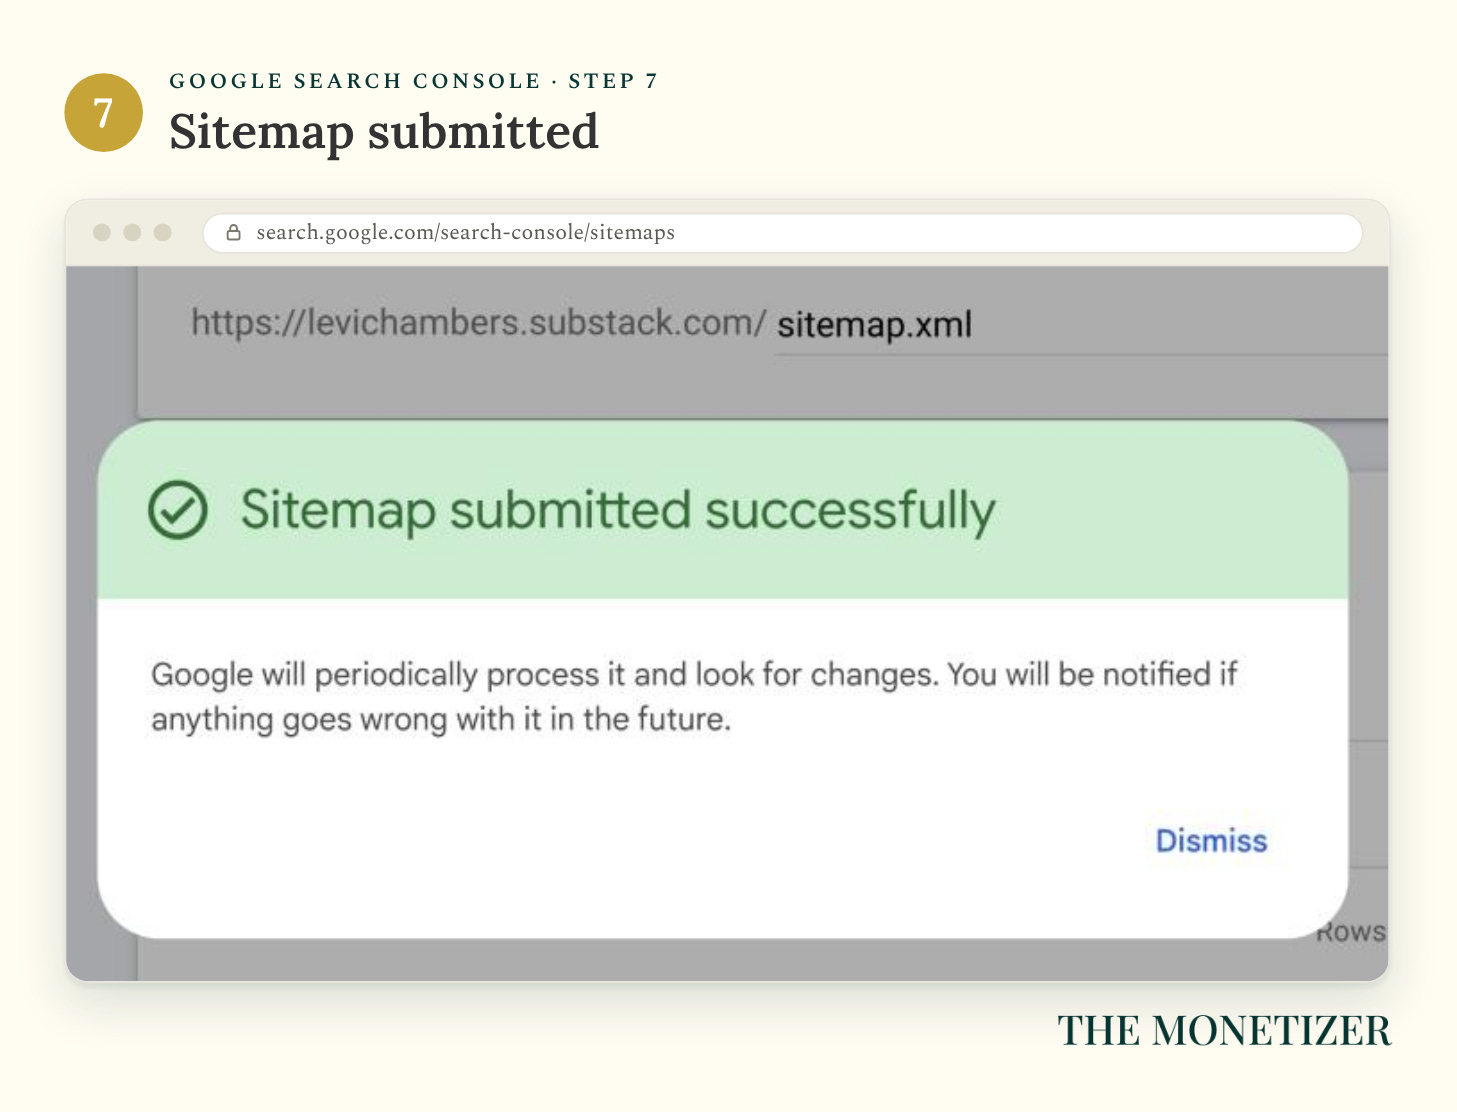
That confirmation is a receipt for your submission. The sitemap report will tell you whether Google managed to read the file. If you use a custom domain, check that the submitted address includes its correct hostname and any www.
Step 8: Ask Google to Index Your Best Posts
Paste a published post’s full address into the search bar at the top and press Enter. If Google hasn’t indexed it, open the details and read the explanation. Test live URL checks whether Google can access the page now. When the page is accessible and eligible for indexing, click Request indexing.
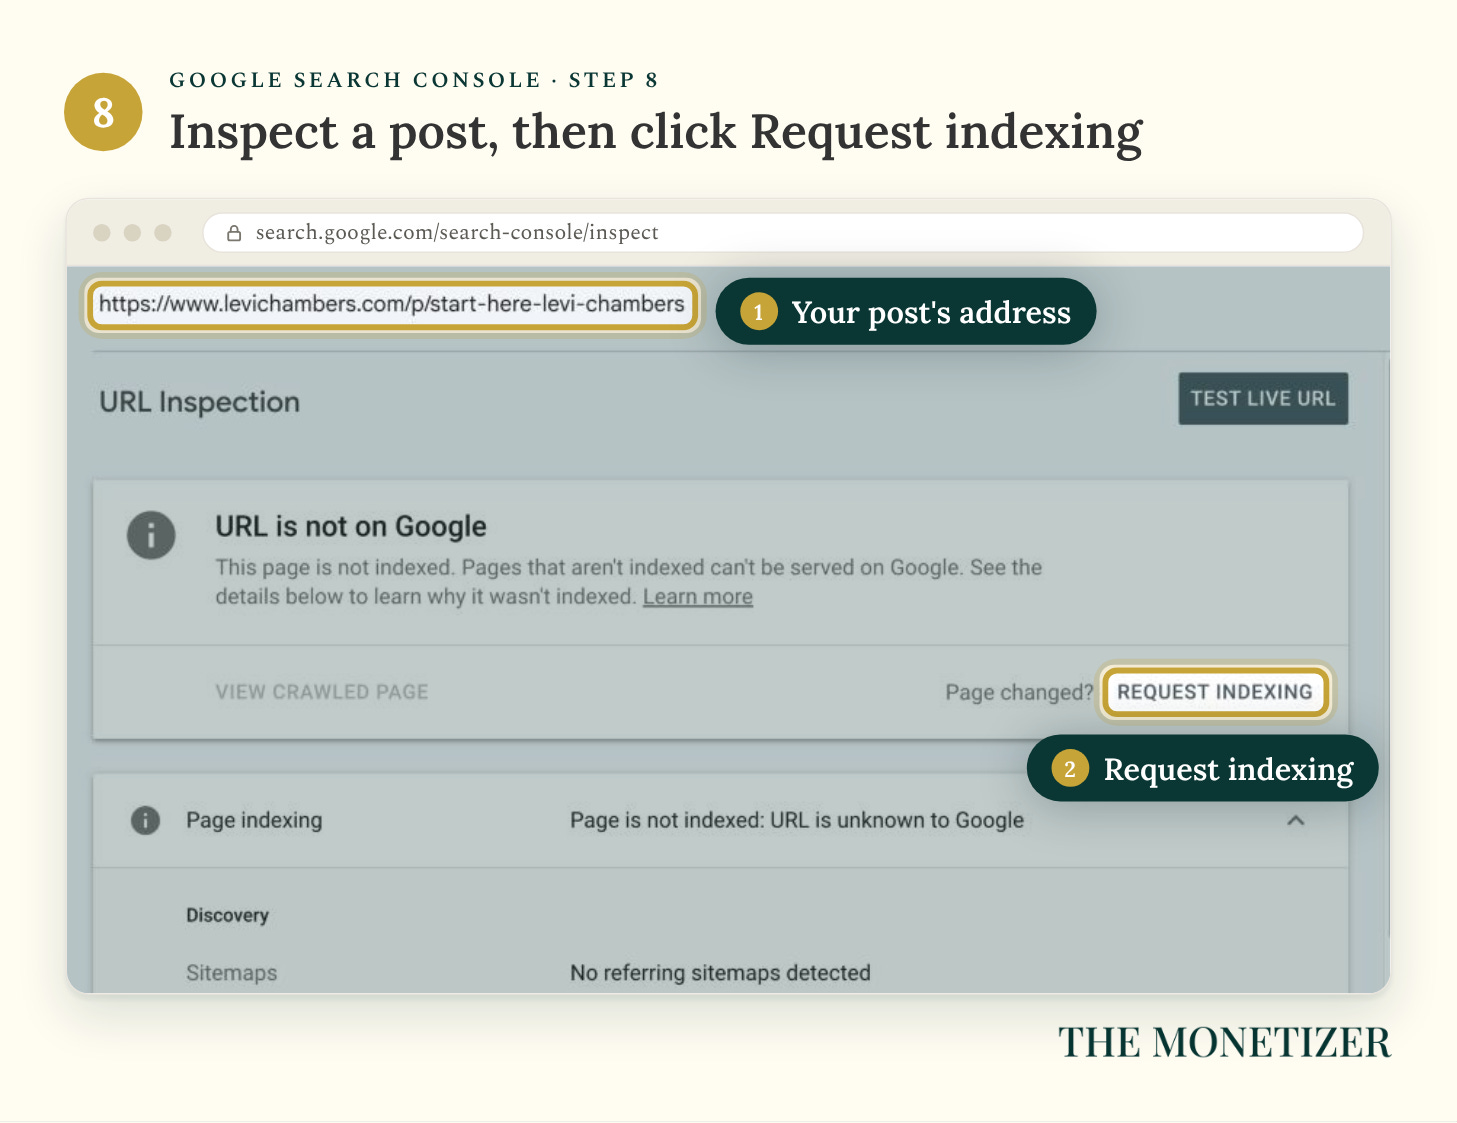
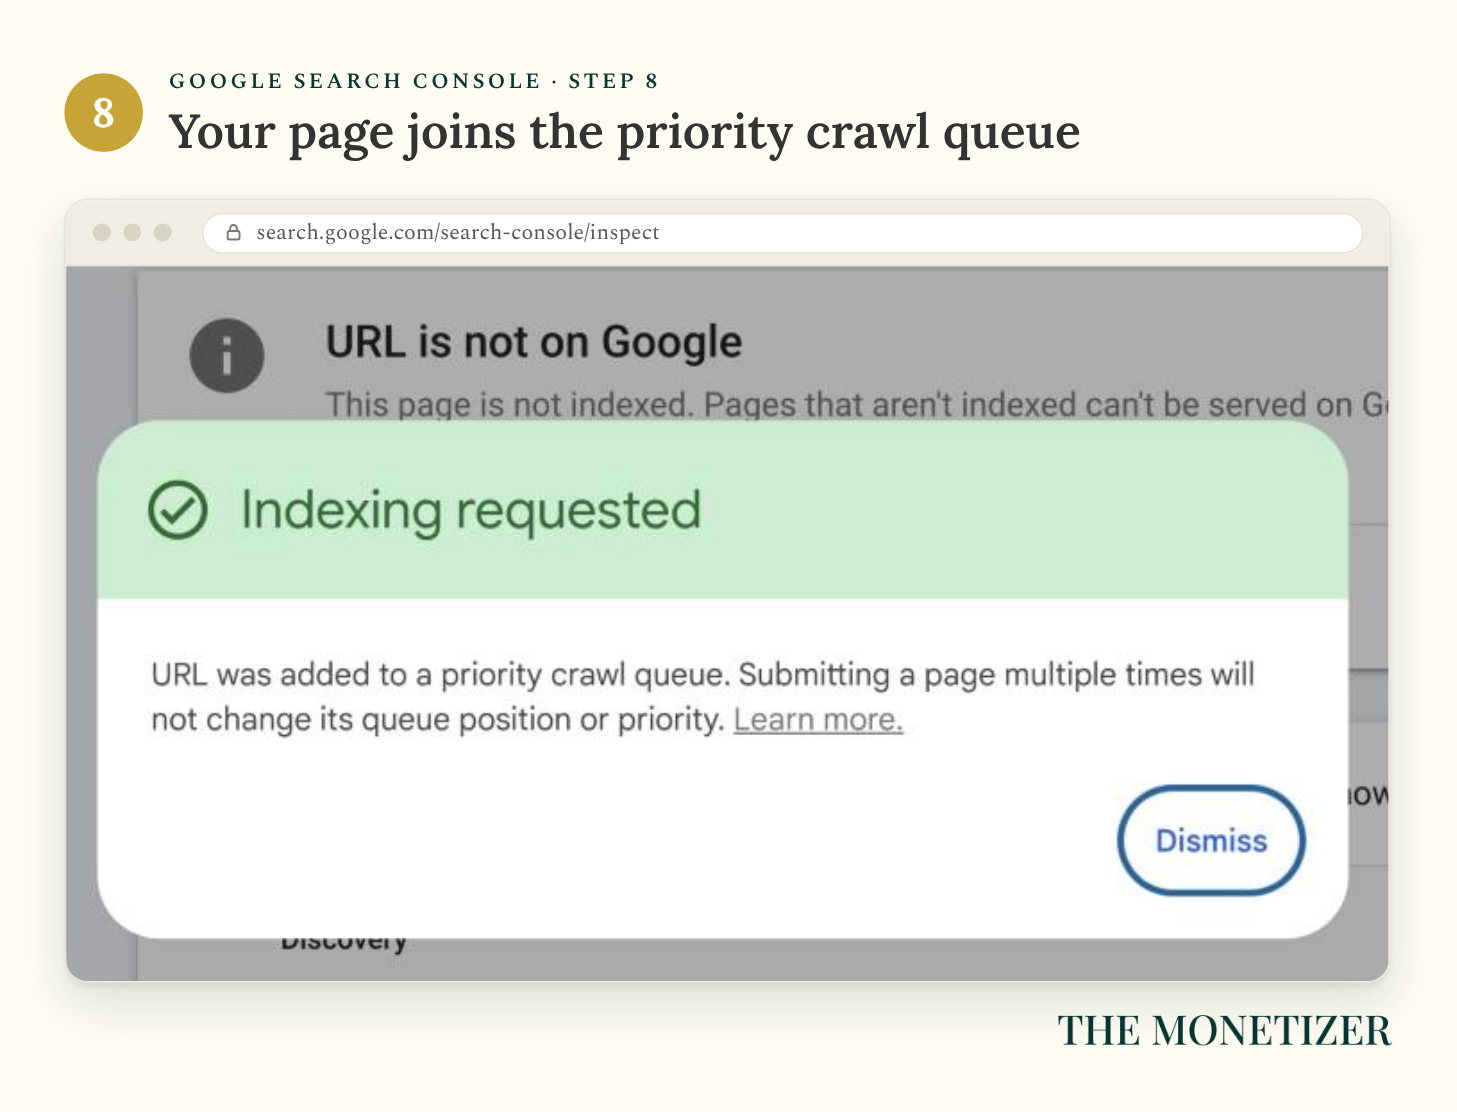
I’d begin with your Start Here or About page, followed by your five strongest public posts. Use published addresses, not draft or preview links. Google says crawling can take days to weeks, and the request doesn’t guarantee indexing. There’s a daily submission limit, too. Asking again for the same page won’t move it along faster.
What “Couldn’t Fetch” Actually Means
Here’s the less satisfying screen from my setup. Search Console reported Couldn’t fetch for levichambers.com. It had the sitemap address, but that status meant Google hadn’t successfully retrieved the file.
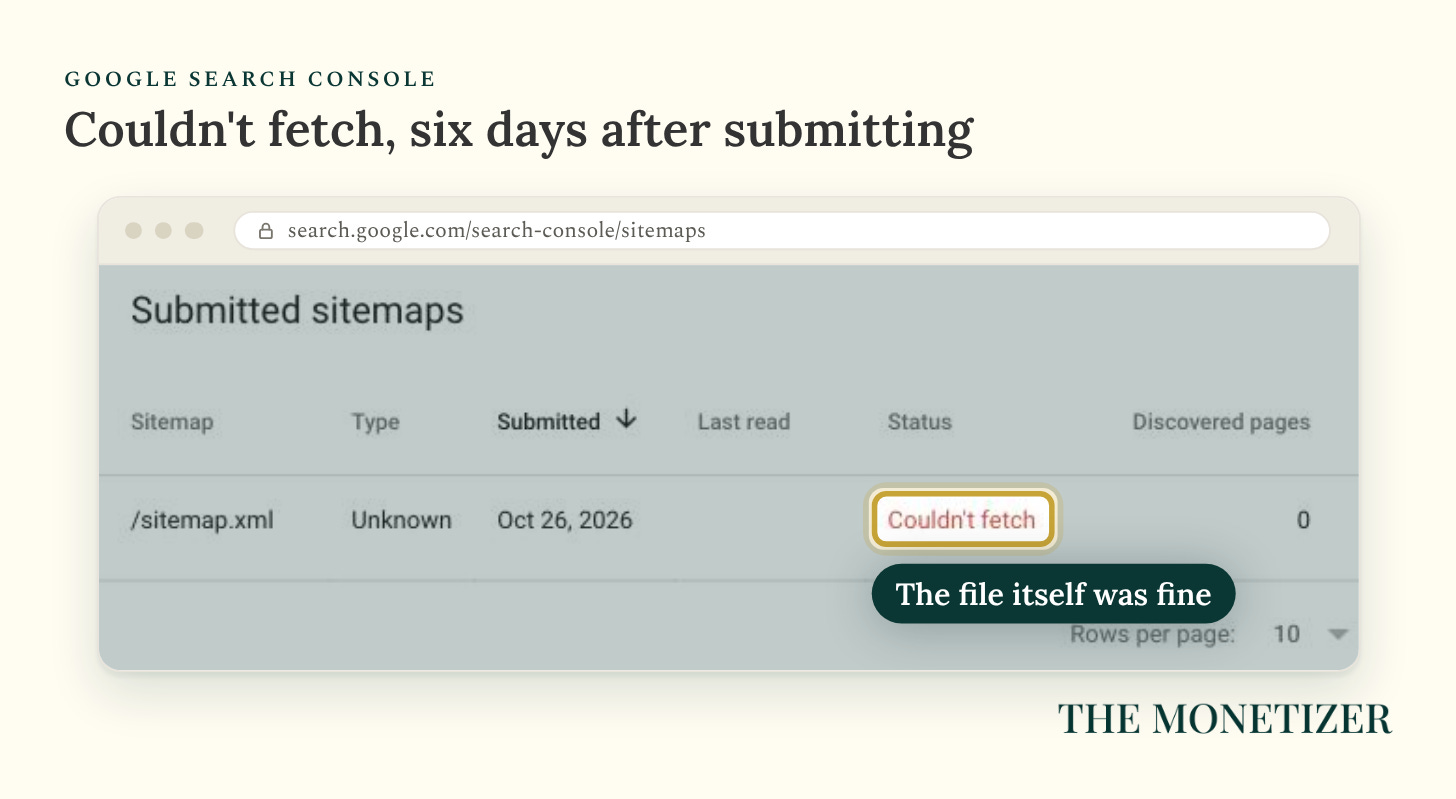
Bing read that same sitemap without errors that afternoon. That helped narrow the problem, but it didn’t tell me why Google couldn’t fetch it. The Monetizer’s sitemap showed what I wanted to see: Success, with 85 pages discovered.
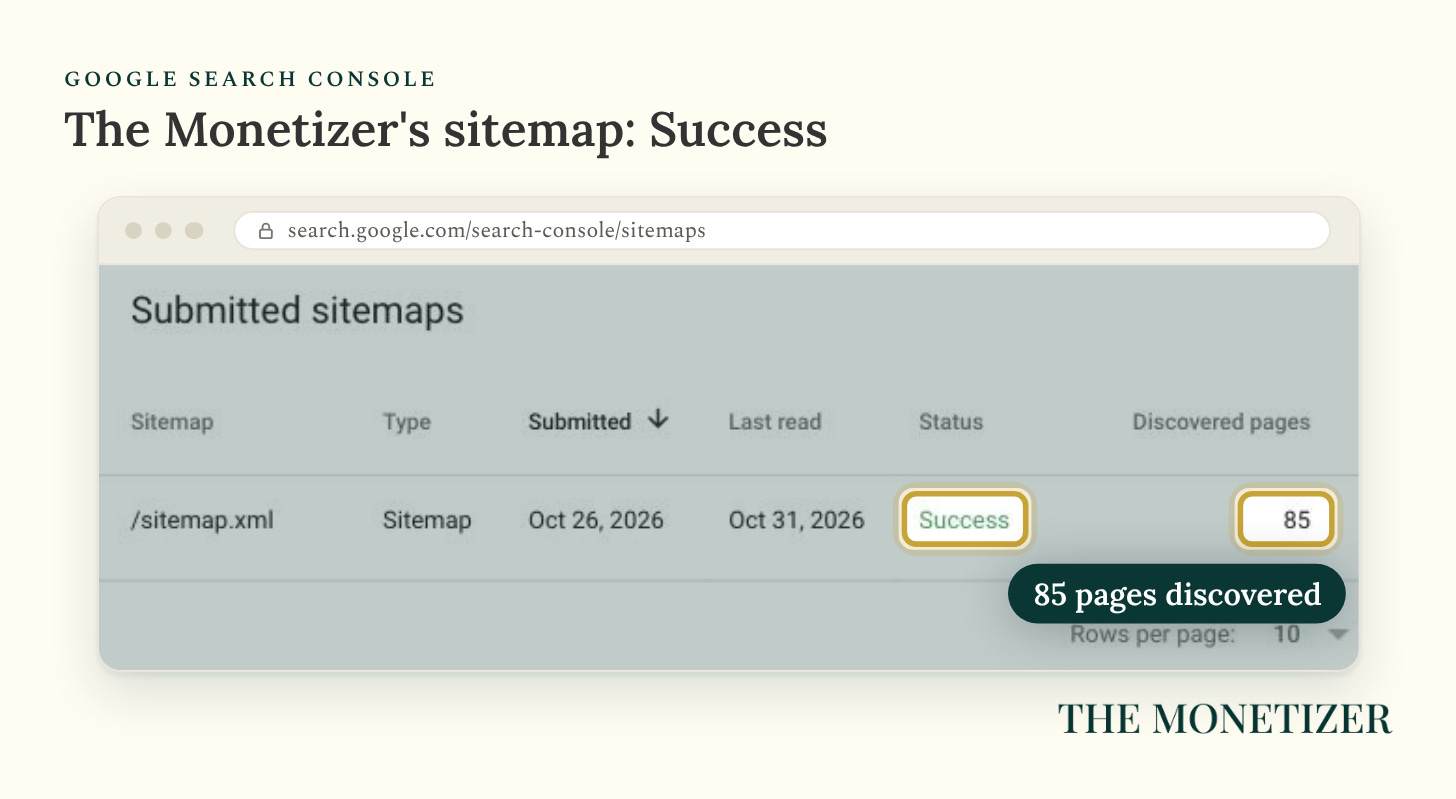
If yours says Couldn’t fetch, use Google’s troubleshooting instructions to check the actual failure:
Open the exact sitemap URL you submitted. Check the spelling,
https, andwww.Click the failed sitemap in Search Console and read its error details.
Inspect that sitemap URL, then run Test live URL. Look for crawl permission and a successful page fetch.
Correct a wrong address or access problem before resubmitting. If the tests pass, allow time for Google to retry.
Opening the file yourself only proves your browser can retrieve it. Google’s fetch result is the useful check here. Once the sitemap succeeds, use URL Inspection to check individual posts. The discovered-page count doesn’t tell you how many pages Google has indexed.
No Verification Box? Use Your Domain
I verified levichambers.com through DNS. If you own a custom domain, this gives you another way in when Substack’s verification box is missing. A Domain property covers the domain with or without www, across http and https.
In Step 3, choose Domain instead of URL prefix. Type your domain without https or www, like yourdomain.com.
Google gives you a TXT record, a short line of text that proves you control the domain. Some providers, like Cloudflare, let Google add it for you in a few clicks.
Otherwise, copy the record. Log in to the provider managing your domain’s DNS, open its DNS settings, and add a new TXT record with that text. Your DNS provider may differ from the company where you bought the domain.
Go back to Search Console and click Verify. DNS changes can take a while to kick in, so try again later if it fails.
Add Google’s record alongside the existing ones. Leave the records connecting your domain to Substack in place. Once Google verifies ownership, return to Step 7 and submit your sitemap. With a Domain property, you’ll usually enter the full sitemap address.
Part 2: Add Google Analytics to Your Substack
Next comes the traffic. Someone can find a post through Google, a shared link, or a social feed. Analytics helps you see which route brought them to your website and what they read once they arrived.
Substack’s integration tracks page views, sign-ups, and paid-subscription events. Your email opens and reading inside the Substack app belong in Substack’s own stats. If the two dashboards show different totals, remember that they’re counting different activity.
First, a naming problem. Google gives you an account, a property, and a data stream. The account can hold several publications. The property holds this publication’s reporting. Its web stream connects that reporting to your website.
New to Analytics? Start at Step 1. Already have an account? Create this publication’s property at Step 3. If the property already exists, go to Step 6 and open its web stream. There’s no benefit in creating duplicates.
Step 1: Create an Account
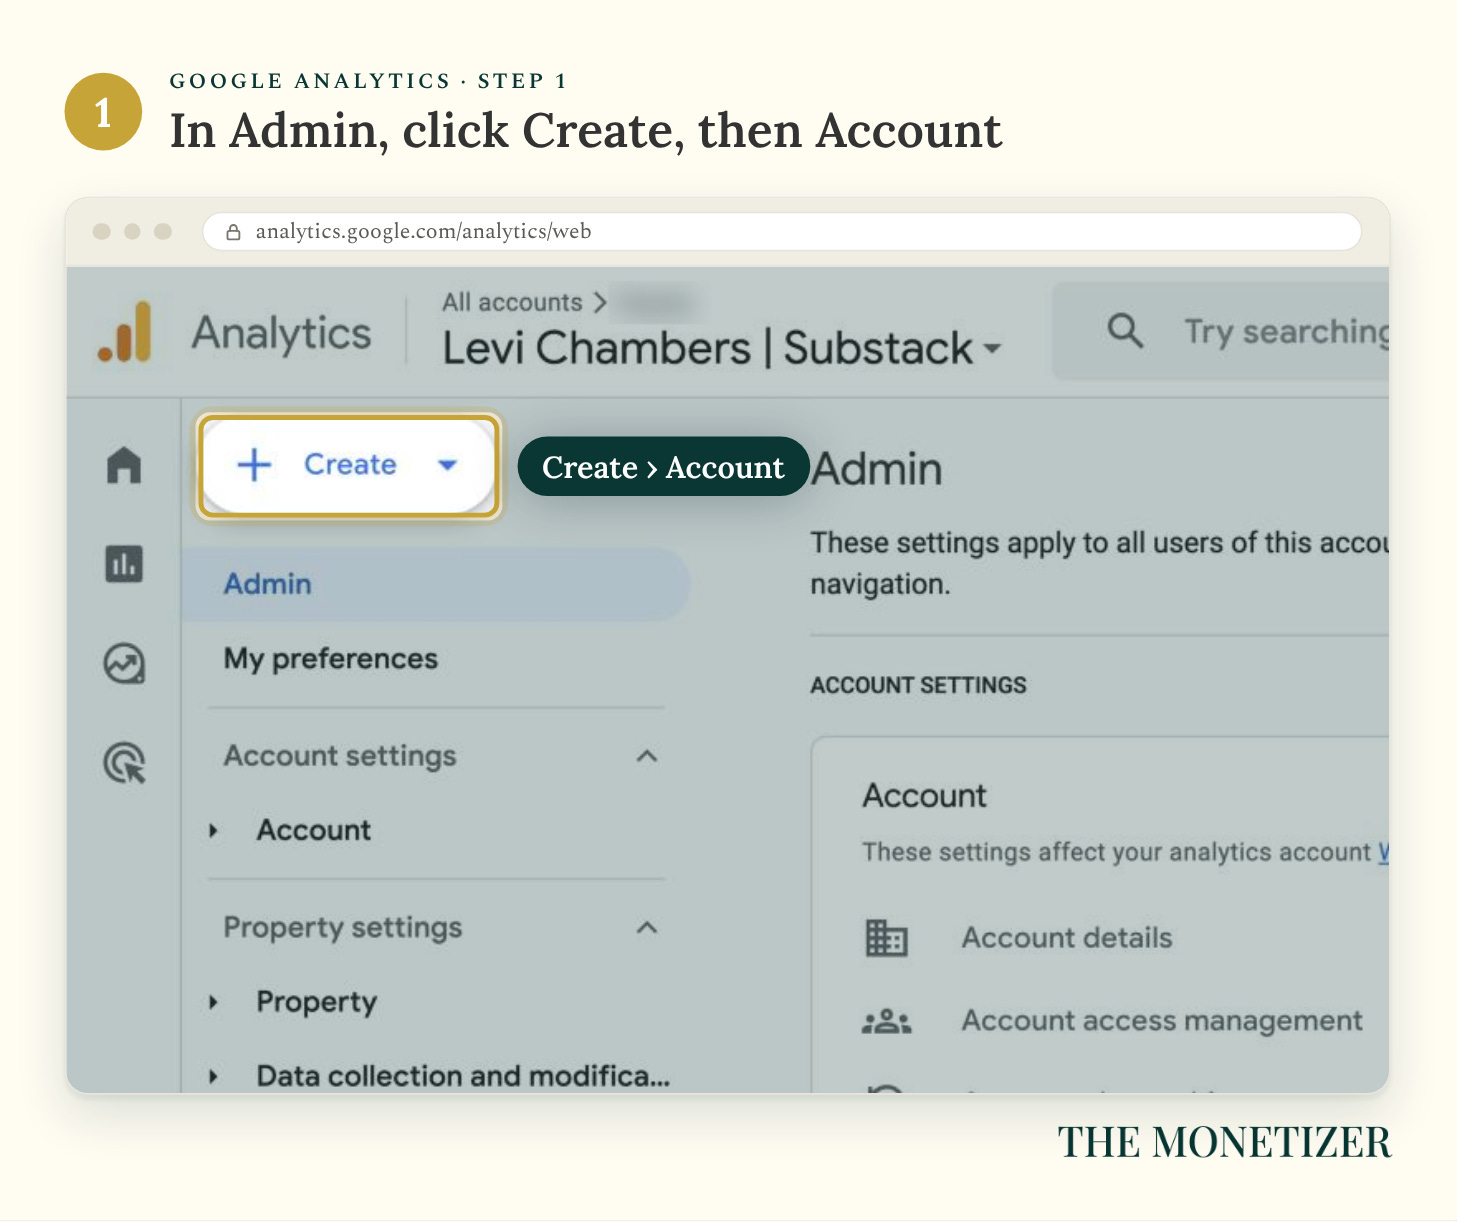
Open Google Analytics and choose Start measuring if this is your first account. Otherwise, Admin → Create → Account adds another account. For another newsletter within your existing account, skip ahead to the property.
Step 2: Name Your Account
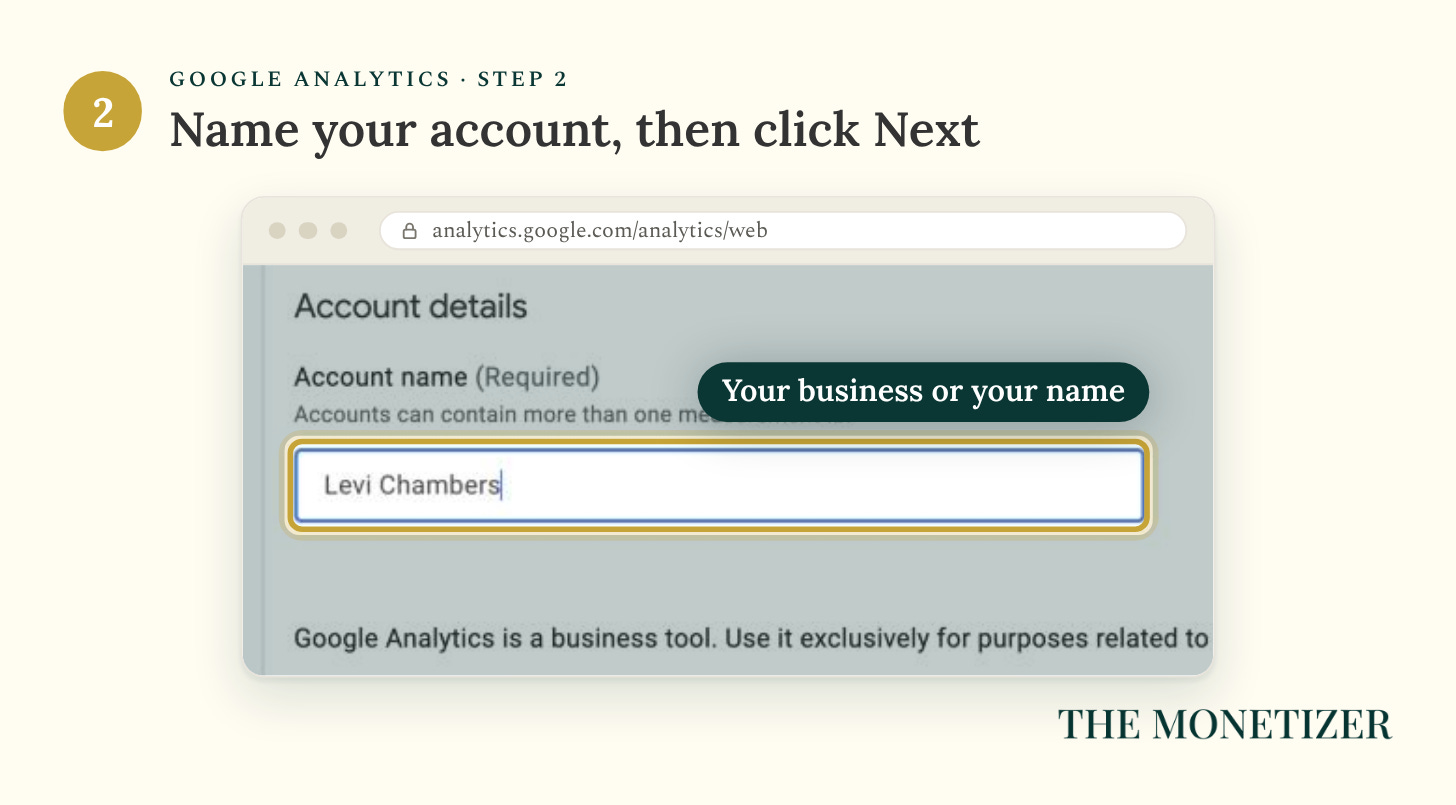
Your business name works here. So does your own name. Review the optional data-sharing checkboxes beneath it, make your choices, and click Next.
Step 3: Create a Property
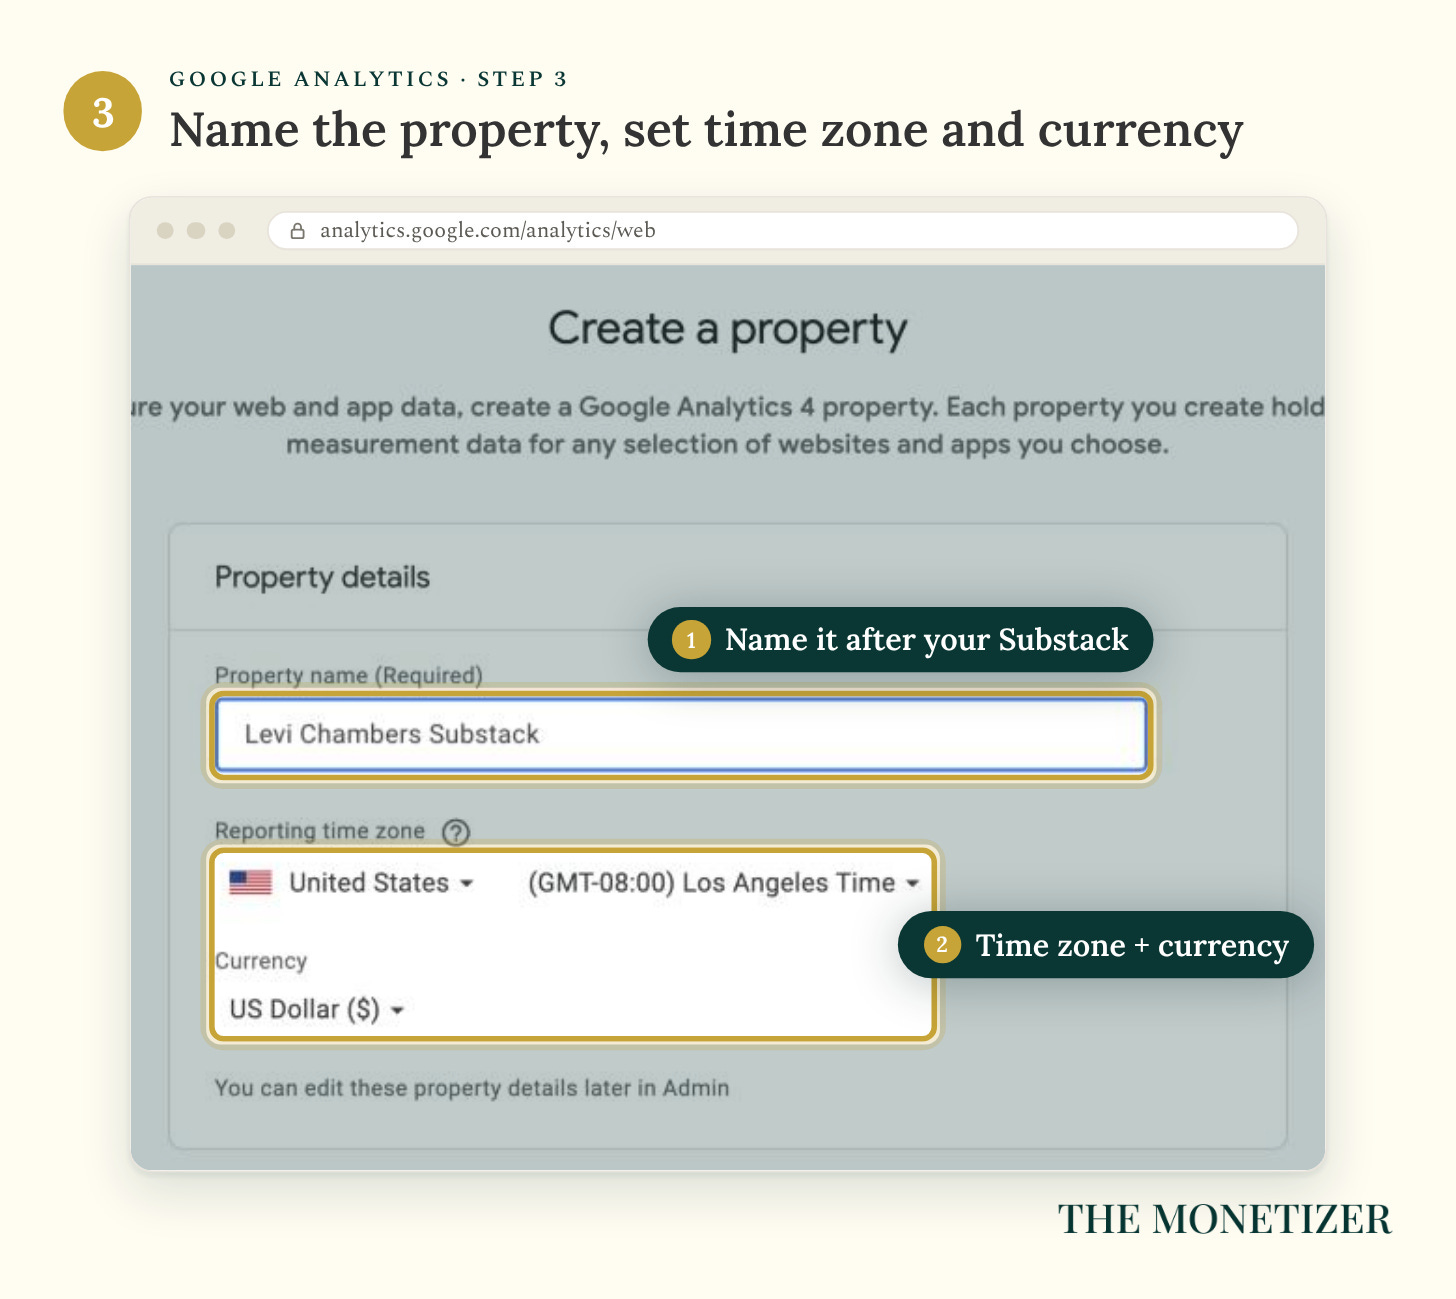
Name this property after your Substack so you can find it later. Set the reporting time zone and currency, then click Next. Joining from an existing account? Open Admin → Create → Property to reach this screen.
Step 4: Describe Your Business
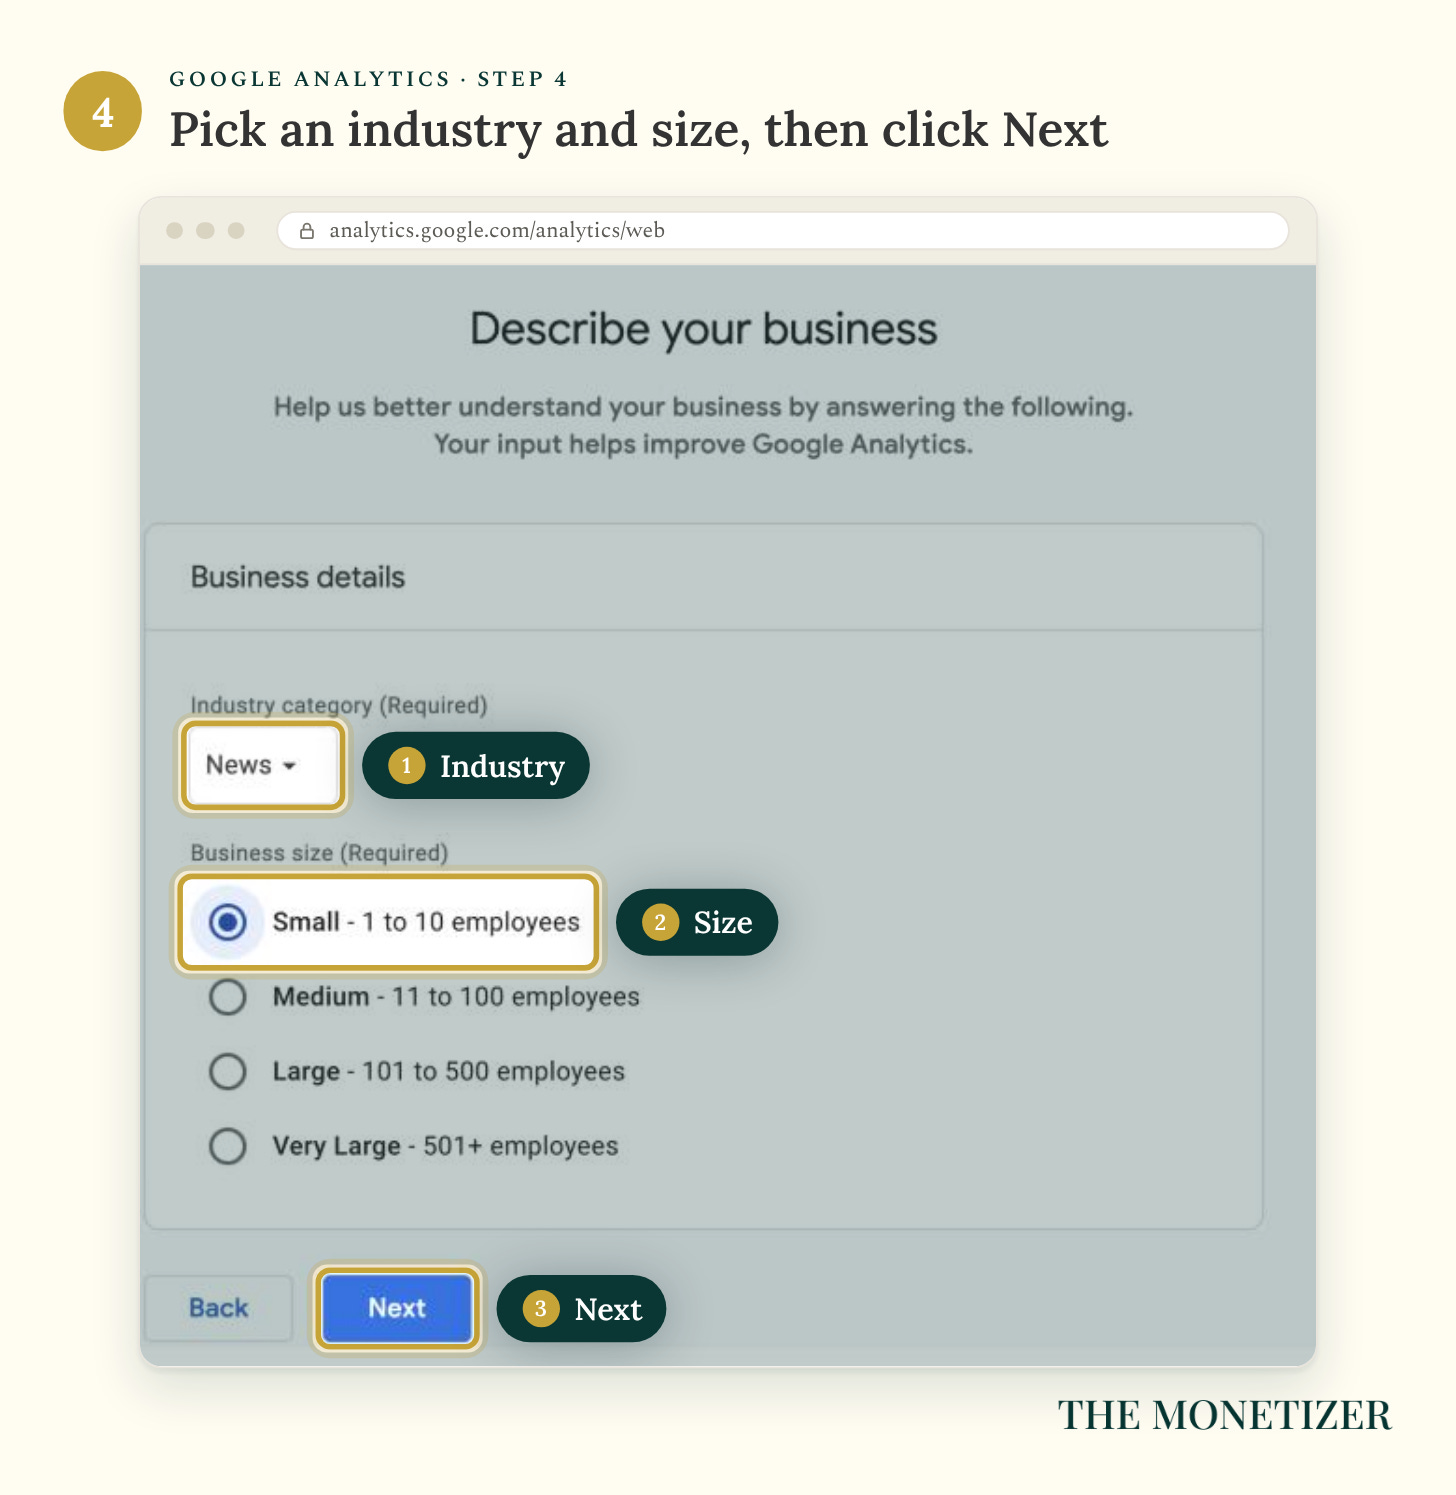
I chose News for the industry. Choose whichever category fits your publication, add your business size, and click Next.
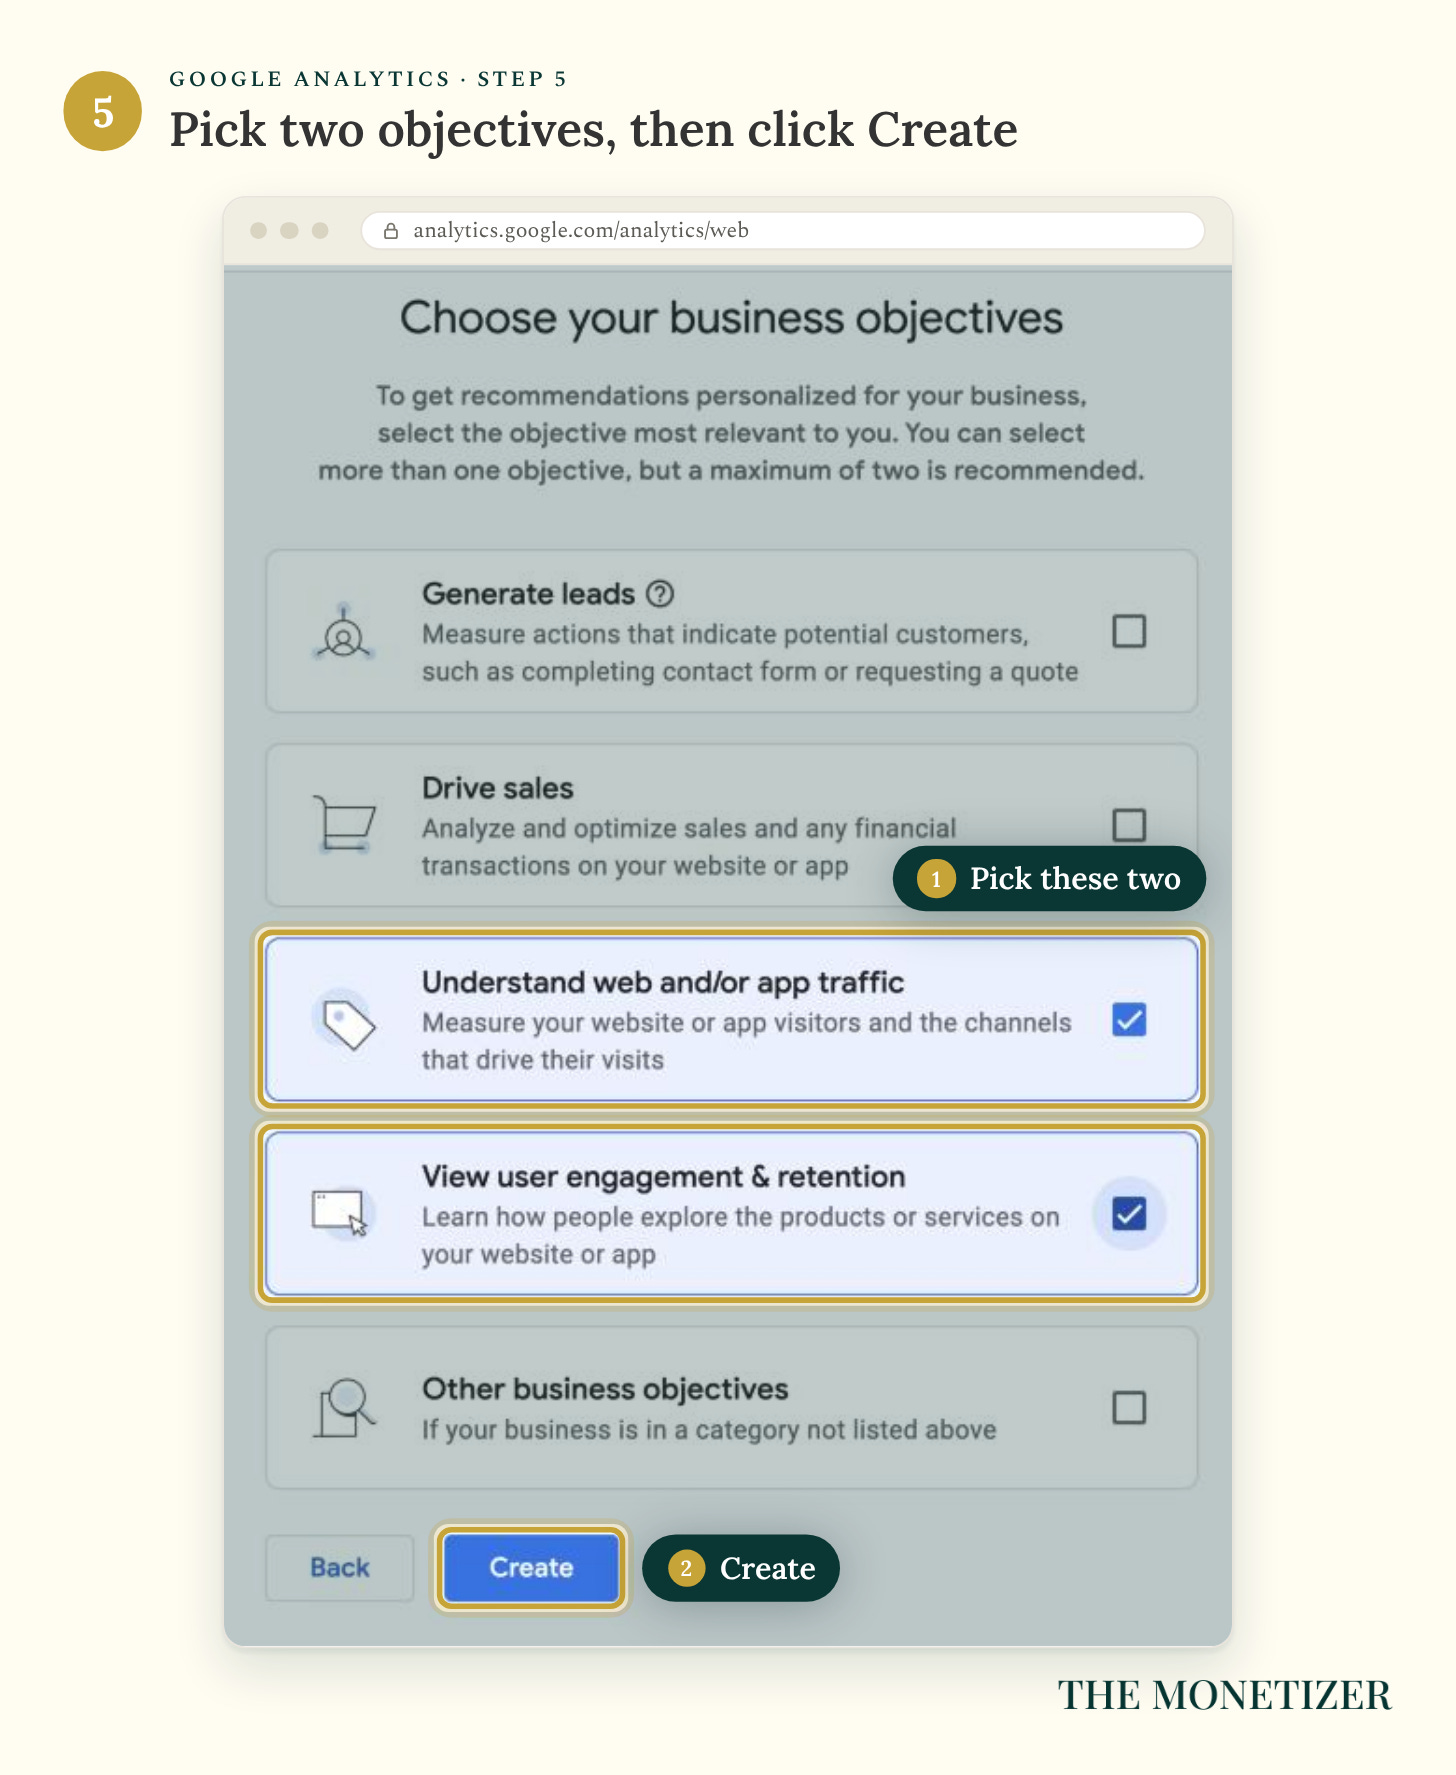
Step 5: Pick Your Objectives and Click Create
The two options used here are Understand web and/or app traffic and View user engagement & retention. Google recommends picking no more than two objectives. Click Create, read the terms, and accept them if you agree.
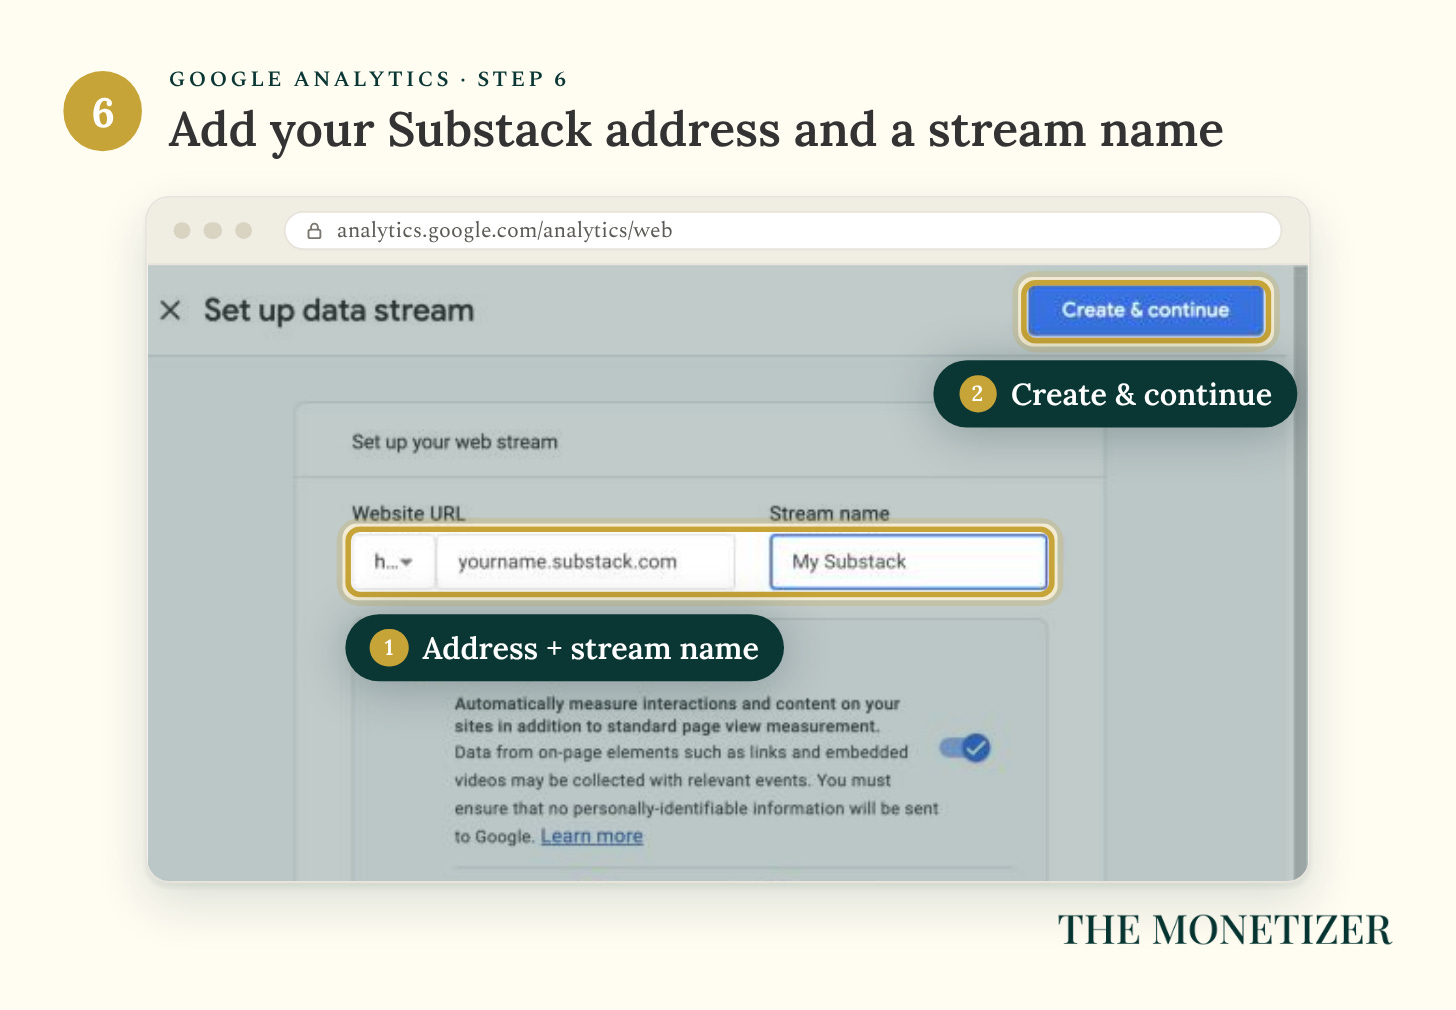
Step 6: Add a Web Data Stream
Choose Web. Enter your publication’s address and give the stream a name you’ll recognize. Leave Enhanced measurement on to capture interactions such as scrolling and outbound clicks. Then click Create & continue.
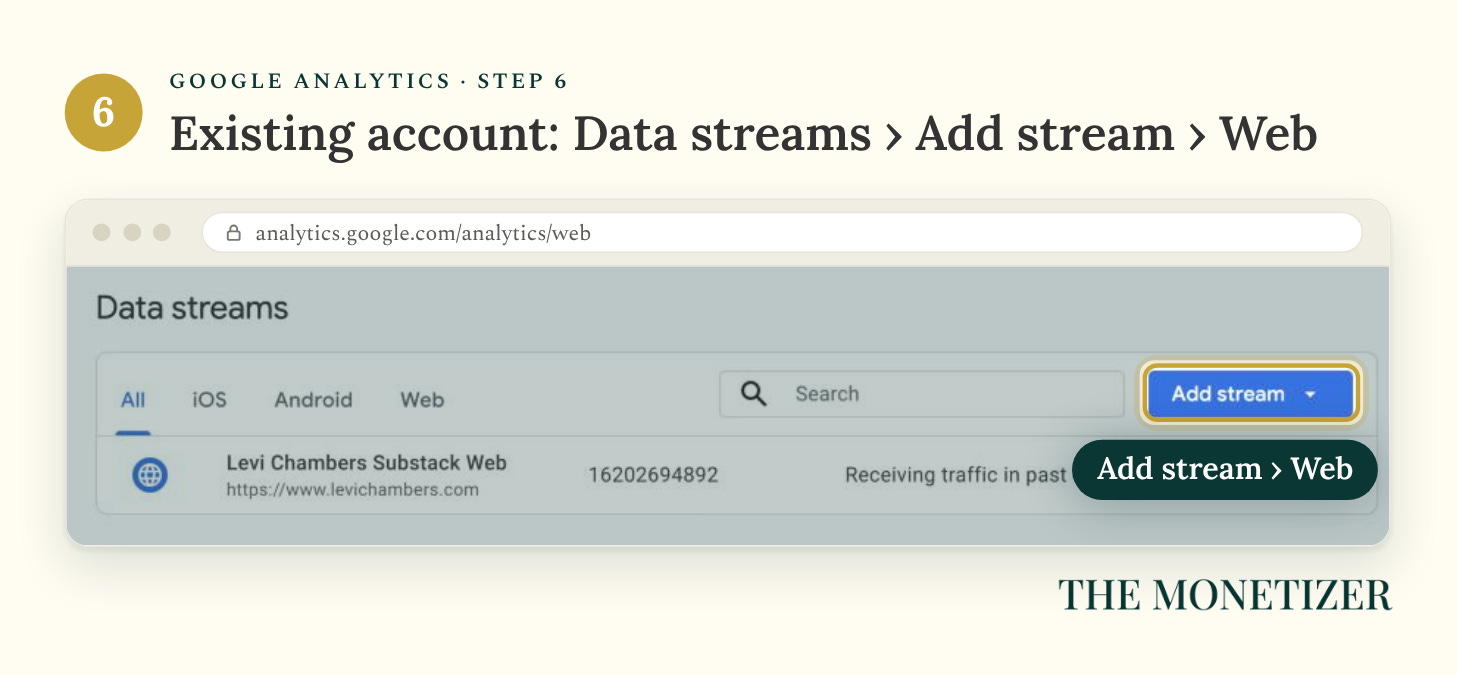
If your property already exists, open Admin → Data streams → Add stream → Web. Check the property name before creating anything. If this publication already has a web stream, open that one instead.
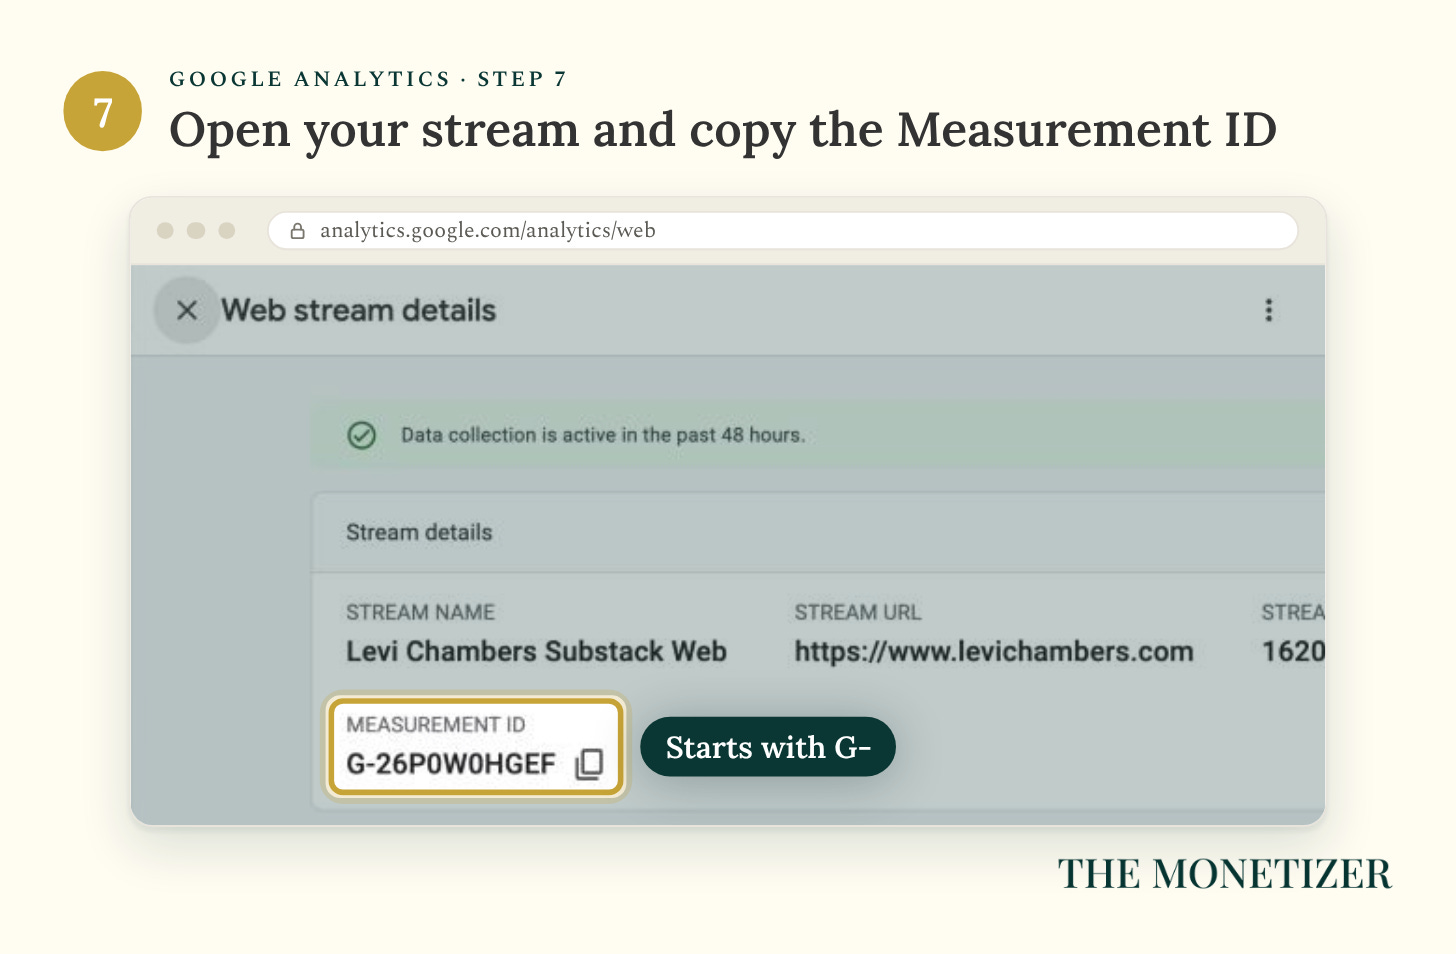
Step 7: Copy Your Measurement ID
Open the stream’s details and find Measurement ID. Copy the value beginning G-. You’ll paste this into Substack in the next step.
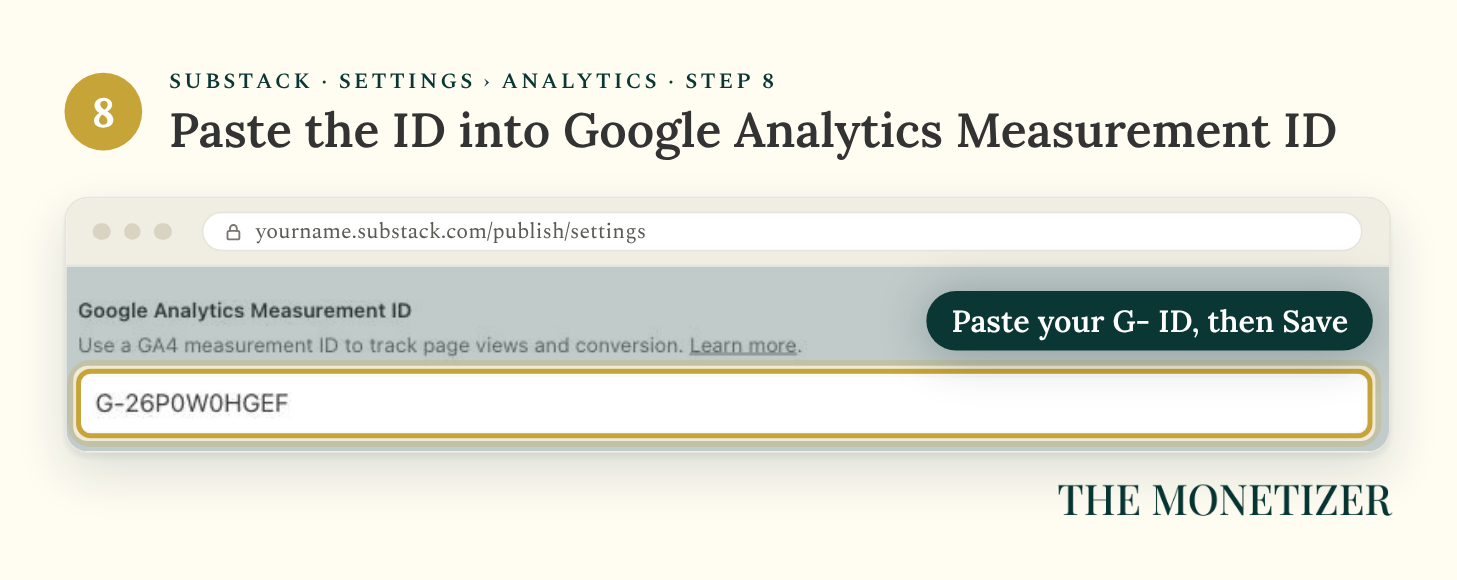
Step 8: Paste It Into Substack
Back in Substack, open Settings → Analytics. Paste the G- value into Google Analytics Measurement ID and save it. The ID is all this box needs. You can leave the longer installation code alone.
Step 9: Make Sure It’s Working
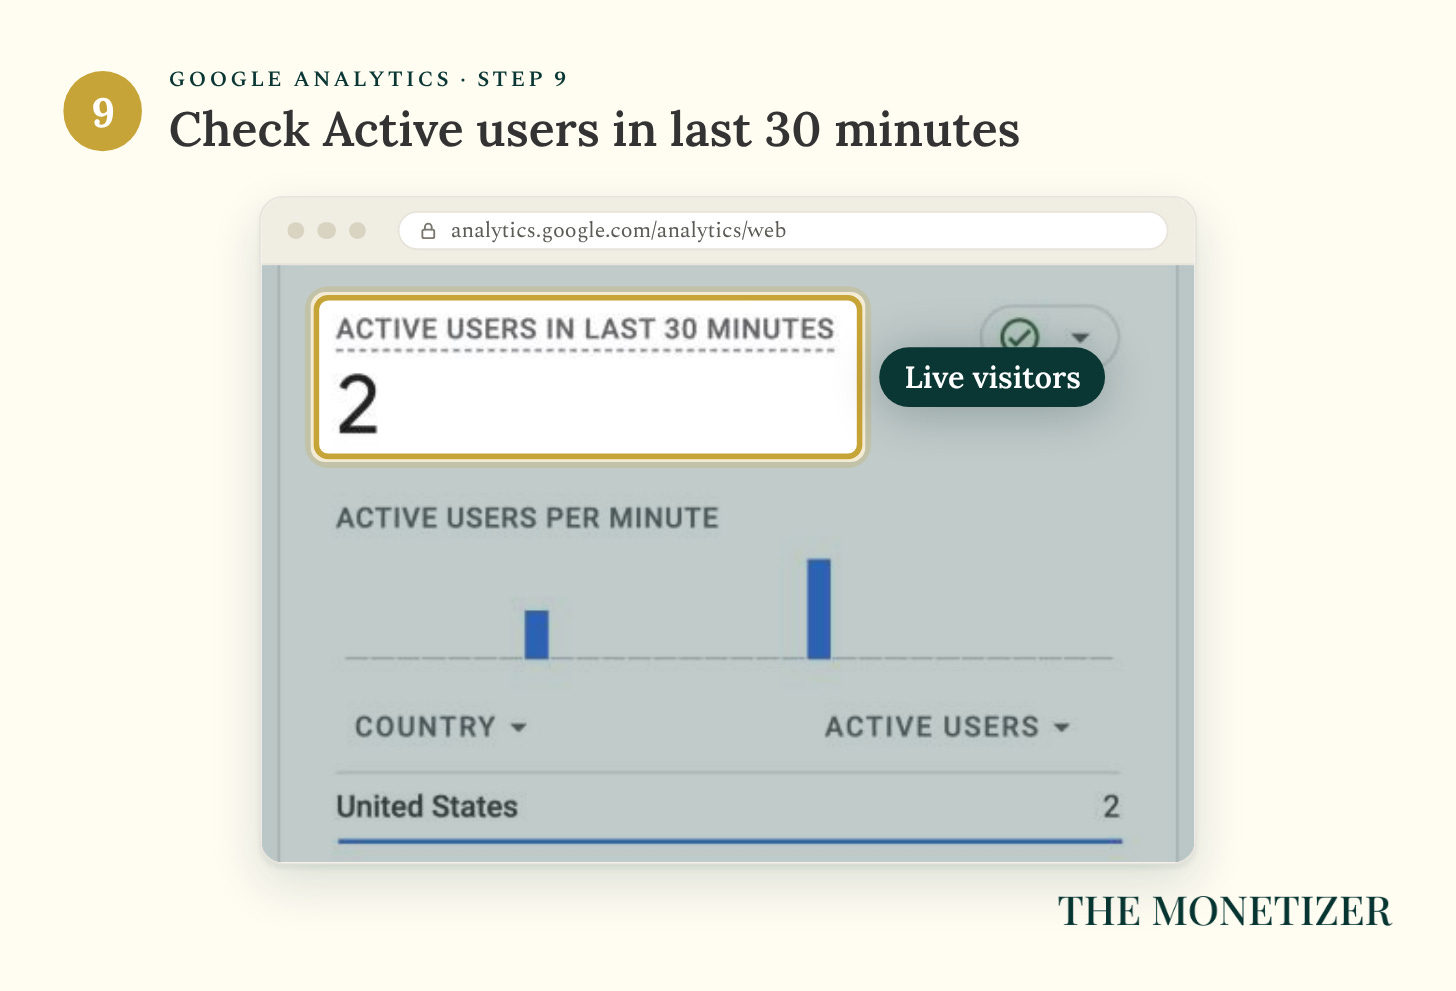
Visit a post on your publication, then look at Analytics. The Home screen has an Active users in last 30 minutes card; you can also open Realtime. Seeing a visit there is your first sign the connection works.
A blank screen right after setup doesn’t tell you much. Collection may take time, and an ad blocker or your privacy choices can hide your own visit.
Substack says its page-view, sign-up, and paid-subscription events should appear after 24 hours. Give the setup that time before changing it. Still empty afterward? Compare the G- ID saved in Substack with the one in your publication’s web stream.
Want your search reports in Analytics too? You can link the two accounts after setup. You’ll need Editor access to the Analytics property and verified ownership in Search Console. Open Admin → Product links → Search Console links → Link. Select the publication’s Search Console property and its matching web stream, then review and submit.
If the reports don’t appear, open Reports → Library and publish the Search Console collection. Google’s linking instructions cover the permissions and reporting limits. This is optional, so don’t let it hold up the rest of your setup.
Part 3: Add Your Substack to Bing
I’d do Bing while you have these tabs open. DuckDuckGo gets its traditional search links largely from Bing. Microsoft also describes Bing’s role in other search and AI experiences. Even if you never open Bing yourself, your next reader might reach you through its results.
The useful part: Bing can import your Search Console verification and submitted sitemaps. You’ve already done much of the work. Analytics isn’t required for the import, so you can finish this section whenever Search Console is verified.
Step 1: Sign In to Bing Webmaster Tools
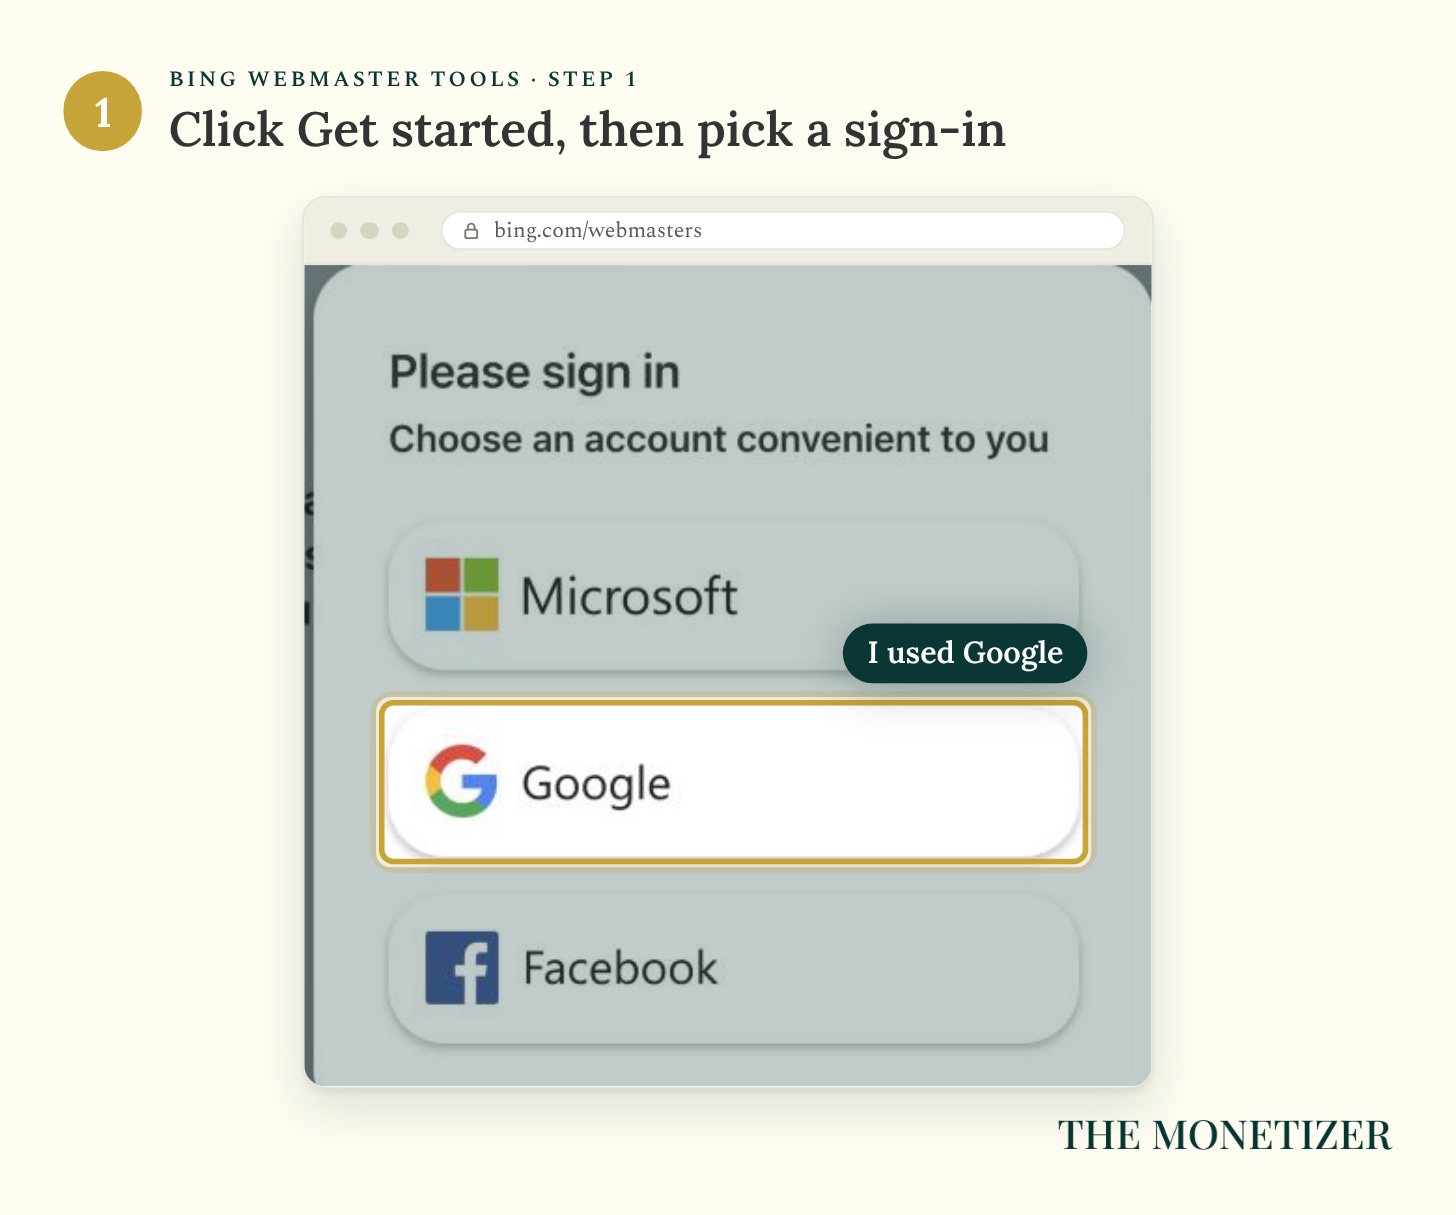
Open Bing Webmaster Tools and choose Get started. My screen offered Microsoft, Google, and Facebook. I used Google. Choose an account you’ll be able to access when you return to these reports.
Step 2: Choose Import From Google Search Console
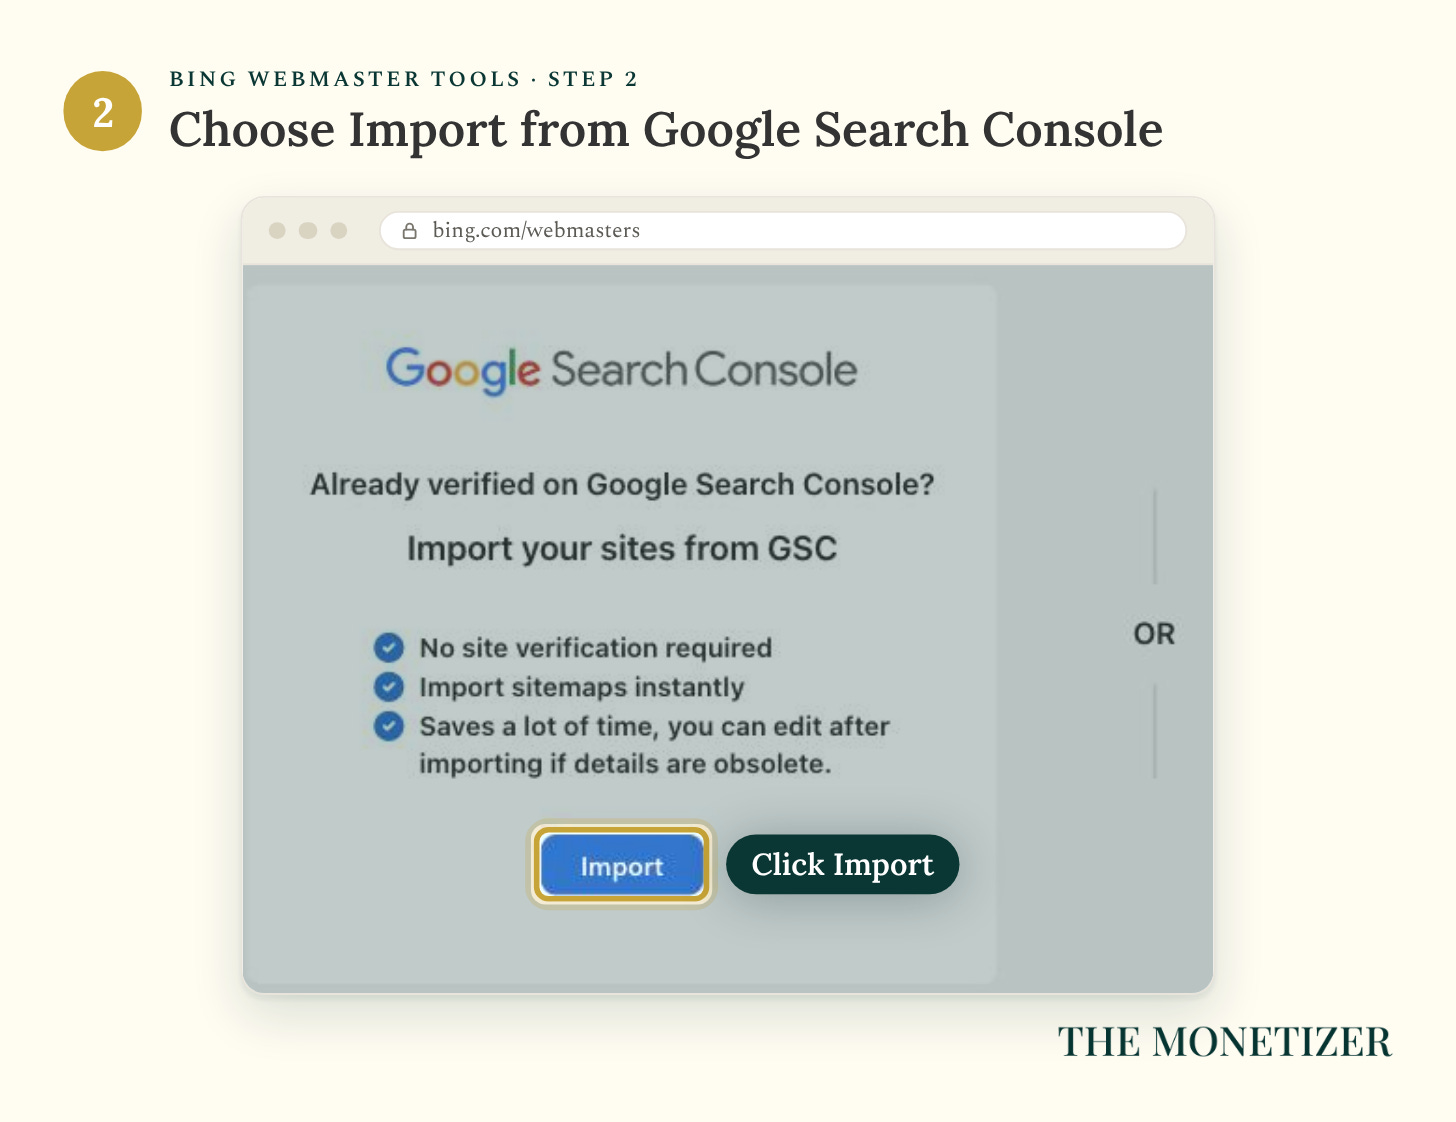
Under Google Search Console, click Import. This lets Bing reuse your ownership verification and bring across submitted sitemaps. You won’t need to copy another tag into Substack.
There’s another route for custom domains: DNS verification. If you choose it, add the record Bing provides at the company managing your DNS. Substack’s normal editor doesn’t support the file-upload or header-tag methods. For this walkthrough, I’m using the import.
Step 3: Give Bing Read-Only Access
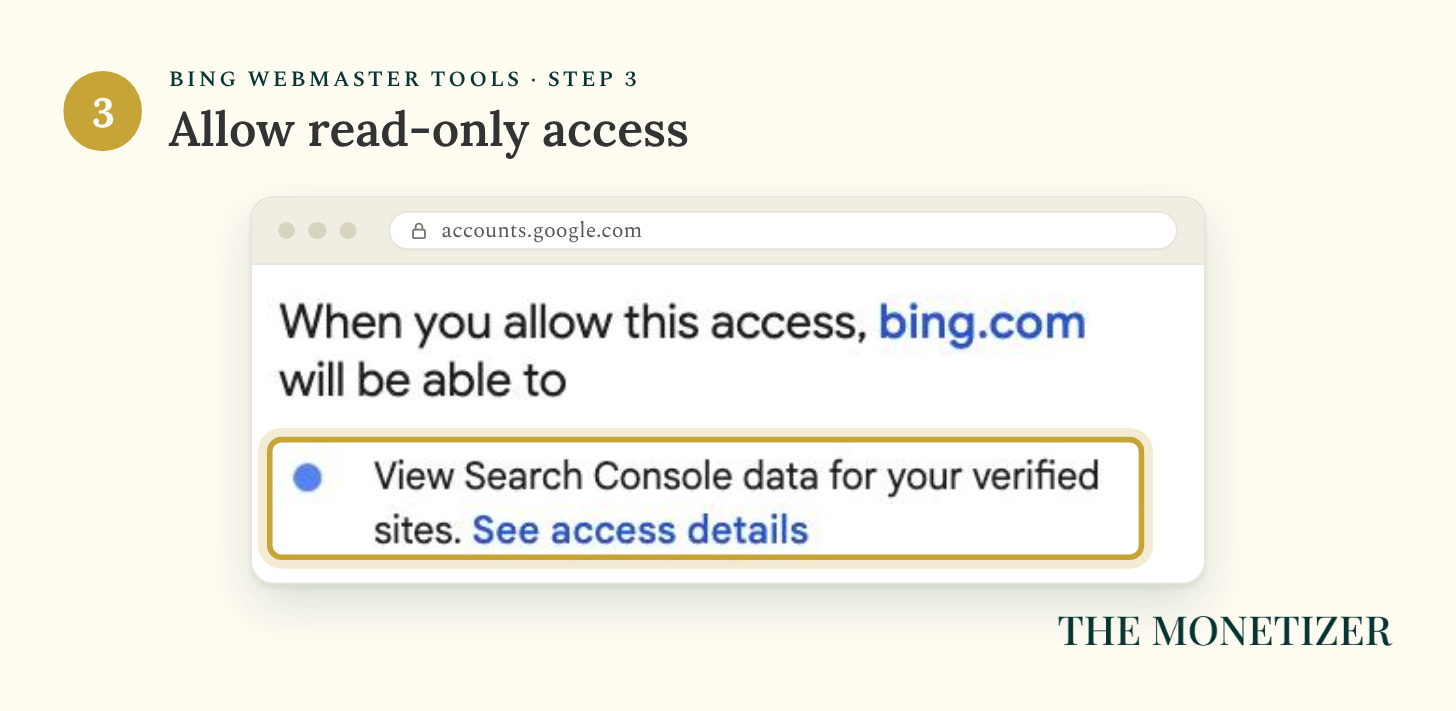
Choose the Google account that owns the Search Console property. Read the permission screen, then click Continue to allow the connection. Bing uses this read access to maintain verification and update sitemaps. It doesn’t give Bing control of your Substack posts.
Step 4: Pick Your Substack and Import
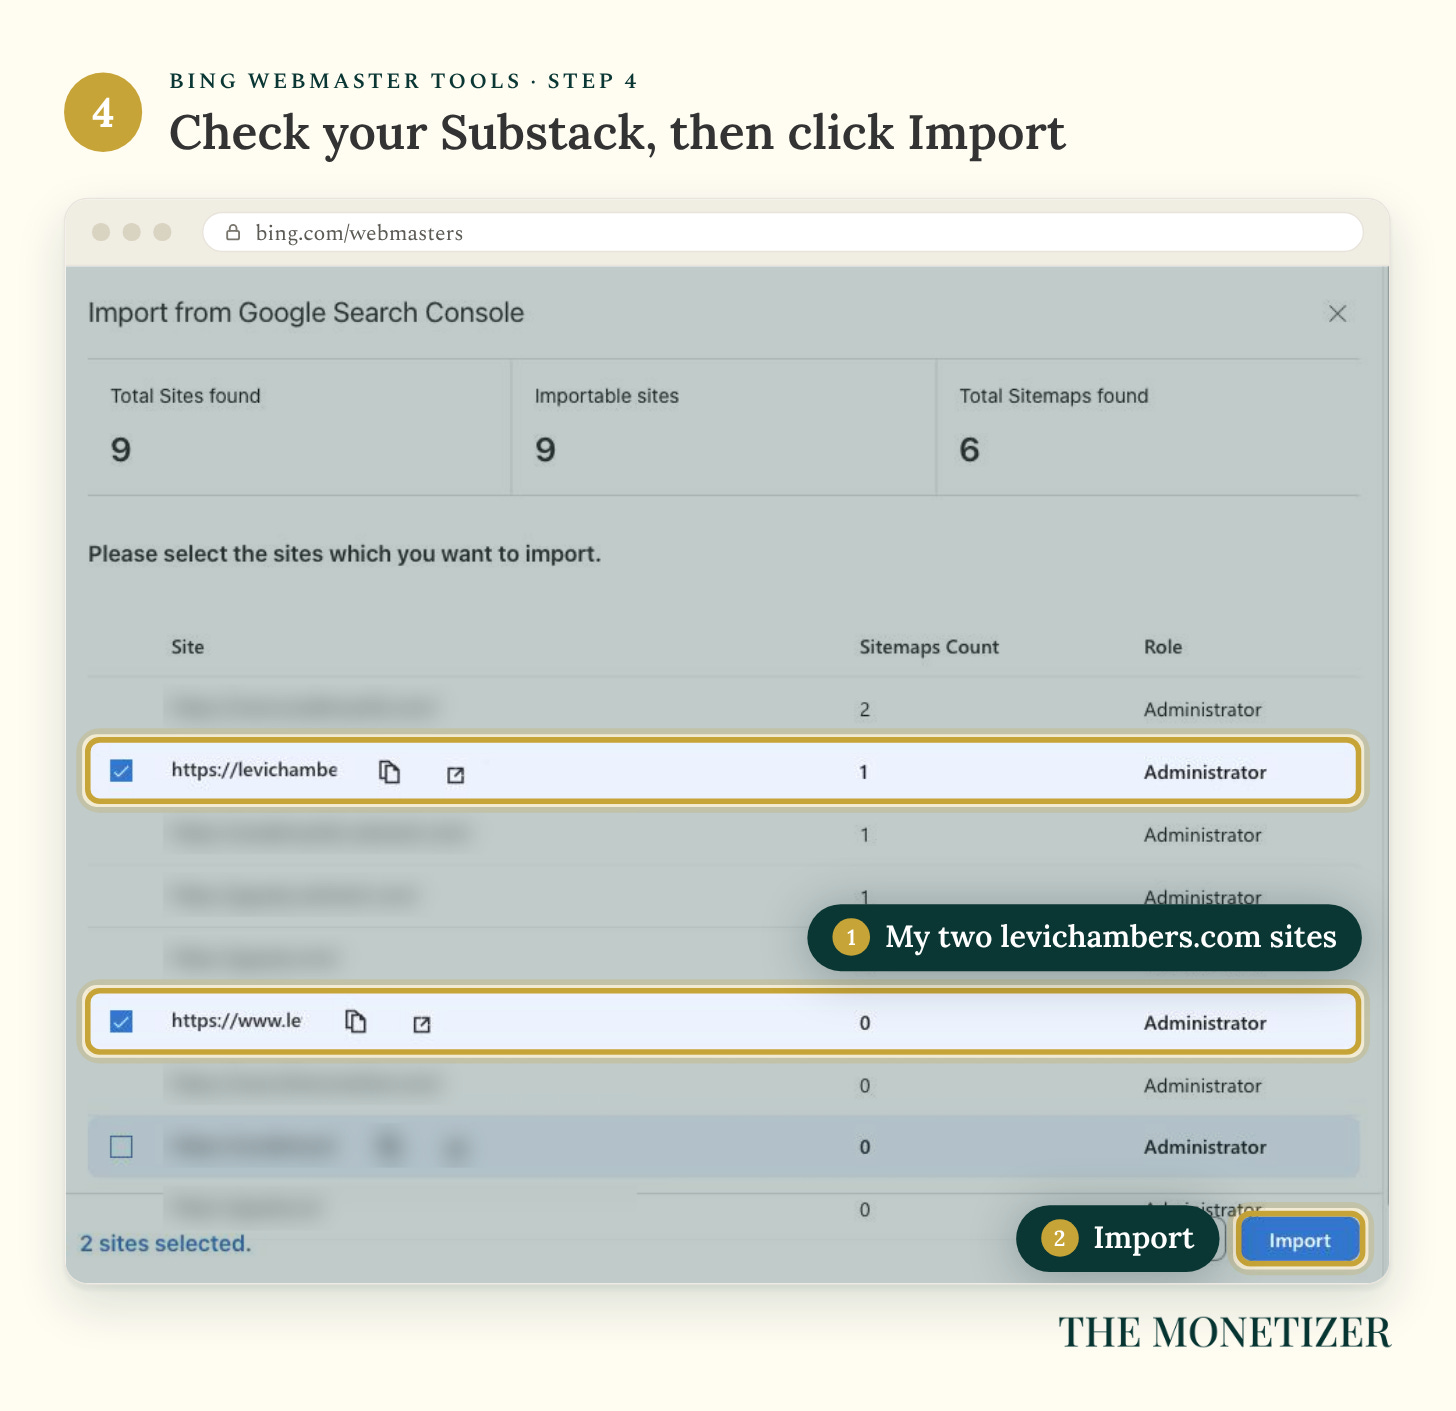
Select your publication from the list and click Import. My screenshot includes two levichambers.com properties. You don’t need both just because I selected both. Choose the verified property for your publication and leave unrelated sites unchecked.
Step 5: Check Your Sitemap
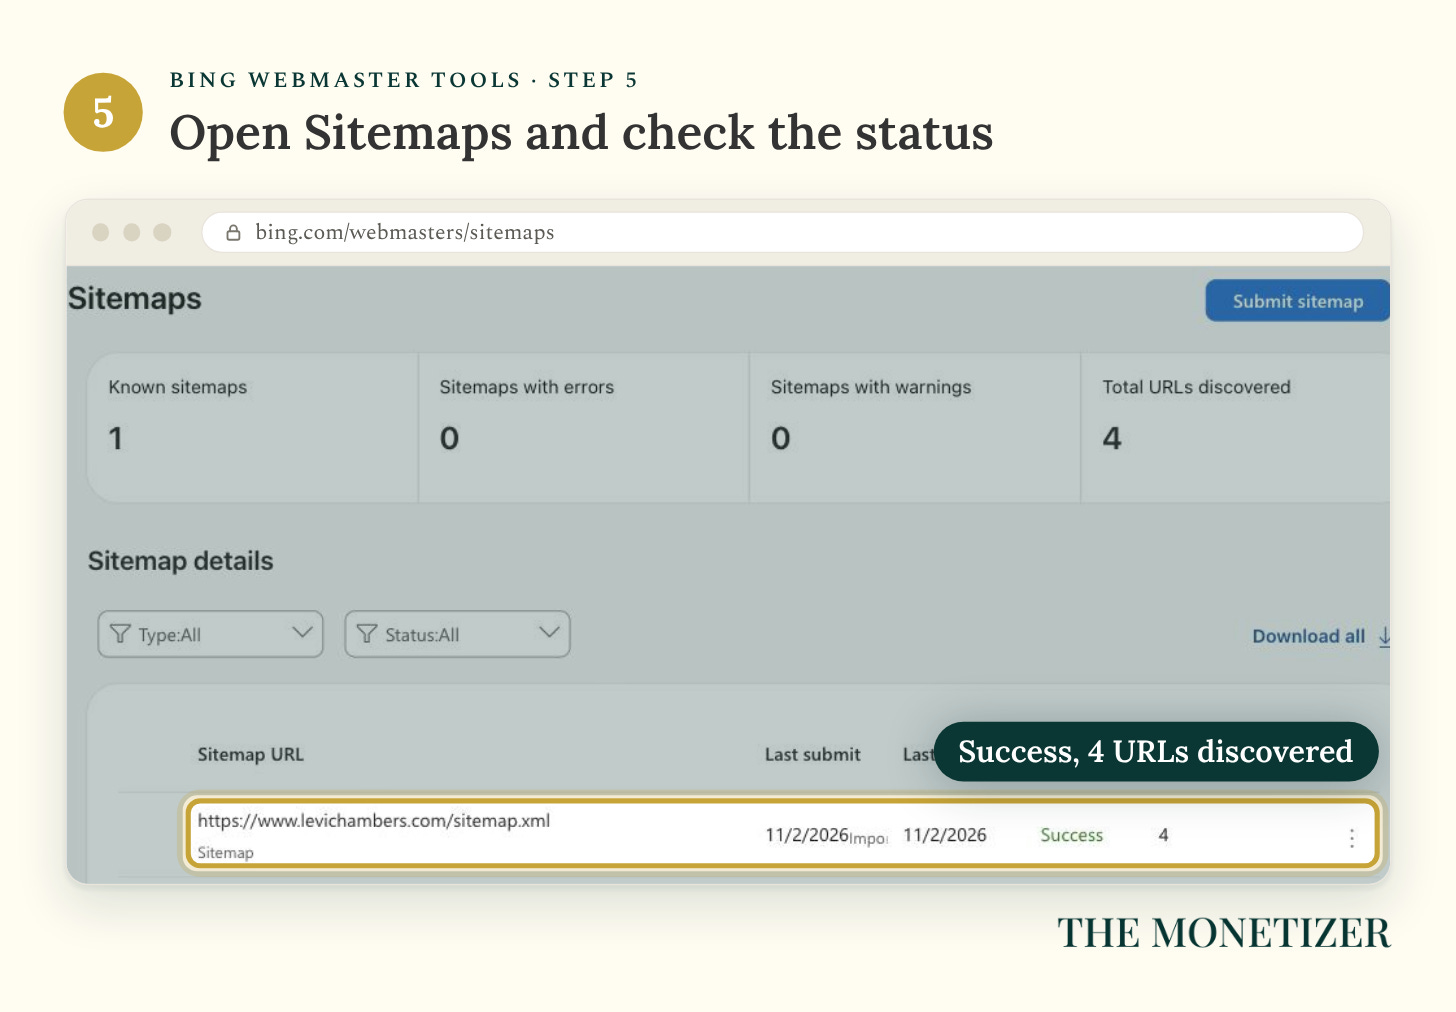
Open Sitemaps in Bing’s left menu. Mine showed Success and four discovered pages that afternoon. Google still showed a fetch problem for the same sitemap. That comparison is why I check both dashboards.
Bing’s setup notice says reports can take up to 48 hours to populate. Check again later if yours are empty.
Step 6: Submit Your Most Important Pages
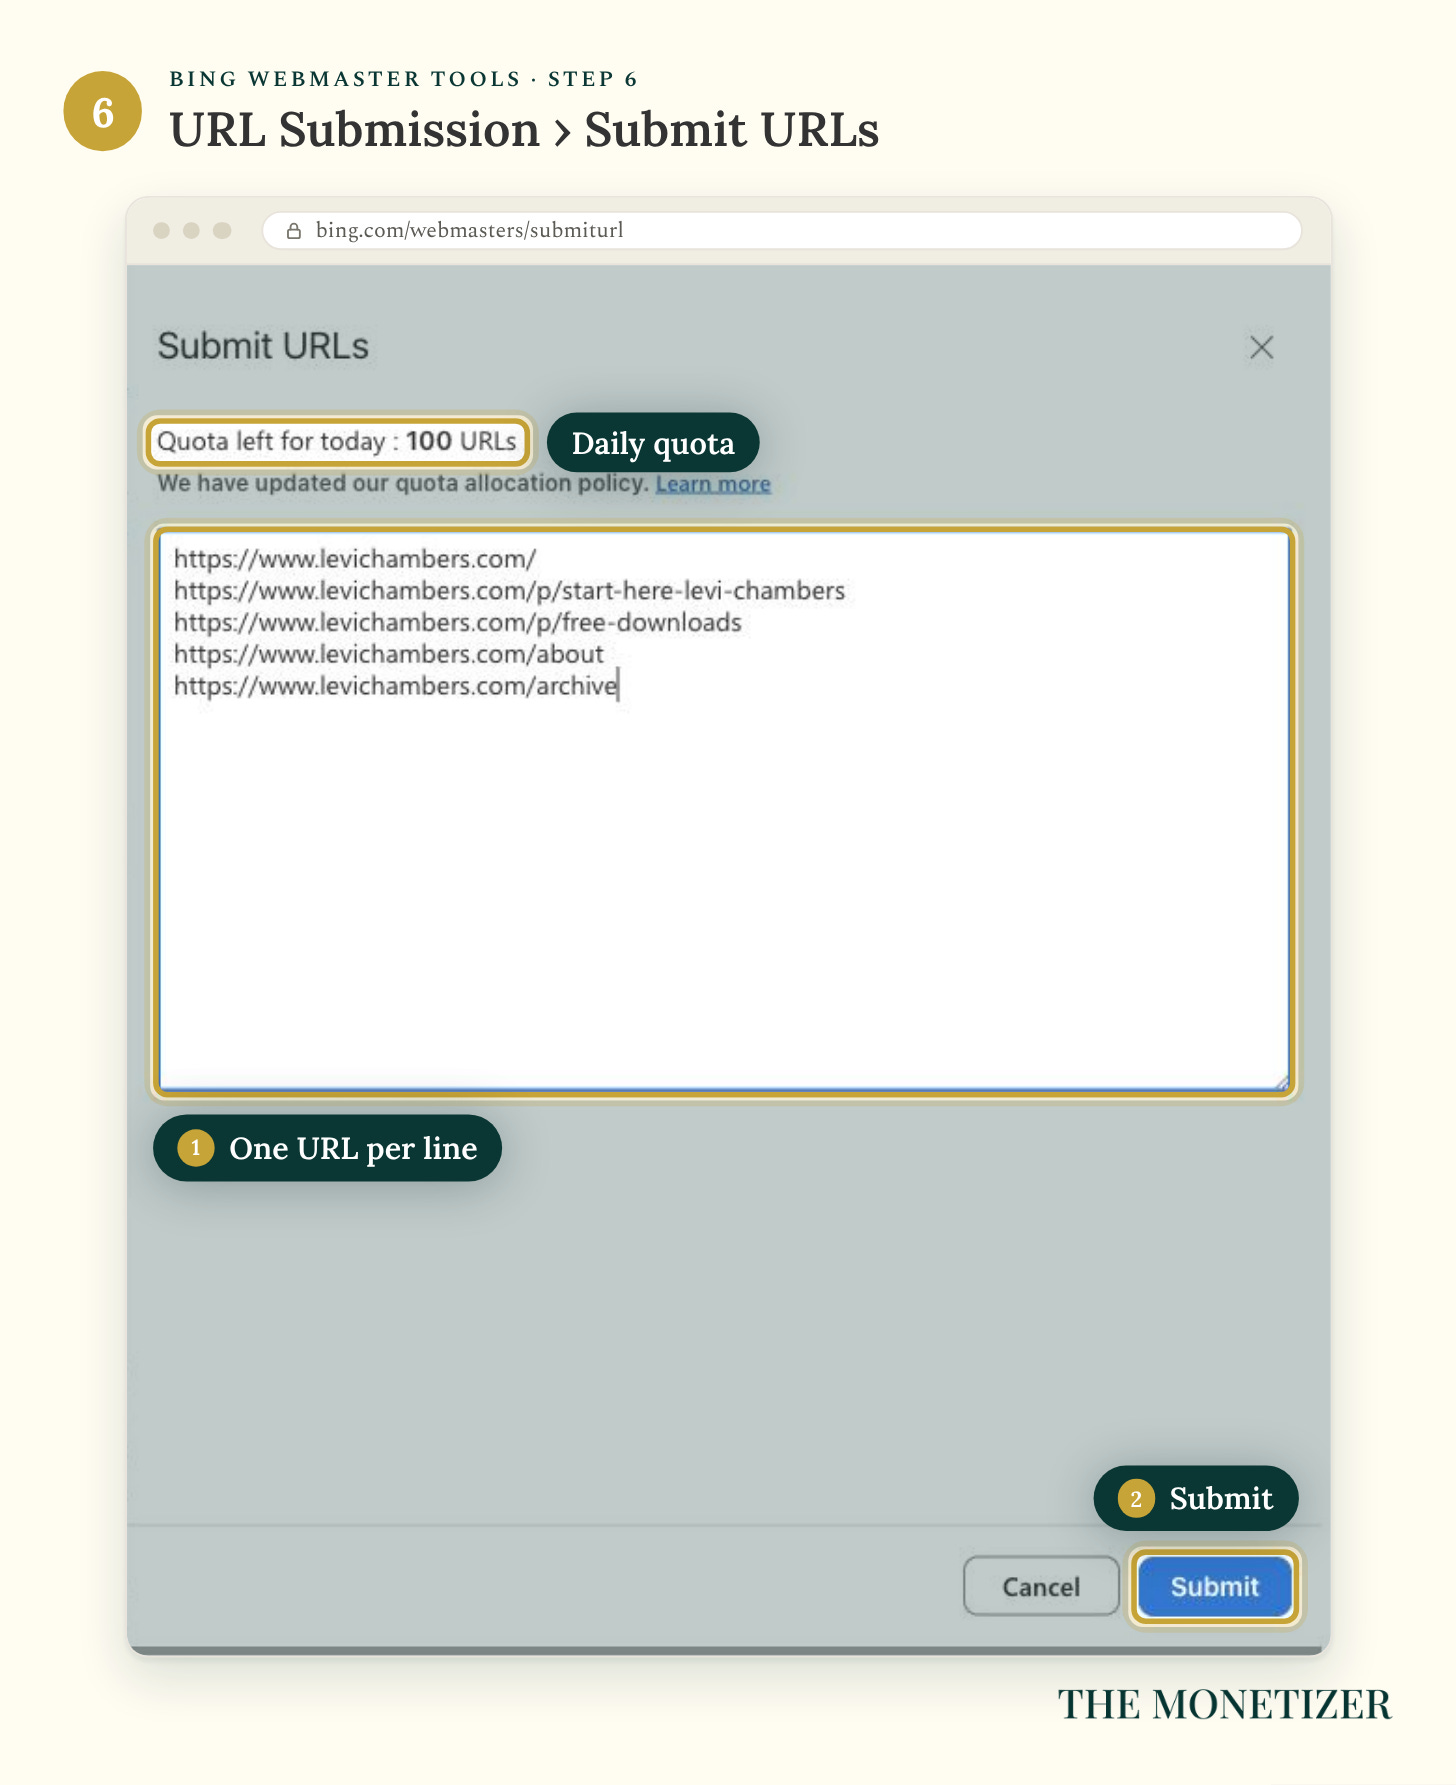
Open URL Submission → Submit URLs. Put each full page address on its own line, then click Submit. Start with the useful pages you checked in Google. My account allowed 100 submissions a day; your dashboard shows your allowance. There’s no prize for using all of it.
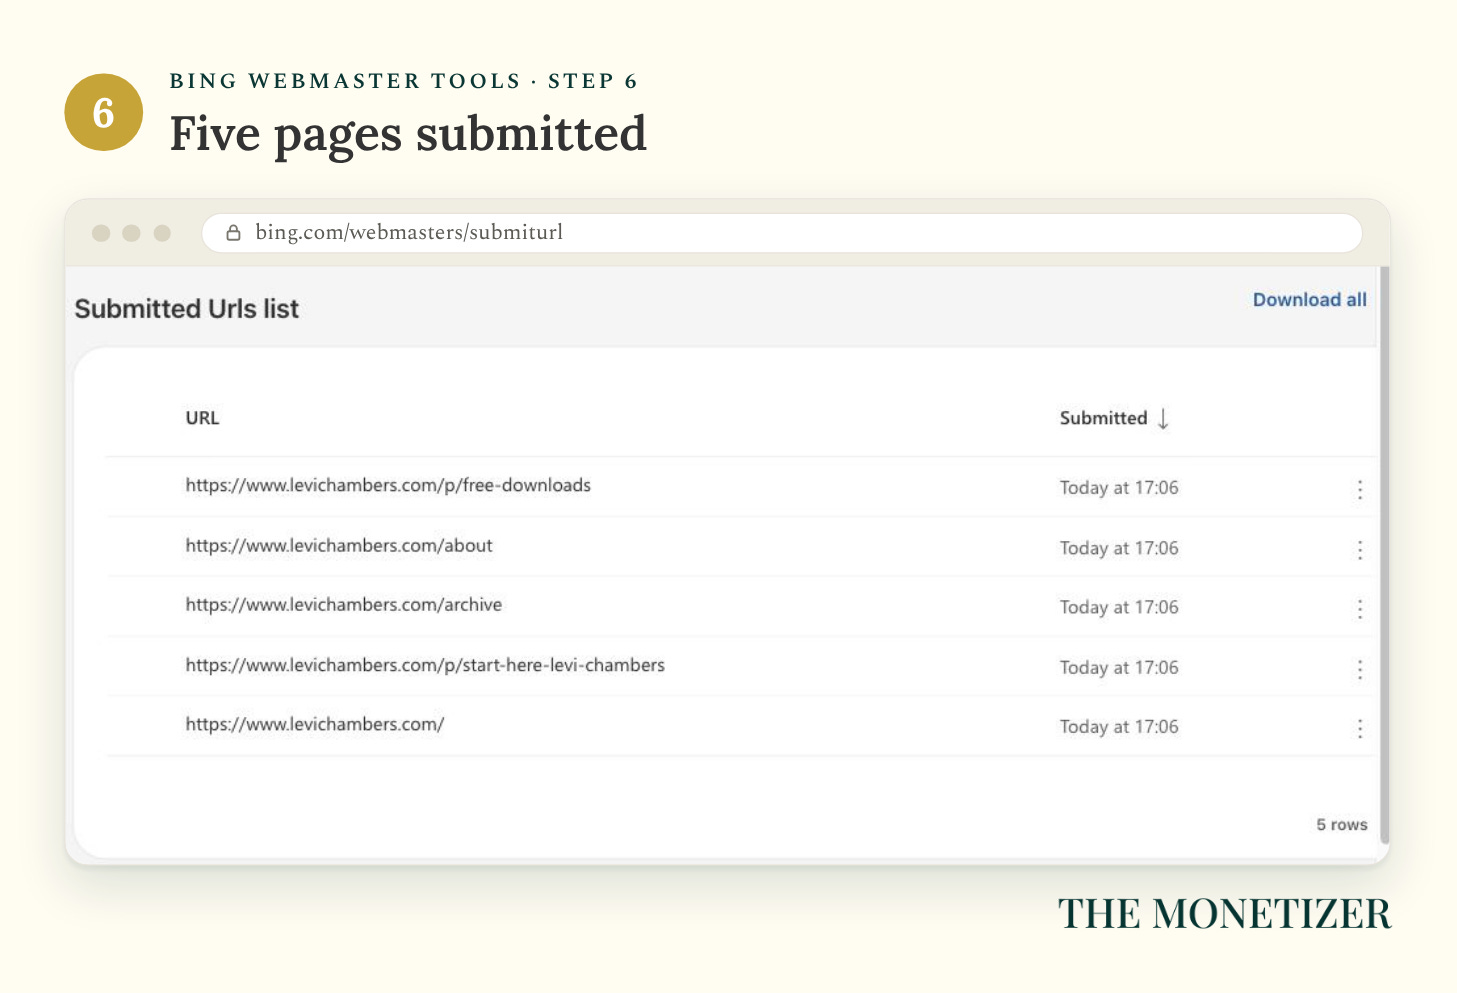
You may notice IndexNow nearby. It alerts participating search engines when content changes, but its manual setup requires a key file on your website. Substack doesn’t give writers a normal way to host that file. Use the sitemap and URL-submission tools here, then move on to the posts themselves.
Part 4: Help Each Post Get Found
Pick one post you care about. Imagine someone opening it after searching for help, with no idea who you are. They’re trying to do something: fix a setting, choose a tool, understand a problem. Read the opening with that person in mind. I want someone arriving at this guide to find their next step without having to know anything about me first.
Fill In SEO Options Before You Publish
In the editor, open Settings at the bottom right, then SEO Options. This is where you describe the post for search. Google sometimes chooses its own title or description, but it’s still worth giving it a clear version to work with. There are three fields:
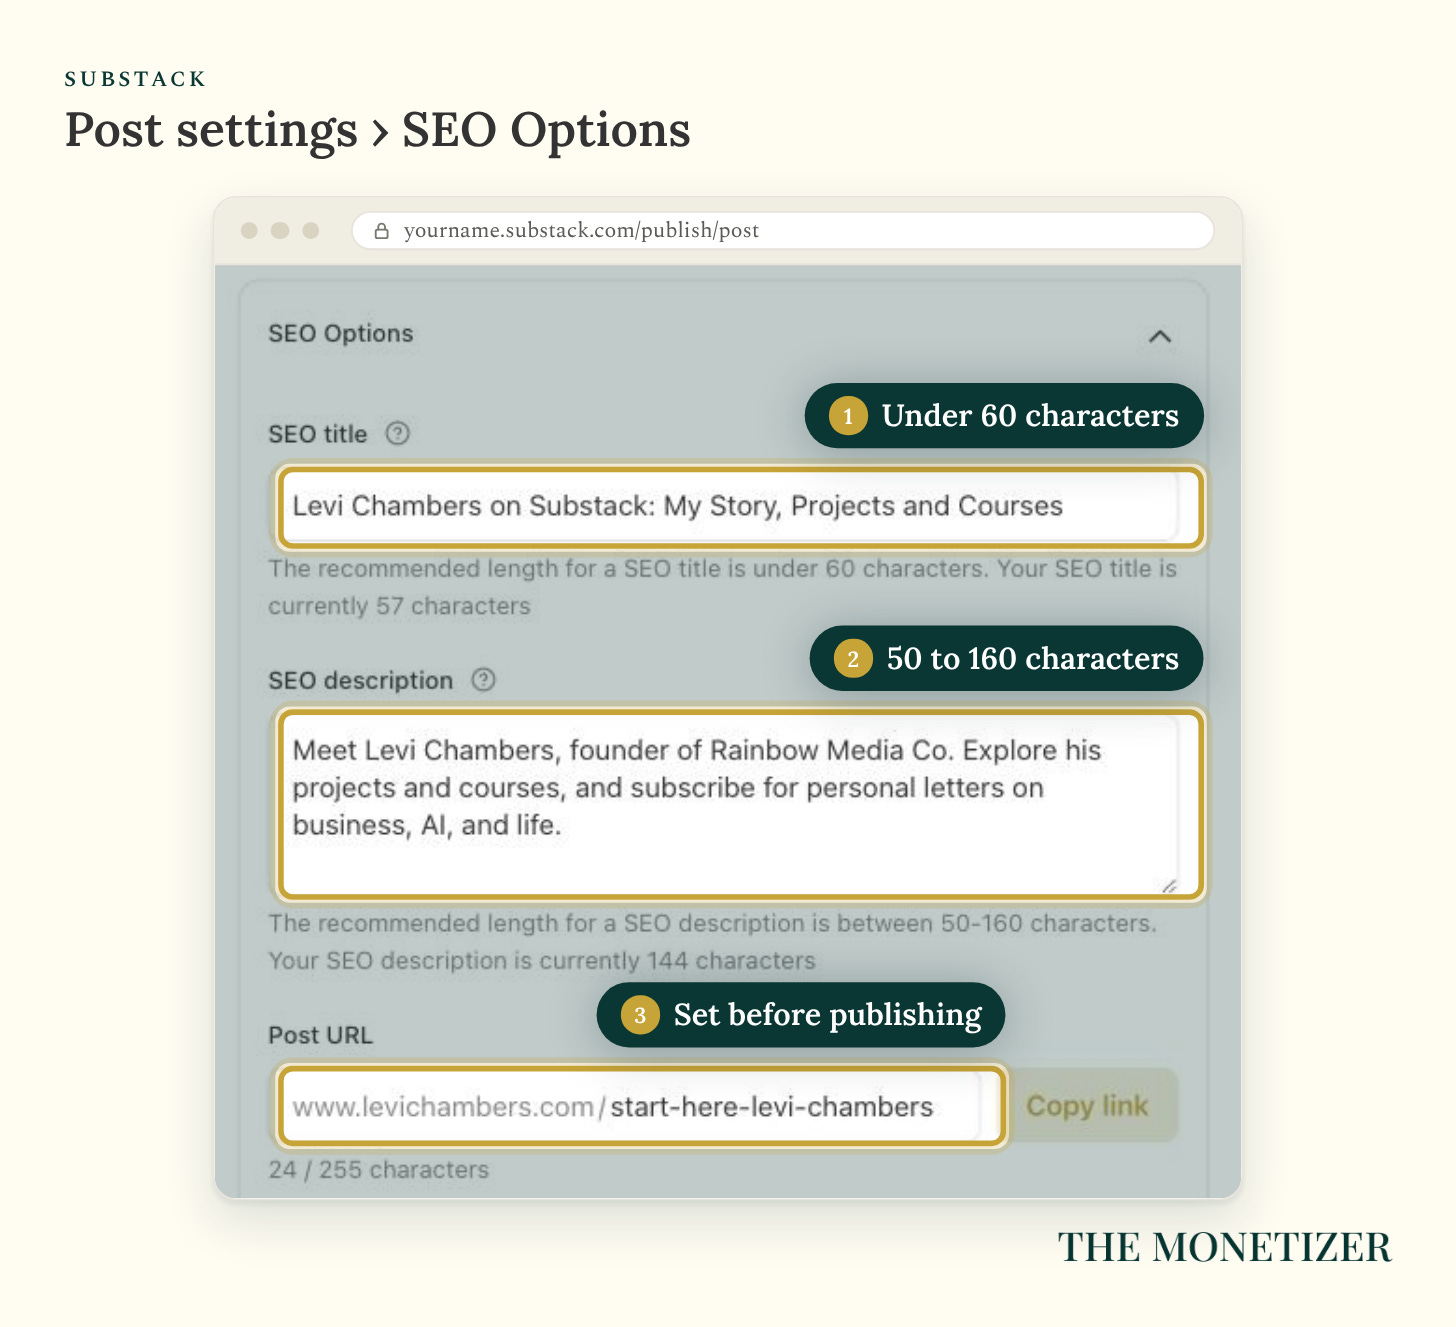
SEO title: the title you suggest for search results. Name the topic clearly, preferably near the start. Substack recommends fewer than 60 characters; that’s a useful editing target, not a ranking guarantee.
SEO description: a short pitch describing what the reader will get. Aim for roughly 150 to 160 characters if the answer fits. Google may shorten it or pull different text from the page.
Post URL: the ending of the web address, often called the slug. Keep it readable, such as
/p/substack-seo. Choose it before publishing. If you later change a published address, check that previously shared links still work.
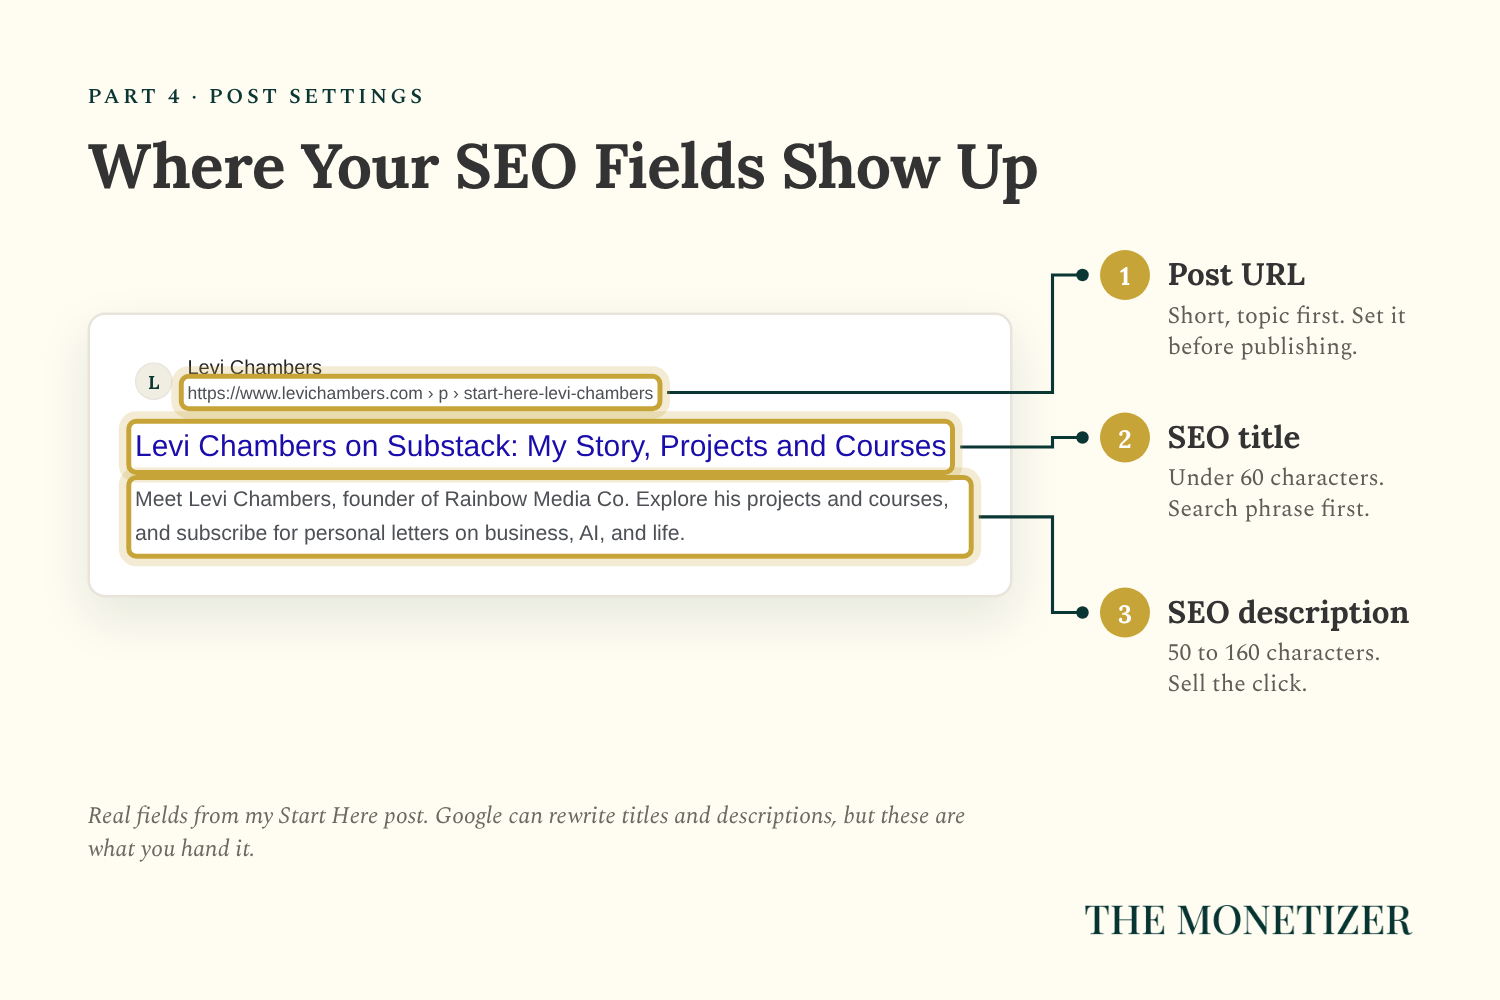
My Start Here post makes this easier to explain. Subscribers see “Why I’m Starting Fresh Under My Own Name.” That headline assumes some interest in what I’m doing. For search, I used “Levi Chambers on Substack: My Story, Projects and Courses.” Someone who has just searched my name gets a much better idea of what’s on the page. You can make that same adjustment without changing the headline your subscribers receive.
For the article you’re reading, I’d start with the phrase Substack SEO. The person searching it probably wants their posts found, or wants to know why Google hasn’t picked them up. Here’s a possible set of fields built around that problem:
SEO title: Substack SEO: Get Found on Google and Bing
SEO description: Set up Google Search Console, Analytics, and Bing for your Substack, with screenshots, troubleshooting, and a printable checklist.
Possible URL ending: /p/substack-seo
The description gives people something concrete to choose: screenshots, help with errors, and a checklist. “Everything you need to know” would tell them much less. Use the space to name what your article actually contains, then make sure readers can find it when they click.
Answer the Search Before the Paywall
I checked the reader experience by opening my posts while logged out. On one paid post, I could read about 800 words before reaching the paywall. On a subscribers-only post, I got a headline and a signup box. That’s a big difference for someone meeting my work for the first time. Google’s access is a separate question: paywalled content can be indexed when Google can access it. Use URL Inspection for that check.
My best growth comes from free posts built to rank and get shared. So this guide gives you the whole walkthrough before the paywall. You can finish the setup whether or not you buy anything; paid subscribers get the printable kit. If you’re writing a post to introduce yourself to new readers, let them experience how you help before asking them to subscribe.
Fix Your Homepage Description
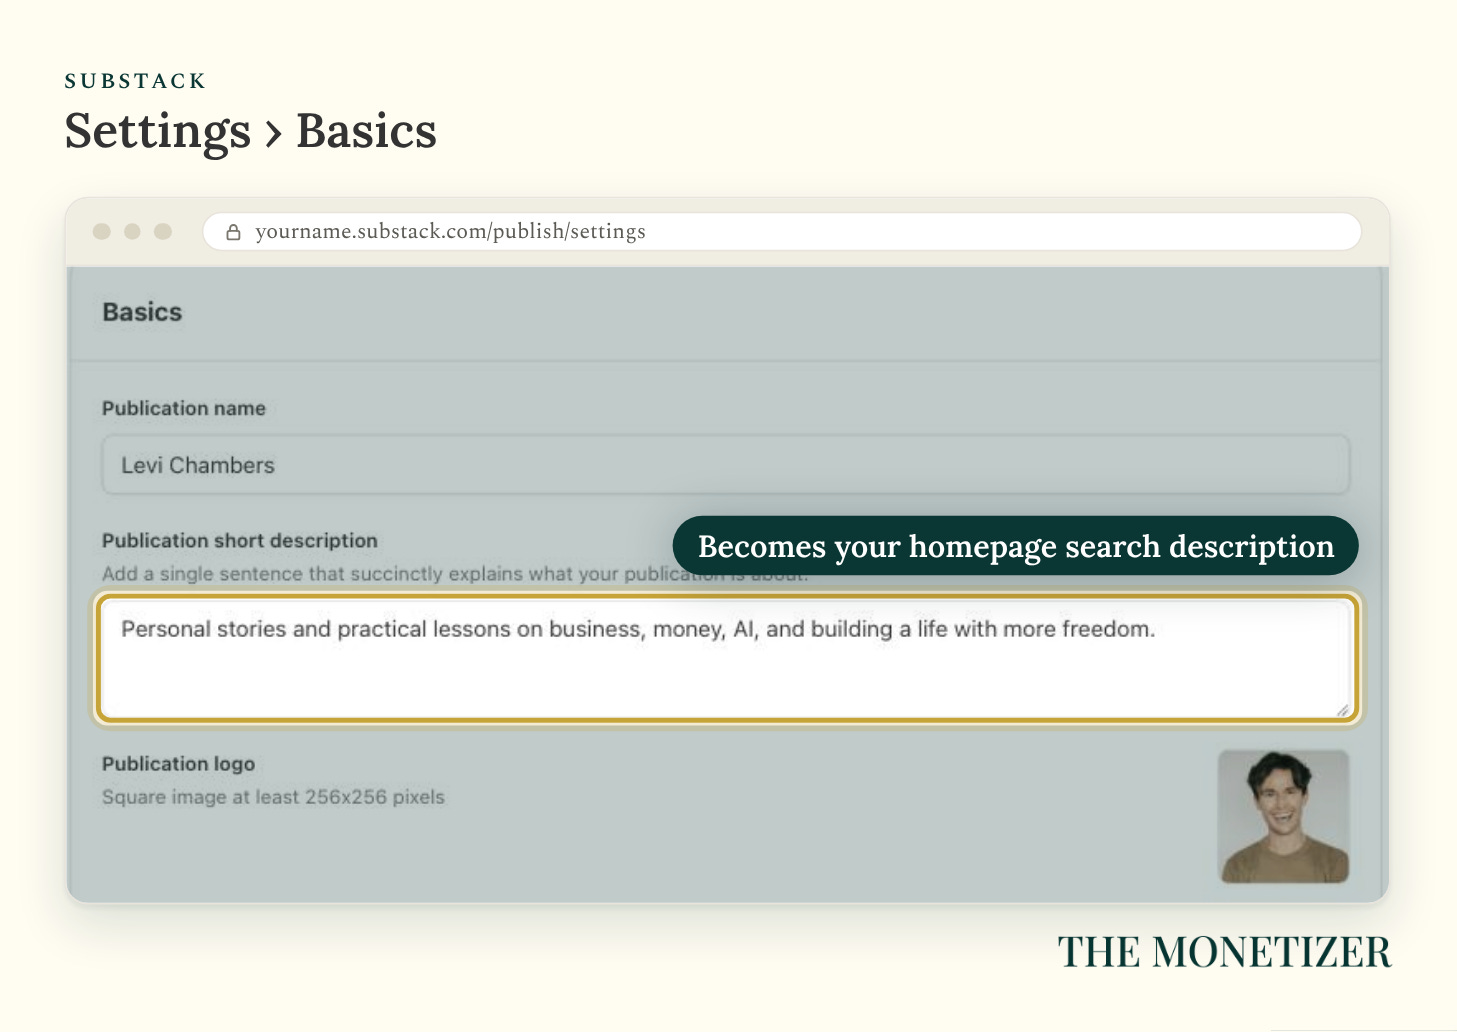
Your homepage needs that same clarity. Open Settings → Basics → Publication short description and read what you’ve written. Would a stranger know what they’re subscribing to? For example, “Practical guides to growing and earning from a newsletter” names the subject and the benefit. “My thoughts on business” leaves them doing the guessing. This field supplies your homepage’s description metadata.
Link Your Posts Together
When a post brings up something you’ve already explained, give readers the link right there. Say you’re writing about your welcome email and you have a separate guide to creating one. Link the words “set up your welcome email” to that guide. You’ve saved someone a search and helped them find more of your work. Older posts can point to the new one too, wherever the connection makes sense.
Another writer linking to your guide can bring readers who might never have found you otherwise. It also helps search engines discover the page. A useful resource gives people a reason to make that reference. Think about the part of your article someone might send to a friend who asked for help, and make that part easy to find.
Make the AI Training Call on Purpose
There’s one setting I’d read before moving on: Settings → Privacy → AI training protection. It asks participating AI tools not to use your content for training. Substack’s explanation includes a tradeoff: the setting may also limit discovery in some AI tools and search experiences.
You get to decide how comfortable you are with that use of your writing. Read the setting’s explanation and choose deliberately. I wouldn’t flip it simply because somebody promised more traffic.
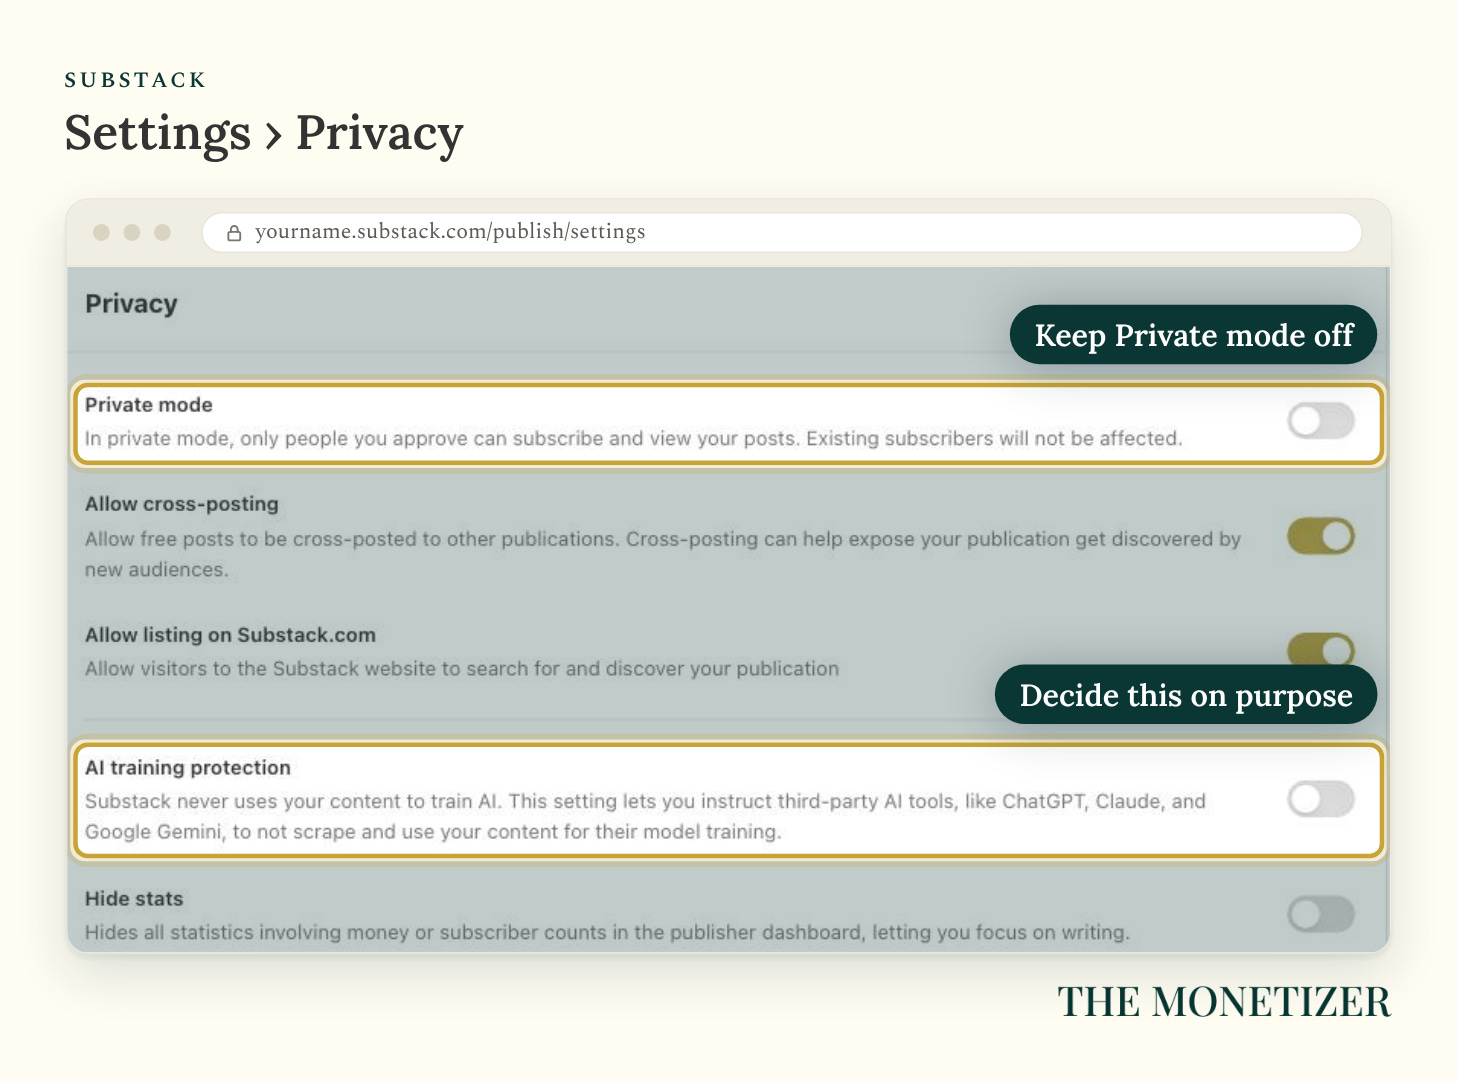
While you’re there, check Private mode. Leave it off for a publication you want new people to discover. Turning it on restricts reading to people you approve. You can still run a public publication and charge for selected posts.
What to Check After Setup
Once the connections work, you can get back to writing. Put a reminder on your calendar to check the reports instead of leaving another dashboard open all day. Here’s a sensible schedule for those first checks:
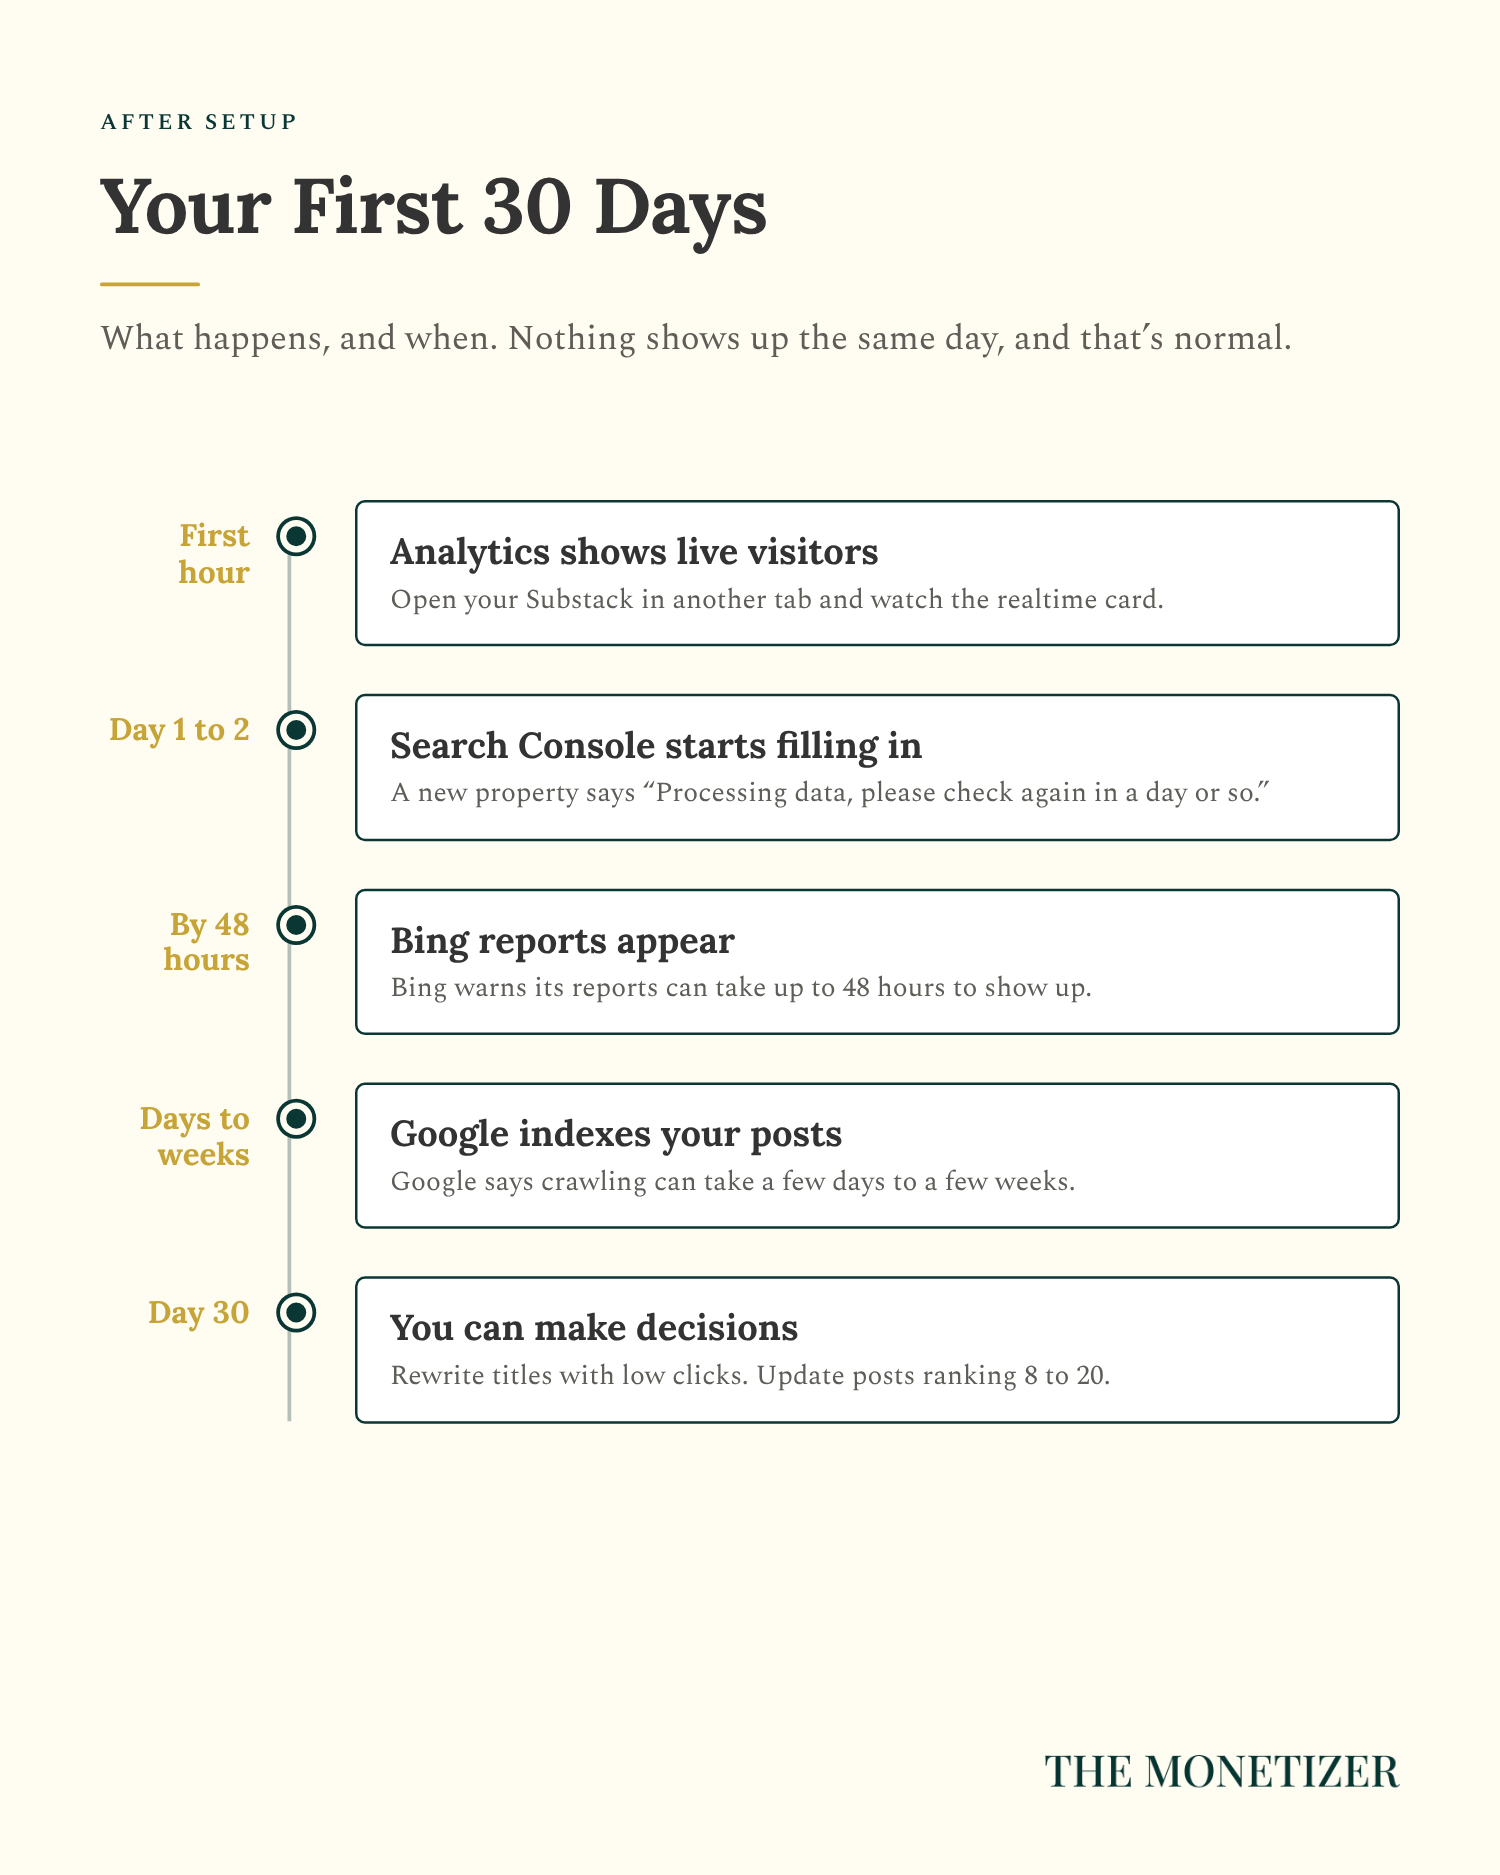
First check: visit a post and look for activity in Analytics Realtime. Allow the new connection time to collect data.
Next few days: look for Search Console data. “Processing data” on a new property is normal; an empty report can also reflect little search activity.
Around 48 hours: revisit Bing’s reports. Its setup notice gives this as a processing window, not a promise of visitors.
Days to weeks: recheck important pages in URL Inspection. A crawl request doesn’t guarantee that Google will index them.
At 30 days: review what’s appearing and decide what deserves another look. If the sample is tiny, keep collecting data.
The Monetizer’s Search Console report is below. To open yours, choose Performance and a date range. Start with Pages, select a post, and look at its Queries. Those are the searches associated with that page appearing. Give yourself ten minutes to look at one post properly. That will tell you more than staring at the overall graph and wondering whether the number is good.
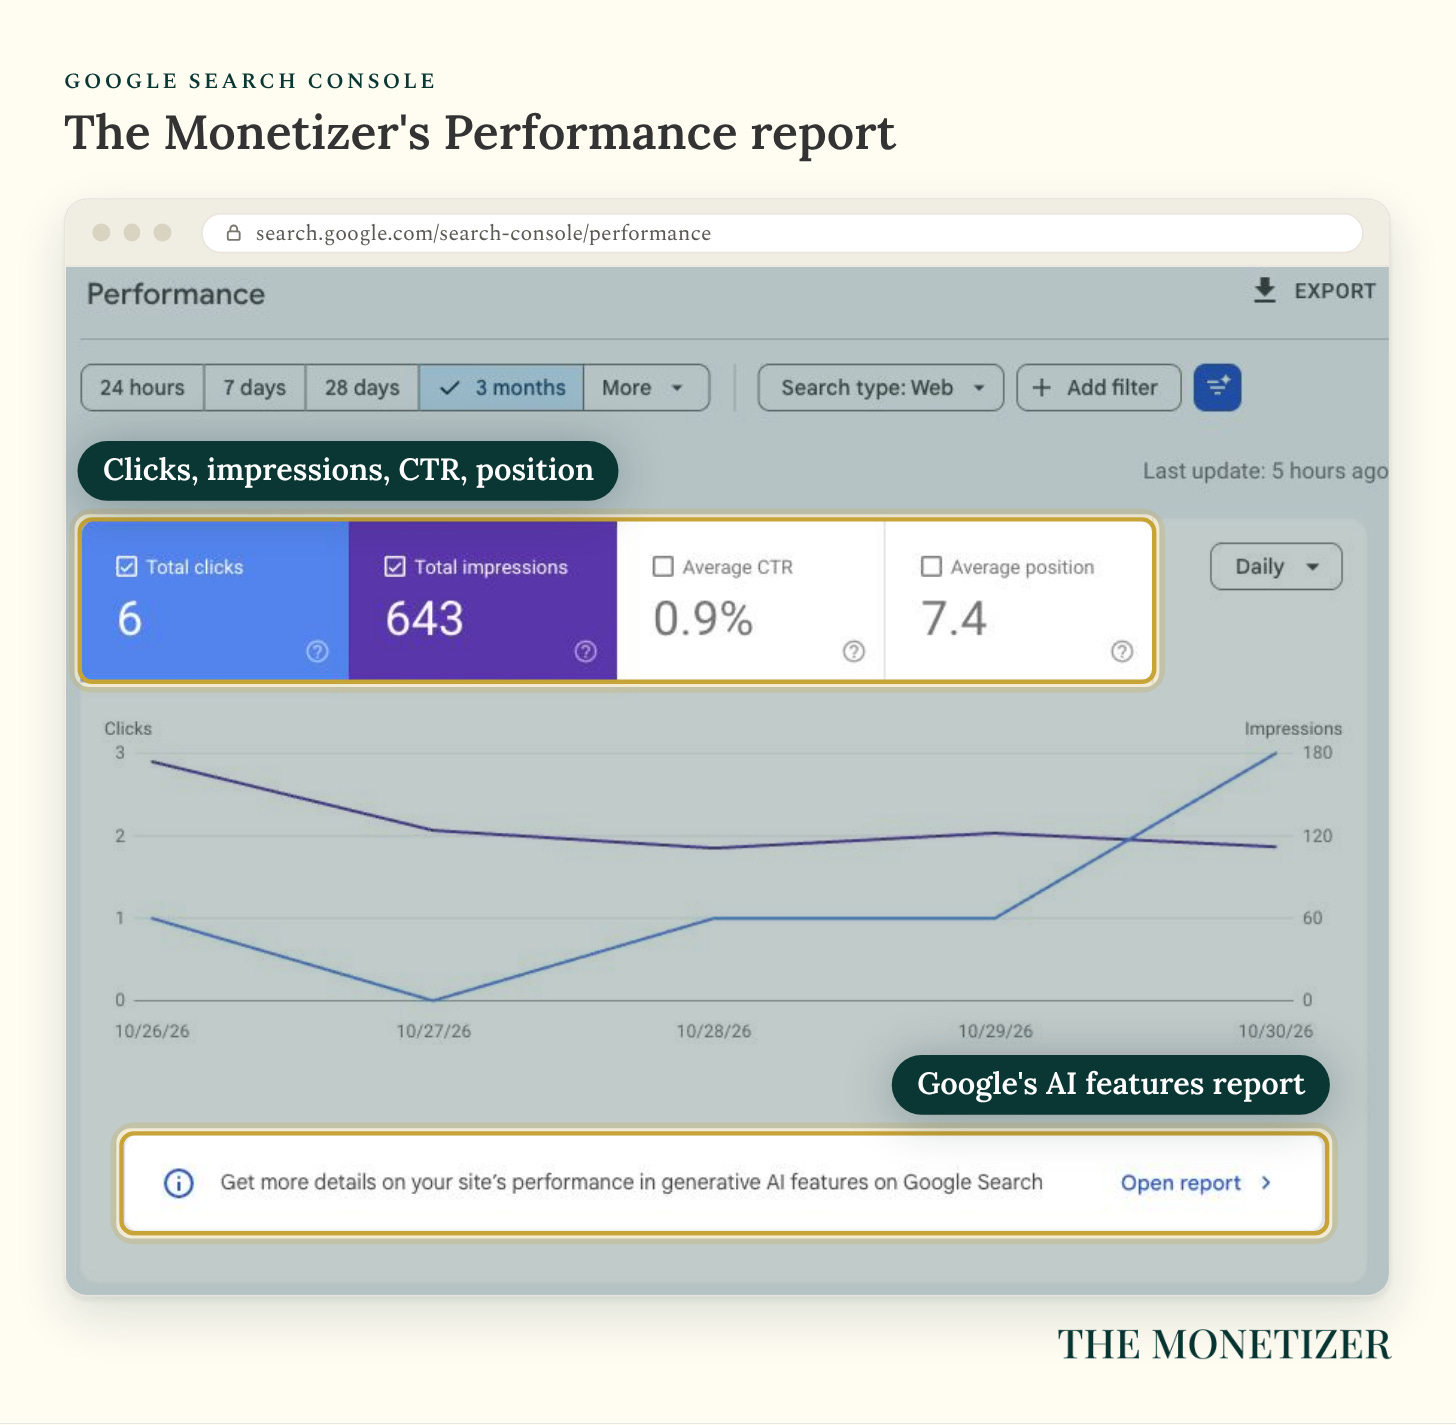
Suppose this guide appears for “Substack sitemap,” but hardly anyone clicks. I’d check whether the search listing makes its sitemap instructions obvious. If readers ask how to find the file, I’d look at the instructions themselves. The next change should come from a specific question like that. These two patterns are useful places to start:
Relevant impressions, few clicks. Filter to one page and inspect its queries. If the article answers those searches, check whether the title communicates that clearly. Improve a vague promise before assuming you need a different topic.
A relevant query averaging around position 8 to 20. This can be worth investigating. Average position moves across searches, devices, and dates. Find what the article leaves unanswered, add a useful example, and link from related posts. Record the change so you can assess it later.
For the visits themselves, use Reports → Acquisition → Traffic acquisition in Analytics and find Organic Search. Bing has its own Search Performance report. Its AI Performance report, where available, shows citations in supported AI answers. Keep those numbers separate in your notes: being cited doesn’t tell you how many people visited or subscribed.
Write down the date and the change you made, even if it was only a new title. Then leave it long enough to learn something. Changing the headline, opening, and topic every few days makes it hard to know what helped. The tracking sheet at the end gives you somewhere to keep that record.
Substack SEO Questions, Answered
Why Isn’t My Substack Showing Up on Google?
Paste the post’s address into Search Console’s URL Inspection tool. If Google says the URL is indexed, you’re dealing with visibility for particular searches. If it isn’t indexed, read the details. Google may still be waiting to crawl it, may have chosen another address for the same content, or may report an access problem. That result gives you a much better starting point than guessing from a search for your headline.
Is Substack Good for SEO?
Yes, you can build a publication people find through search. Substack gives you SEO fields and handles much of the website setup, though some features depend on publication growth. You have less control over code and server files than on a site you manage yourself. For the work in this guide, you can start with the publication you already have.
Does Substack Have a Sitemap?
When your publication has the feature, you’ll find it by adding /sitemap.xml to your homepage address. Keep the same hostname, including www if you use it. Substack says sitemaps become available as publications grow, so a missing one on a new publication may reflect that limit. You can still improve your posts and request indexing for eligible individual pages after verification.
Can I Add Google Analytics to Substack?
Yes. The piece you need is the G- Measurement ID from your publication’s GA4 web stream. Paste it into Settings → Analytics → Google Analytics Measurement ID in Substack and save. The integration supports page views, sign-ups, and paid subscriptions. Check the property before copying so you don’t send visits to the wrong reports.
Do I Need a Custom Domain for Substack SEO?
You don’t need to buy a domain to appear on Google. My new publication uses a custom domain, which also gives me the DNS verification option explained earlier. That can be useful when the verification box is missing. Substack’s connection fee is $50 once; registration and renewals are separate. Buy one for your publication’s address and brand, rather than expecting the purchase to move a post up the results.
How Long Does Google Take to Index a Substack Post?
Google’s guidance says crawling can take a few days to a few weeks. That’s the visit from Google’s crawler; Google still decides whether to index the page afterward. Once you’ve requested indexing and checked access, come back to URL Inspection later. Repeating the request for the same address won’t hurry it along.
Give New Readers a Reason to Stay
I started my Substack with zero subscribers in January 2024. Today my newsletters pay for a team of six. The reason I care about getting found is what can happen after that first visit. Someone reads a useful post, sees what else you publish, and decides they want more. When you’re ready to work on that part, here’s my guide to getting your first 1,000 subscribers.
I teach the full business inside Substack Best Seller Academy, including the paid offers that support it. Right now, you’ve got a clear next task: finish the setup you can complete, then apply the post settings to one article. Start there.
Paid Subscriber Bonus: The Substack Search Setup Kit
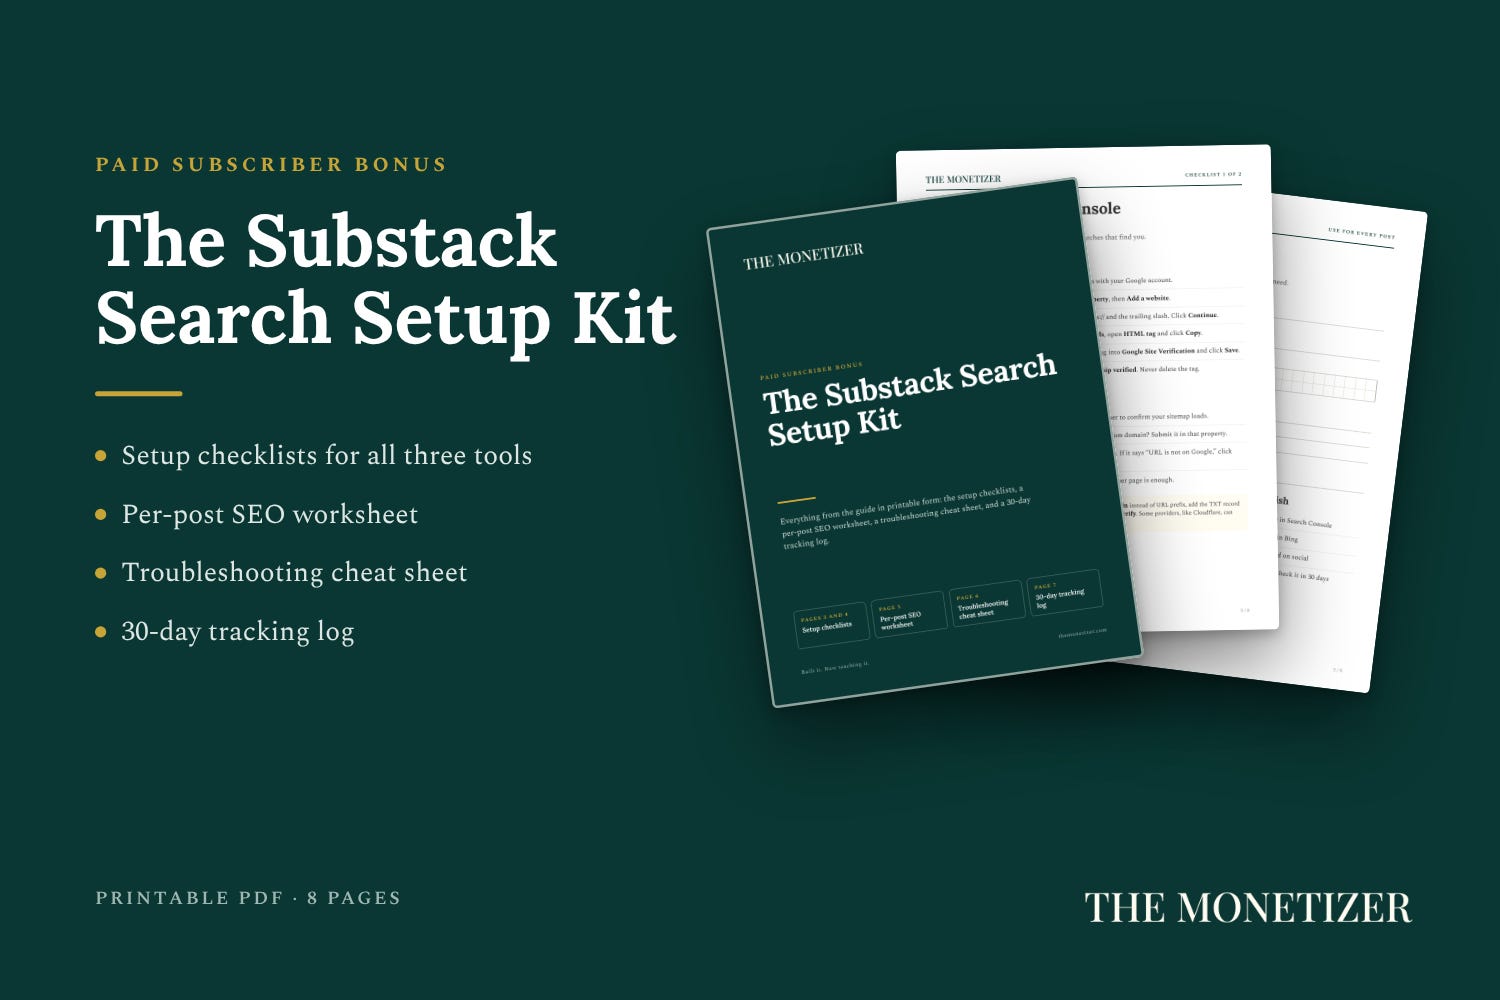
Paid subscribers can download the eight-page kit below. Use it alongside the screenshots so you can mark off each step. You’ll also have a worksheet ready when you sit down to publish your next post. Inside:
A setup checklist for Search Console, Google Analytics, and Bing, with every click in order
A per-post SEO worksheet to fill out before you hit publish
A troubleshooting cheat sheet for “Couldn’t fetch,” missing boxes, and empty reports
A 30-day tracking log, so you can see which posts search is sending readers to
